> ## Documentation Index
> Fetch the complete documentation index at: https://docs.monad.xyz/llms.txt
> Use this file to discover all available pages before exploring further.
# How to use the Next.js Serwist 0x Privy embedded wallet template
This guide walks you through using the [template](https://github.com/monad-developers/next-serwist-privy-0x) which uses [Next.js](https://nextjs.org/docs), [Serwist](https://serwist.pages.dev/) (offline capabilities), [0x](https://0x.org/docs/) (token trading), and [Privy embedded wallet](https://docs.privy.io/wallets/wallets/create/create-a-wallet) (authentication) to build a Progressive Web Application (PWA) on Monad.
## Prerequisites
* [Node.js](https://nodejs.org/) (v18 or higher)
* a [Privy account](https://www.privy.io/)
* a [0x account](https://www.0x.org/)
1. Create your Privy app:
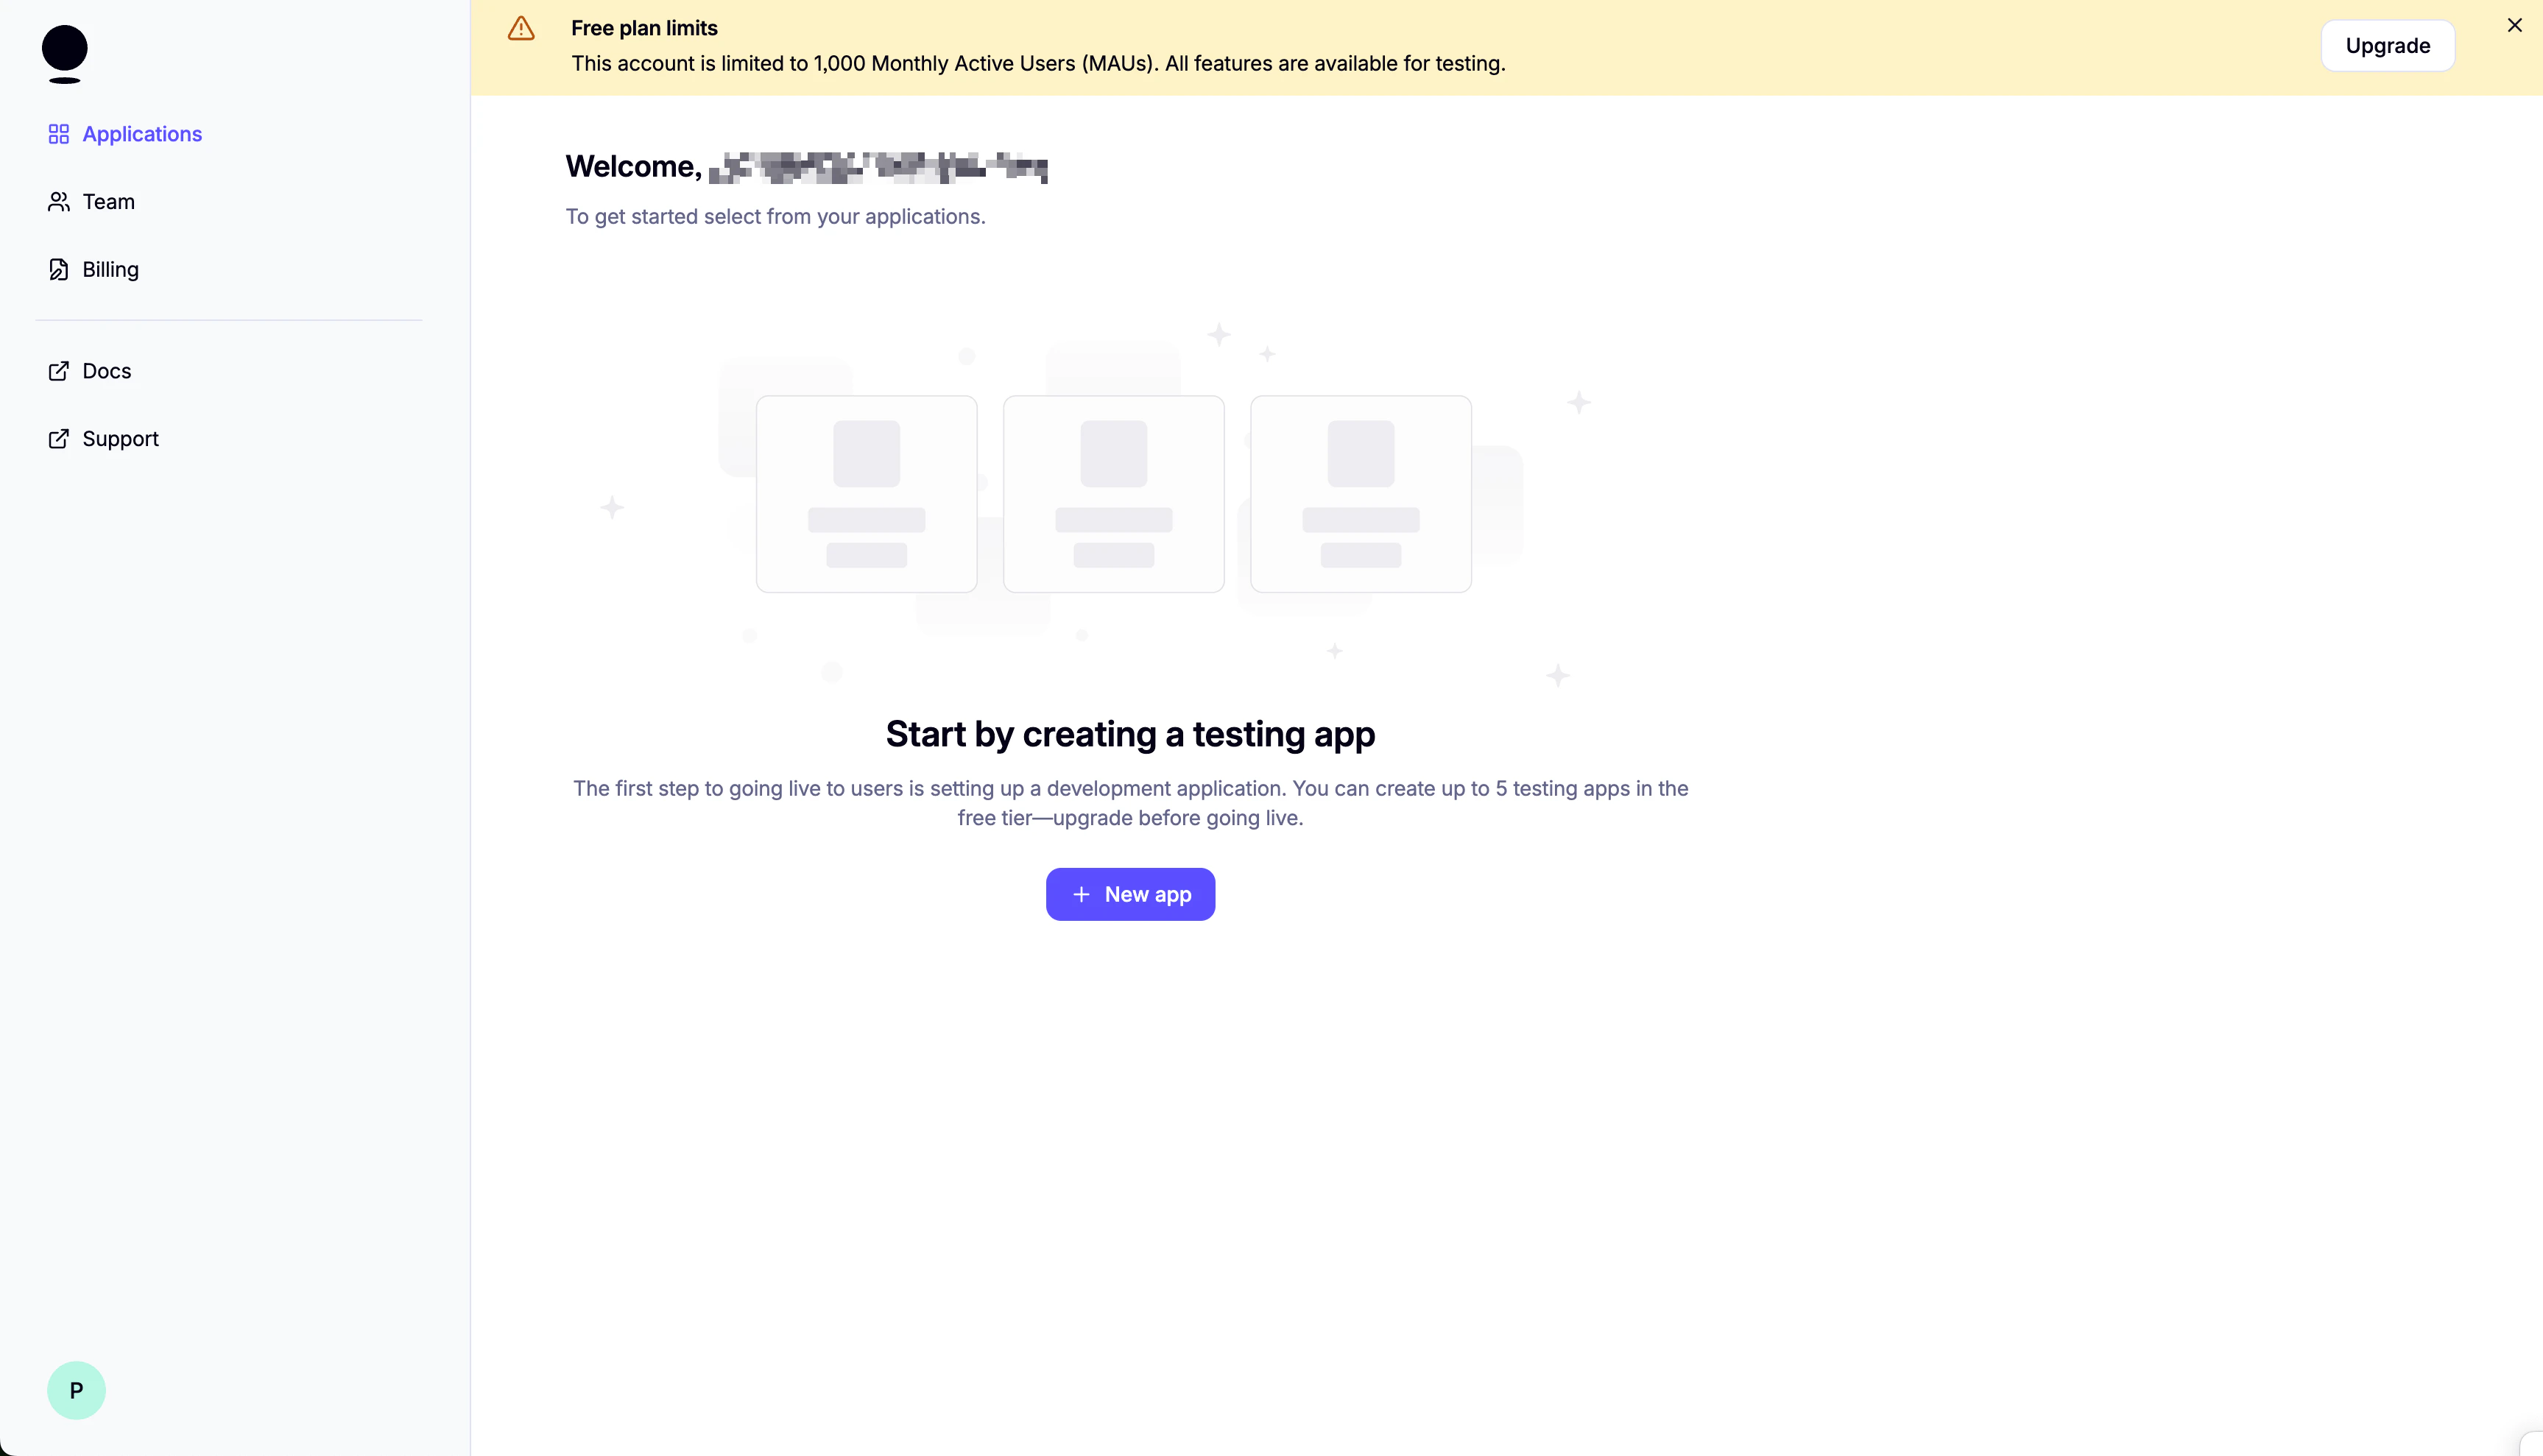 Select "Web" as the platform. Then, click "Create app".
 On the next screen, make sure to save your App ID.
2. Set up login methods:
On the next screen, make sure to save your App ID.
2. Set up login methods:
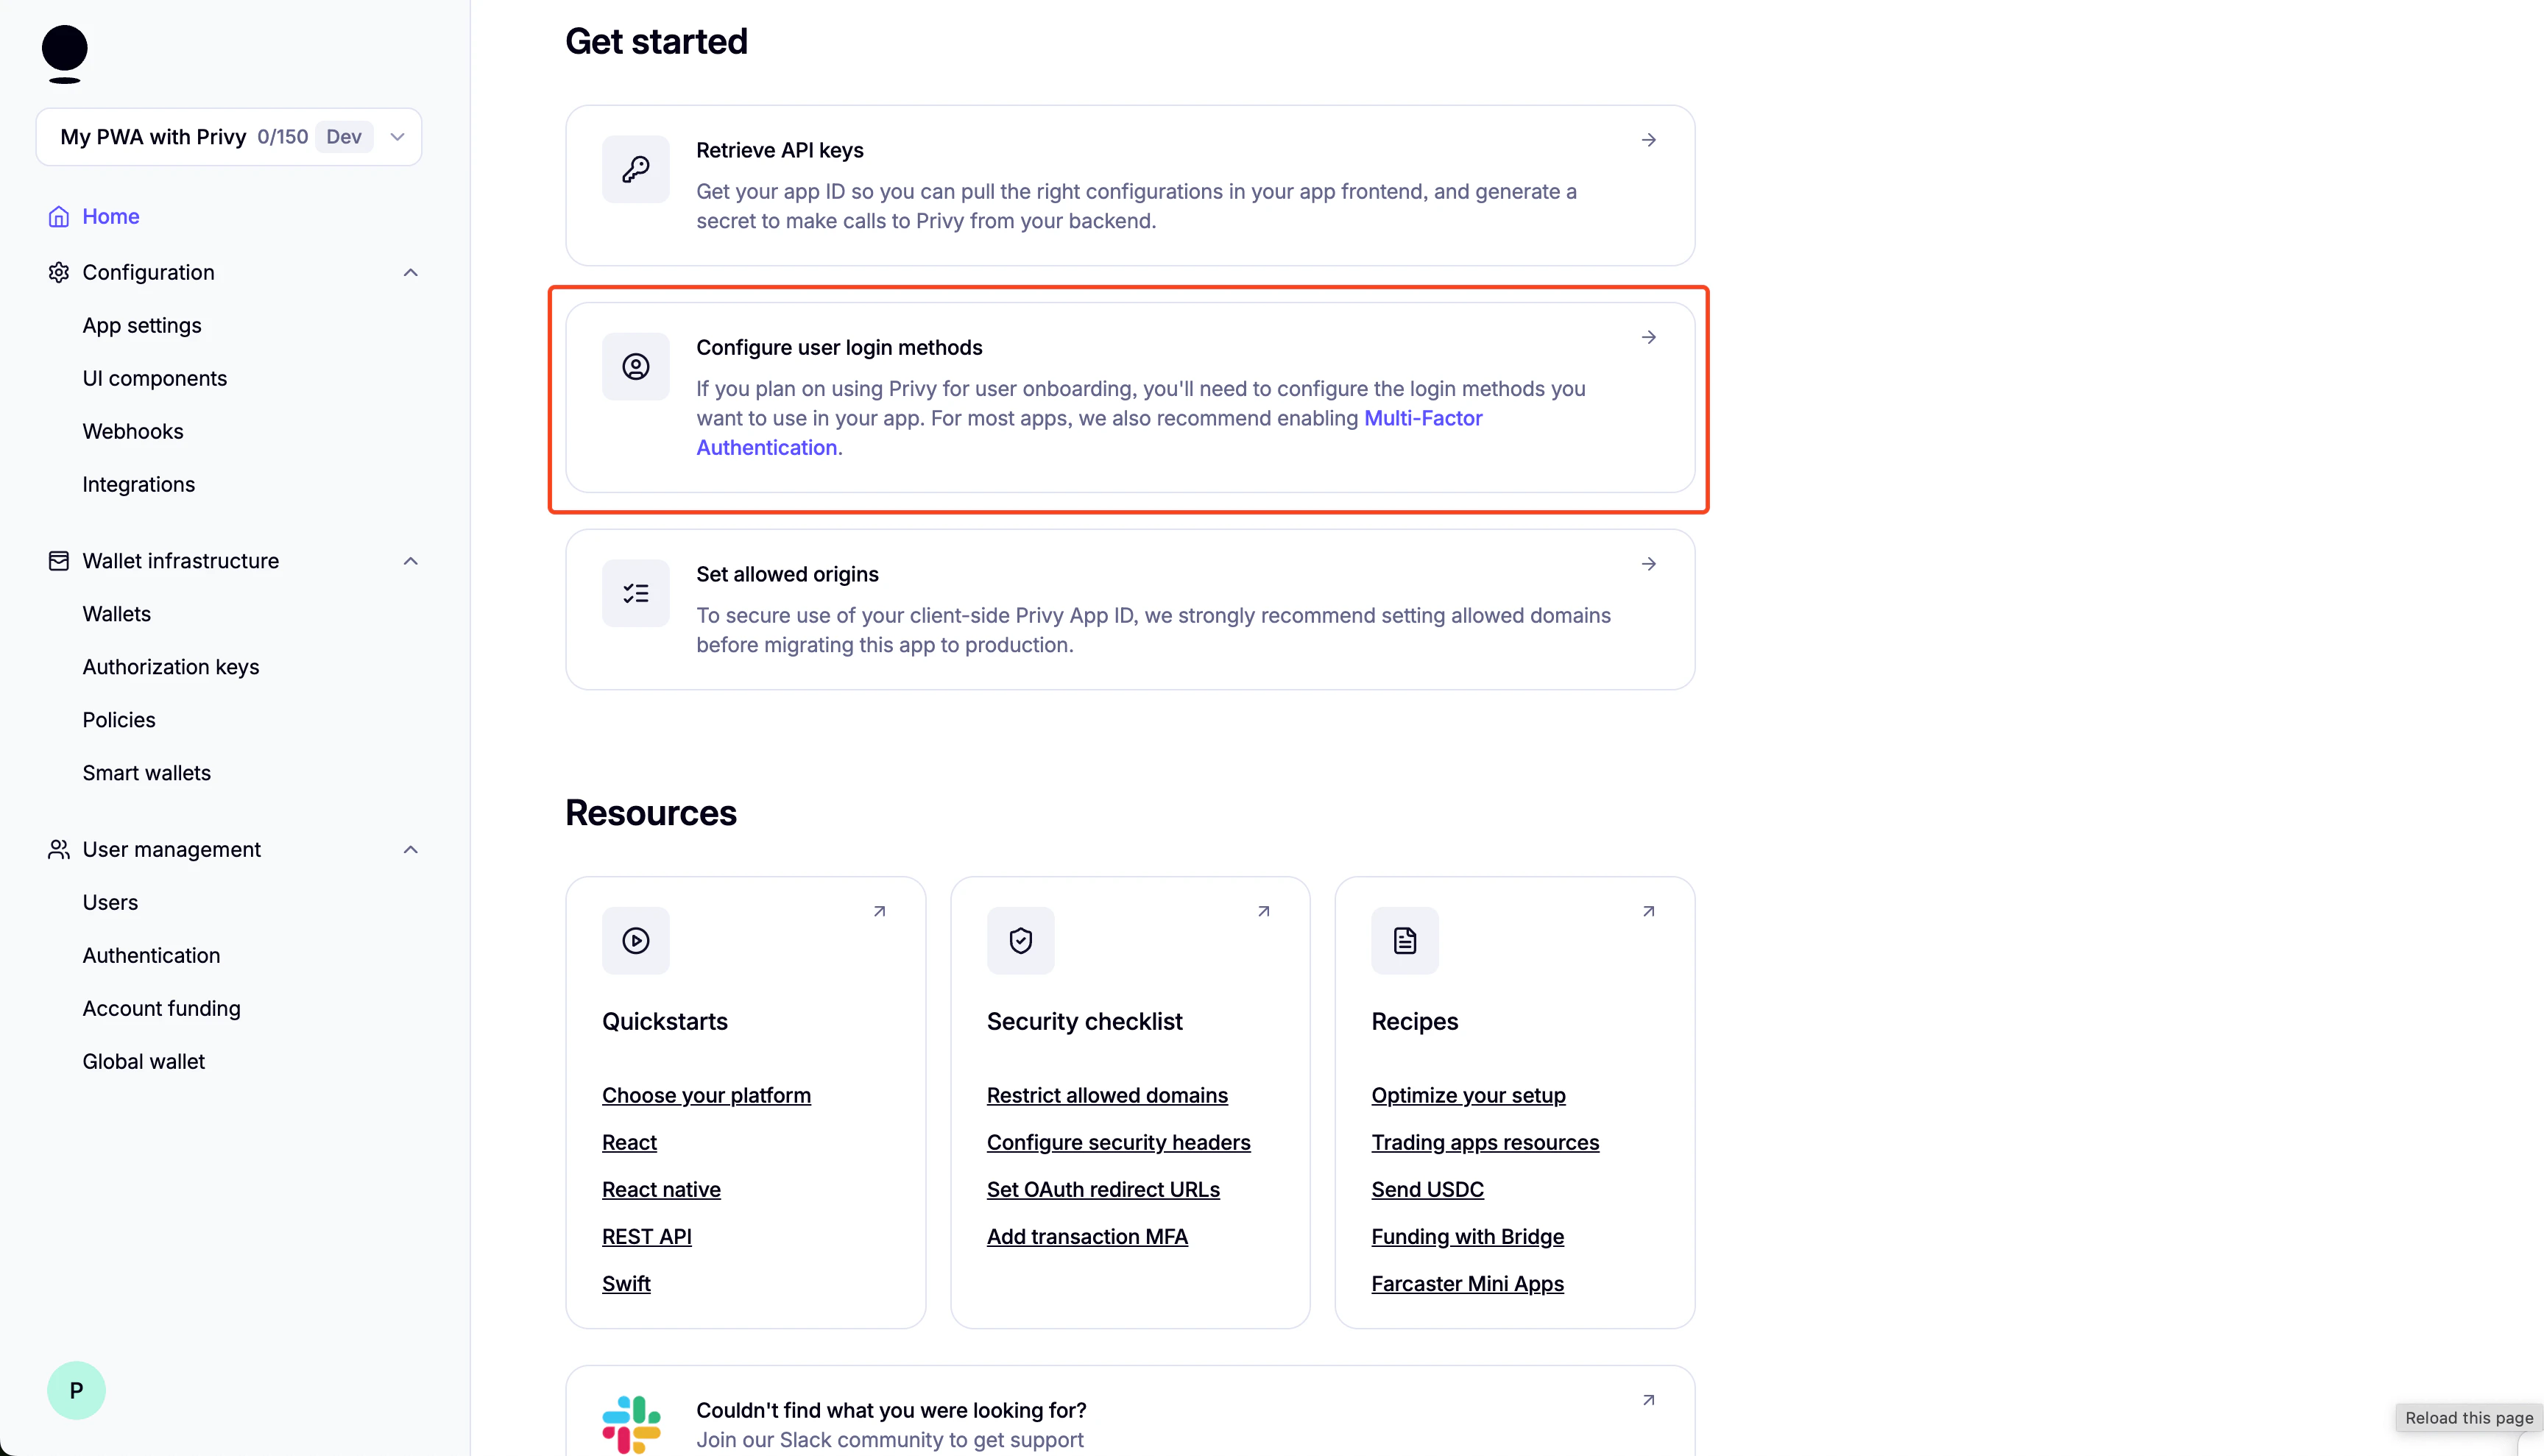 3. Disable External Wallets:
 4. Scroll down and enable "Automatically create embedded wallets on login" and select "EVM Wallets":
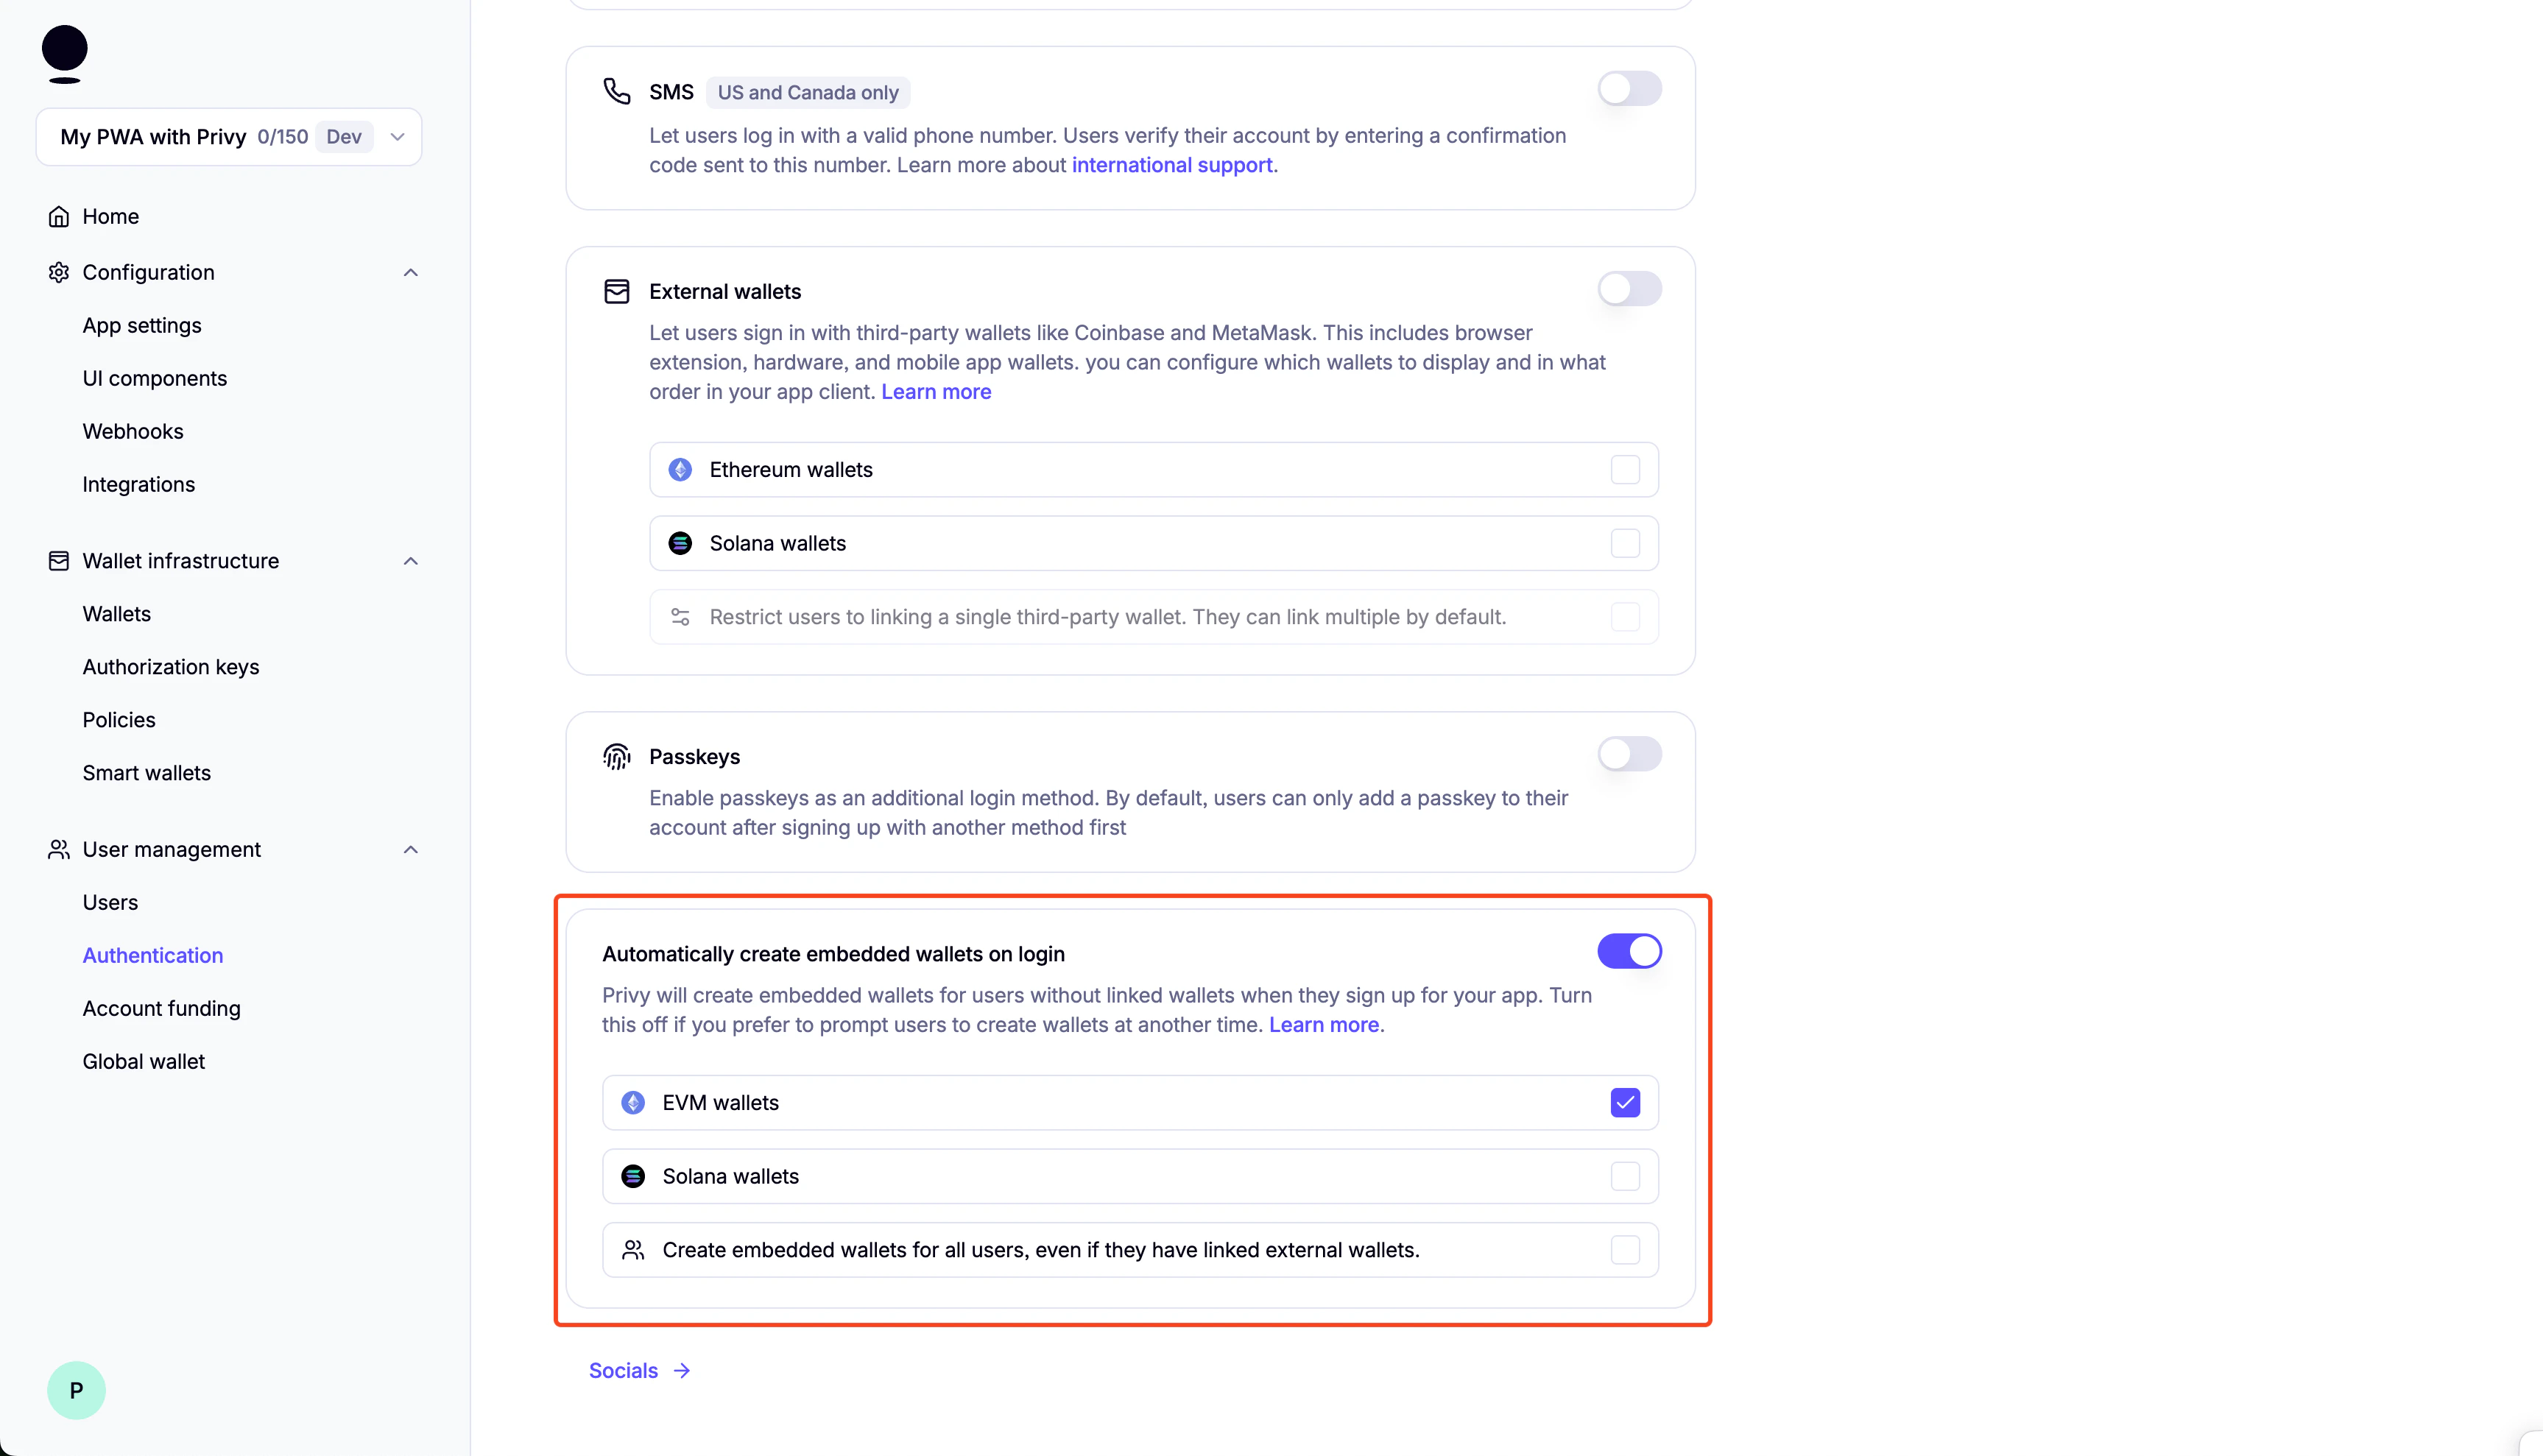 You can enable "Test Accounts" for testing purposes.
 1. Create your 0x account:
Go to [0x dashboard](https://dashboard.0x.org/create-account) and create your account.
On the next screen, make sure to save your API Key.
2. Get your API Key:
To get your API key, create an app and then go to API Keys.
Copy the API key and save it for later.
## Setup
1. Clone the repository:
```bash theme={null}
git clone https://github.com/monad-developers/next-serwist-privy-0x.git
```
2. `cd` into the project directory:
```bash theme={null}
cd next-serwist-privy-0x
```
3. Install dependencies:
```bash theme={null}
npm install
```
4. Create a `.env.local` file in the root directory:
```bash theme={null}
cp .env.example .env.local
```
5. Start adding your environment variables to the `.env.local` file:
```bash theme={null}
# Privy
NEXT_PUBLIC_PRIVY_APP_ID=your_privy_app_id_here
NEXT_PUBLIC_PRIVY_CLIENT_ID= # optional, you can leave this empty
# VAPID Keys for push notifications
NEXT_PUBLIC_VAPID_PUBLIC_KEY=your_vapid_public_key_here
VAPID_PRIVATE_KEY=your_vapid_private_key_here
# 0x Configuration
ZEROX_API_KEY=your_0x_api_key_here
```
If you lost your Privy App ID, you can find it in the Privy dashboard.
6. Generate VAPID keys for web push notifications:
```bash theme={null}
npx web-push generate-vapid-keys --json
```
Copy the generated keys to your .env.local file (replace the placeholder values from step 5).
7. Running the Application:
**Development Mode**:
```bash theme={null}
npm run dev
```
The application will be available at [http://localhost:3000](http://localhost:3000).
**Production Mode**:
For full PWA functionality (including install prompts):
```bash theme={null}
npm run build && npm run start
```
## Folder structure of the template
```
next-serwist-privy-0x/
├── app/
│ ├── components/ # React components
│ │ ├── 0x/ # 0x Protocol integration
│ │ ├── InstallPWA.tsx # PWA install prompt
│ │ ├── SwapComponent.tsx # Token swap interface
│ │ └── ...
│ ├── api/ # API routes
│ │ ├── price/ # Token price endpoints
│ │ └── quote/ # Swap quote endpoints
│ ├── ~offline/ # Offline page
│ └── ...
├── public/ # Static assets
├── utils/ # Utility functions
└── ...
```
## Changing the app name
* Edit [`public/manifest.json`](https://github.com/monad-developers/next-serwist-privy-0x/blob/main/public/manifest.json):
* Change the `name` and `short_name` fields
* Run `npm run build` to update the app
## Notification Setup
To receive push notifications from this app, you need to enable notifications in your browser and/or system settings:
### Browser Settings
1. Click the lock icon 🔒 in the address bar
2. Set "Notifications" to "Allow"
3. Or go to Settings → Privacy and security → Site Settings → Notifications
1. Click the shield icon 🛡️ in the address bar
2. Turn off "Enhanced Tracking Protection" for this site (if needed)
3. Allow notifications when prompted
4. Or go to Settings → Privacy & Security → Permissions → Notifications
1. Go to Safari → Settings → Websites → Notifications
2. Find your site and set it to "Allow"
### System Settings
1. System Preferences → Notifications & Focus
2. Find your browser and ensure notifications are enabled
3. Check "Allow notifications from websites" in browser settings
1. Settings → System → Notifications & actions
2. Ensure your browser can send notifications
3. Check browser notification settings
1. Settings → Notifications → \[Your Browser]
2. Enable "Allow Notifications"
3. Also enable in browser settings
1. Settings → Apps → \[Your Browser] → Notifications
2. Enable notifications
3. Check browser notification permissions
### Backend Integration Required
This requires backend implementation:
* **Save subscription data** when users subscribe (see TODO comments in code)
* **Delete subscription data** when users unsubscribe
* **Implement [`/notification` endpoint](https://github.com/monad-developers/next-serwist-privy-0x/blob/main/app/notification/route.ts)** to send actual push notifications
* **Use `web-push` library** or similar for server-side notification delivery
### Customizing Notification Content
To customize your push notification content, edit [`app/notification/route.ts`](https://github.com/monad-developers/next-serwist-privy-0x/blob/main/app/notification/route.ts) and modify the `title`, `message`, `icon`, and other properties in the `sendNotification` call.
## Modifying the App Icon & Splash Screen
### App Icons
Replace the icon files in the [`public/icons/`](https://github.com/monad-developers/next-serwist-privy-0x/tree/main/public/icons) directory with your custom icons:
* **`icon-512x512.png`** - Main app icon (512×512px)
* **`android-chrome-192x192.png`** - Android icon (192×192px)
* **`apple-touch-icon.png`** - iOS home screen icon (180×180px)
Also update the favicon:
* **[`public/favicon.ico`](https://github.com/monad-developers/next-serwist-privy-0x/blob/main/public/favicon.ico)** - Browser favicon
* **[`app/favicon.ico`](https://github.com/monad-developers/next-serwist-privy-0x/blob/main/app/favicon.ico)** - Next.js app favicon
### Splash Screen
Splash screens are automatically generated from your app icon and theme colors defined in [`manifest.json`](https://github.com/monad-developers/next-serwist-privy-0x/blob/main/public/manifest.json). To customize:
1. Update the `theme_color` and `background_color` in [`manifest.json`](https://github.com/monad-developers/next-serwist-privy-0x/blob/main/public/manifest.json)
2. Ensure your main icon (`icon-512x512.png`) represents your brand
3. Run `npm run build` to apply changes
Use tools like [PWA Asset Generator](https://www.pwabuilder.com/imageGenerator) to create all required icon sizes from a single source image.
## Adding More Tokens
The template currently supports WMON and USDT tokens. To add more tokens for trading, follow these steps:
### 1. Find Token Information
Before adding a token, you'll need the following information:
* **Contract Address**: The token's smart contract address
* **Symbol**: The token's symbol (e.g., "ETH", "USDC")
* **Name**: The full name of the token
* **Decimals**: Number of decimal places (usually 18 for most ERC-20 tokens)
* **Logo URI**: URL to the token's logo image
You can find this information on the DEXes that 0x Swap API supports.
To get the DEXes that 0x Swap API supports, you can query the [sources](https://api.0x.org/sources) endpoint. For reference, see [getSources](https://0x.org/docs/api#tag/Sources/operation/sources::getSources) page.
### 2. Update Token Constants
Edit [`utils/constants.ts`](https://github.com/monad-developers/next-serwist-privy-0x/blob/main/utils/constants.ts) and add your new token to three places:
#### A. Add to MONAD\_TESTNET\_TOKENS array
```typescript title="utils/constants.ts" theme={null}
export const MONAD_TESTNET_TOKENS: Token[] = [
// ... existing tokens ...
{
chainId: 1,
name: "Your Token Name",
symbol: "YOUR_SYMBOL",
decimals: 18,
address: "0xYourTokenContractAddress",
logoURI: "https://your-token-logo-url.png",
},
];
```
#### B. Add to MONAD\_TESTNET\_TOKENS\_BY\_SYMBOL record
```typescript title="utils/constants.ts" theme={null}
export const MONAD_TESTNET_TOKENS_BY_SYMBOL: Record = {
// ... existing tokens ...
your_symbol: {
// lowercase key
chainId: 1,
name: "Your Token Name",
symbol: "YOUR_SYMBOL",
decimals: 18,
address: "0xYourTokenContractAddress",
logoURI: "https://your-token-logo-url.png",
},
};
```
#### C. Add to MONAD\_TESTNET\_TOKENS\_BY\_ADDRESS record
```typescript title="utils/constants.ts" theme={null}
export const MONAD_TESTNET_TOKENS_BY_ADDRESS: Record = {
// ... existing tokens ...
"0xyourtokencontractaddress": {
// lowercase address
chainId: 1,
name: "Your Token Name",
symbol: "YOUR_SYMBOL",
decimals: 18,
address: "0xYourTokenContractAddress", // original case
logoURI: "https://your-token-logo-url.png",
},
};
```
### 3. Example: Adding shMON
Here's a complete example of adding USDC:
```typescript title="utils/constants.ts" theme={null}
// In MONAD_TESTNET_TOKENS array
{
chainId: 1,
name: "shMonad",
symbol: "shMON",
decimals: 18,
address: "0x3a98250F98Dd388C211206983453837C8365BDc1",
logoURI: "put_your_logo_url_here_or_use_the_default_logo",
},
// In MONAD_TESTNET_TOKENS_BY_SYMBOL record
shmon: {
chainId: 1,
name: "shMonad",
symbol: "shMON",
decimals: 18,
address: "0x3a98250F98Dd388C211206983453837C8365BDc1",
logoURI: "put_your_logo_url_here_or_use_the_default_logo",
},
// In MONAD_TESTNET_TOKENS_BY_ADDRESS record
"0x3a98250F98Dd388C211206983453837C8365BDc1": {
chainId: 1,
name: "shMonad",
symbol: "shMON",
decimals: 18,
address: "0x3a98250F98Dd388C211206983453837C8365BDc1",
logoURI: "put_your_logo_url_here_or_use_the_default_logo",
},
```
### 4. Important Notes
* **Decimals**: Most tokens use 18 decimals, but some (like USDT, USDC) use 6
* **Logo URLs**: Use permanent, reliable image URLs. Consider hosting logos yourself for better reliability
* **Testing**: Test thoroughly with small amounts before using in production
* **0x Protocol Support**: Ensure the token is supported by 0x Protocol for your target network
### 5. Rebuild and Test
After adding tokens:
```bash theme={null}
npm run build
npm run start
```
The new tokens will automatically appear in the token selector dropdowns in the swap interface.
## Configuring Slippage Tolerance
Slippage tolerance determines how much price movement you're willing to accept during a trade. The app currently uses the 0x API's default slippage tolerance of 1% (100 basis points).
### Adding Slippage Configuration
#### 1. Update Constants
Add slippage options to [`utils/constants.ts`](https://github.com/monad-developers/next-serwist-privy-0x/blob/main/utils/constants.ts):
```typescript title="utils/constants.ts" theme={null}
export const DEFAULT_SLIPPAGE_BPS = 100; // 1% in basis points
export const SLIPPAGE_OPTIONS = [
{ label: "0.1%", value: 10 },
{ label: "0.5%", value: 50 },
{ label: "1%", value: 100 },
{ label: "2%", value: 200 },
{ label: "3%", value: 300 },
];
```
#### 2. Update API Routes
Add `slippageBps` parameter to both API routes:
**[`app/api/price/route.ts`](https://github.com/monad-developers/next-serwist-privy-0x/blob/main/app/api/price/route.ts) and [`app/api/quote/route.ts`](https://github.com/monad-developers/next-serwist-privy-0x/blob/main/app/api/quote/route.ts):**
```typescript title="app/api/price/route.ts" theme={null}
export async function GET(request: NextRequest) {
const searchParams = request.nextUrl.searchParams;
// Add default slippage if not provided
if (!searchParams.has("slippageBps")) {
searchParams.set("slippageBps", "100"); // 1% default
}
const res = await fetch(
`https://api.0x.org/swap/permit2/price?${searchParams}`, // or /quote
{
headers: {
"0x-api-key": process.env.ZEROX_API_KEY as string,
"0x-version": "v2",
},
}
);
const data = await res.json();
return Response.json(data);
}
```
#### 3. Add Slippage to Components
Update the price/quote requests to include `slippageBps` parameter:
**In [`app/components/0x/price.tsx`](https://github.com/monad-developers/next-serwist-privy-0x/blob/main/app/components/0x/price.tsx):**
```typescript title="app/components/0x/price.tsx" theme={null}
const [slippageBps, setSlippageBps] = useState(DEFAULT_SLIPPAGE_BPS);
// Add slippageBps to your API request parameters
const priceRequest = useMemo(
() => ({
chainId,
sellToken: sellTokenObject.address,
buyToken: buyTokenObject.address,
sellAmount: parsedSellAmount,
taker,
slippageBps, // Add this
// ... other params
}),
[...dependencies, slippageBps]
);
```
### Slippage Parameter Details
* **Range**: 0-10000 basis points (0%-100%)
* **Default**: 100 (1%)
* **Format**: Basis points (100 bps = 1%)
Reference: [0x API Documentation](https://0x.org/docs/api#tag/Swap/operation/swap::permit2::getPrice)
## Deploying to Vercel
### Using Vercel Dashboard
1. **Connect your repository**:
* Push your code to GitHub
* Visit [vercel.com](https://vercel.com) and import your repository
2. **Configure environment variables**:
* In your Vercel project dashboard, go to Settings → Environment Variables
* Add the same variables from your `.env.local`:
```
NEXT_PUBLIC_PRIVY_APP_ID
NEXT_PUBLIC_PRIVY_CLIENT_ID
NEXT_PUBLIC_VAPID_PUBLIC_KEY
VAPID_PRIVATE_KEY
ZEROX_API_KEY
```
3. **Deploy**: Vercel will automatically build and deploy your app
4. **Update Privy settings**: In your Privy dashboard, add your Vercel domain (e.g., `your-app.vercel.app`) to the allowed origins
PWA features (install prompts, offline support, push notifications) work automatically on HTTPS domains like Vercel deployments.
### Using Vercel CLI
Alternatively, deploy using the Vercel CLI:
1. **Install Vercel CLI**:
```bash theme={null}
npm i -g vercel
```
2. **Login to Vercel**:
```bash theme={null}
vercel login
```
3. **Deploy**:
```bash theme={null}
vercel
```
Follow the prompts to configure your project.
4. **Add environment variables**:
```bash theme={null}
vercel env add NEXT_PUBLIC_PRIVY_APP_ID
vercel env add NEXT_PUBLIC_PRIVY_CLIENT_ID
vercel env add NEXT_PUBLIC_VAPID_PUBLIC_KEY
vercel env add VAPID_PRIVATE_KEY
vercel env add ZEROX_API_KEY
```
Or you can go to the Vercel dashboard and add the environment variables there.
5. **Redeploy with environment variables**:
```bash theme={null}
vercel --prod
```
## Learn more
* Serwist: [docs](https://serwist.pages.dev/) | [guides](https://serwist.pages.dev/docs/next/getting-started)
* Privy: [create a wallet](https://docs.privy.io/wallets/wallets/create/create-a-wallet) | [send a transaction](https://docs.privy.io/wallets/using-wallets/ethereum/send-a-transaction) | [sign a transaction](https://docs.privy.io/wallets/using-wallets/ethereum/sign-a-transaction)
* 0x: [docs](https://docs.0x.org/) | [guides](https://0x.org/docs/0x-swap-api/guides/swap-tokens-with-0x-swap-api)
* Monad: [supported tooling and infra](/tooling-and-infra)
1. Create your 0x account:
Go to [0x dashboard](https://dashboard.0x.org/create-account) and create your account.
On the next screen, make sure to save your API Key.
2. Get your API Key:
To get your API key, create an app and then go to API Keys.
Copy the API key and save it for later.
## Setup
1. Clone the repository:
```bash theme={null}
git clone https://github.com/monad-developers/next-serwist-privy-0x.git
```
2. `cd` into the project directory:
```bash theme={null}
cd next-serwist-privy-0x
```
3. Install dependencies:
```bash theme={null}
npm install
```
4. Create a `.env.local` file in the root directory:
```bash theme={null}
cp .env.example .env.local
```
5. Start adding your environment variables to the `.env.local` file:
```bash theme={null}
# Privy
NEXT_PUBLIC_PRIVY_APP_ID=your_privy_app_id_here
NEXT_PUBLIC_PRIVY_CLIENT_ID= # optional, you can leave this empty
# VAPID Keys for push notifications
NEXT_PUBLIC_VAPID_PUBLIC_KEY=your_vapid_public_key_here
VAPID_PRIVATE_KEY=your_vapid_private_key_here
# 0x Configuration
ZEROX_API_KEY=your_0x_api_key_here
```
If you lost your Privy App ID, you can find it in the Privy dashboard.
6. Generate VAPID keys for web push notifications:
```bash theme={null}
npx web-push generate-vapid-keys --json
```
Copy the generated keys to your .env.local file (replace the placeholder values from step 5).
7. Running the Application:
**Development Mode**:
```bash theme={null}
npm run dev
```
The application will be available at [http://localhost:3000](http://localhost:3000).
**Production Mode**:
For full PWA functionality (including install prompts):
```bash theme={null}
npm run build && npm run start
```
## Folder structure of the template
```
next-serwist-privy-0x/
├── app/
│ ├── components/ # React components
│ │ ├── 0x/ # 0x Protocol integration
│ │ ├── InstallPWA.tsx # PWA install prompt
│ │ ├── SwapComponent.tsx # Token swap interface
│ │ └── ...
│ ├── api/ # API routes
│ │ ├── price/ # Token price endpoints
│ │ └── quote/ # Swap quote endpoints
│ ├── ~offline/ # Offline page
│ └── ...
├── public/ # Static assets
├── utils/ # Utility functions
└── ...
```
## Changing the app name
* Edit [`public/manifest.json`](https://github.com/monad-developers/next-serwist-privy-0x/blob/main/public/manifest.json):
* Change the `name` and `short_name` fields
* Run `npm run build` to update the app
## Notification Setup
To receive push notifications from this app, you need to enable notifications in your browser and/or system settings:
### Browser Settings
1. Click the lock icon 🔒 in the address bar
2. Set "Notifications" to "Allow"
3. Or go to Settings → Privacy and security → Site Settings → Notifications
1. Click the shield icon 🛡️ in the address bar
2. Turn off "Enhanced Tracking Protection" for this site (if needed)
3. Allow notifications when prompted
4. Or go to Settings → Privacy & Security → Permissions → Notifications
1. Go to Safari → Settings → Websites → Notifications
2. Find your site and set it to "Allow"
### System Settings
1. System Preferences → Notifications & Focus
2. Find your browser and ensure notifications are enabled
3. Check "Allow notifications from websites" in browser settings
1. Settings → System → Notifications & actions
2. Ensure your browser can send notifications
3. Check browser notification settings
1. Settings → Notifications → \[Your Browser]
2. Enable "Allow Notifications"
3. Also enable in browser settings
1. Settings → Apps → \[Your Browser] → Notifications
2. Enable notifications
3. Check browser notification permissions
### Backend Integration Required
This requires backend implementation:
* **Save subscription data** when users subscribe (see TODO comments in code)
* **Delete subscription data** when users unsubscribe
* **Implement [`/notification` endpoint](https://github.com/monad-developers/next-serwist-privy-0x/blob/main/app/notification/route.ts)** to send actual push notifications
* **Use `web-push` library** or similar for server-side notification delivery
### Customizing Notification Content
To customize your push notification content, edit [`app/notification/route.ts`](https://github.com/monad-developers/next-serwist-privy-0x/blob/main/app/notification/route.ts) and modify the `title`, `message`, `icon`, and other properties in the `sendNotification` call.
## Modifying the App Icon & Splash Screen
### App Icons
Replace the icon files in the [`public/icons/`](https://github.com/monad-developers/next-serwist-privy-0x/tree/main/public/icons) directory with your custom icons:
* **`icon-512x512.png`** - Main app icon (512×512px)
* **`android-chrome-192x192.png`** - Android icon (192×192px)
* **`apple-touch-icon.png`** - iOS home screen icon (180×180px)
Also update the favicon:
* **[`public/favicon.ico`](https://github.com/monad-developers/next-serwist-privy-0x/blob/main/public/favicon.ico)** - Browser favicon
* **[`app/favicon.ico`](https://github.com/monad-developers/next-serwist-privy-0x/blob/main/app/favicon.ico)** - Next.js app favicon
### Splash Screen
Splash screens are automatically generated from your app icon and theme colors defined in [`manifest.json`](https://github.com/monad-developers/next-serwist-privy-0x/blob/main/public/manifest.json). To customize:
1. Update the `theme_color` and `background_color` in [`manifest.json`](https://github.com/monad-developers/next-serwist-privy-0x/blob/main/public/manifest.json)
2. Ensure your main icon (`icon-512x512.png`) represents your brand
3. Run `npm run build` to apply changes
Use tools like [PWA Asset Generator](https://www.pwabuilder.com/imageGenerator) to create all required icon sizes from a single source image.
## Adding More Tokens
The template currently supports WMON and USDT tokens. To add more tokens for trading, follow these steps:
### 1. Find Token Information
Before adding a token, you'll need the following information:
* **Contract Address**: The token's smart contract address
* **Symbol**: The token's symbol (e.g., "ETH", "USDC")
* **Name**: The full name of the token
* **Decimals**: Number of decimal places (usually 18 for most ERC-20 tokens)
* **Logo URI**: URL to the token's logo image
You can find this information on the DEXes that 0x Swap API supports.
To get the DEXes that 0x Swap API supports, you can query the [sources](https://api.0x.org/sources) endpoint. For reference, see [getSources](https://0x.org/docs/api#tag/Sources/operation/sources::getSources) page.
### 2. Update Token Constants
Edit [`utils/constants.ts`](https://github.com/monad-developers/next-serwist-privy-0x/blob/main/utils/constants.ts) and add your new token to three places:
#### A. Add to MONAD\_TESTNET\_TOKENS array
```typescript title="utils/constants.ts" theme={null}
export const MONAD_TESTNET_TOKENS: Token[] = [
// ... existing tokens ...
{
chainId: 1,
name: "Your Token Name",
symbol: "YOUR_SYMBOL",
decimals: 18,
address: "0xYourTokenContractAddress",
logoURI: "https://your-token-logo-url.png",
},
];
```
#### B. Add to MONAD\_TESTNET\_TOKENS\_BY\_SYMBOL record
```typescript title="utils/constants.ts" theme={null}
export const MONAD_TESTNET_TOKENS_BY_SYMBOL: Record = {
// ... existing tokens ...
your_symbol: {
// lowercase key
chainId: 1,
name: "Your Token Name",
symbol: "YOUR_SYMBOL",
decimals: 18,
address: "0xYourTokenContractAddress",
logoURI: "https://your-token-logo-url.png",
},
};
```
#### C. Add to MONAD\_TESTNET\_TOKENS\_BY\_ADDRESS record
```typescript title="utils/constants.ts" theme={null}
export const MONAD_TESTNET_TOKENS_BY_ADDRESS: Record = {
// ... existing tokens ...
"0xyourtokencontractaddress": {
// lowercase address
chainId: 1,
name: "Your Token Name",
symbol: "YOUR_SYMBOL",
decimals: 18,
address: "0xYourTokenContractAddress", // original case
logoURI: "https://your-token-logo-url.png",
},
};
```
### 3. Example: Adding shMON
Here's a complete example of adding USDC:
```typescript title="utils/constants.ts" theme={null}
// In MONAD_TESTNET_TOKENS array
{
chainId: 1,
name: "shMonad",
symbol: "shMON",
decimals: 18,
address: "0x3a98250F98Dd388C211206983453837C8365BDc1",
logoURI: "put_your_logo_url_here_or_use_the_default_logo",
},
// In MONAD_TESTNET_TOKENS_BY_SYMBOL record
shmon: {
chainId: 1,
name: "shMonad",
symbol: "shMON",
decimals: 18,
address: "0x3a98250F98Dd388C211206983453837C8365BDc1",
logoURI: "put_your_logo_url_here_or_use_the_default_logo",
},
// In MONAD_TESTNET_TOKENS_BY_ADDRESS record
"0x3a98250F98Dd388C211206983453837C8365BDc1": {
chainId: 1,
name: "shMonad",
symbol: "shMON",
decimals: 18,
address: "0x3a98250F98Dd388C211206983453837C8365BDc1",
logoURI: "put_your_logo_url_here_or_use_the_default_logo",
},
```
### 4. Important Notes
* **Decimals**: Most tokens use 18 decimals, but some (like USDT, USDC) use 6
* **Logo URLs**: Use permanent, reliable image URLs. Consider hosting logos yourself for better reliability
* **Testing**: Test thoroughly with small amounts before using in production
* **0x Protocol Support**: Ensure the token is supported by 0x Protocol for your target network
### 5. Rebuild and Test
After adding tokens:
```bash theme={null}
npm run build
npm run start
```
The new tokens will automatically appear in the token selector dropdowns in the swap interface.
## Configuring Slippage Tolerance
Slippage tolerance determines how much price movement you're willing to accept during a trade. The app currently uses the 0x API's default slippage tolerance of 1% (100 basis points).
### Adding Slippage Configuration
#### 1. Update Constants
Add slippage options to [`utils/constants.ts`](https://github.com/monad-developers/next-serwist-privy-0x/blob/main/utils/constants.ts):
```typescript title="utils/constants.ts" theme={null}
export const DEFAULT_SLIPPAGE_BPS = 100; // 1% in basis points
export const SLIPPAGE_OPTIONS = [
{ label: "0.1%", value: 10 },
{ label: "0.5%", value: 50 },
{ label: "1%", value: 100 },
{ label: "2%", value: 200 },
{ label: "3%", value: 300 },
];
```
#### 2. Update API Routes
Add `slippageBps` parameter to both API routes:
**[`app/api/price/route.ts`](https://github.com/monad-developers/next-serwist-privy-0x/blob/main/app/api/price/route.ts) and [`app/api/quote/route.ts`](https://github.com/monad-developers/next-serwist-privy-0x/blob/main/app/api/quote/route.ts):**
```typescript title="app/api/price/route.ts" theme={null}
export async function GET(request: NextRequest) {
const searchParams = request.nextUrl.searchParams;
// Add default slippage if not provided
if (!searchParams.has("slippageBps")) {
searchParams.set("slippageBps", "100"); // 1% default
}
const res = await fetch(
`https://api.0x.org/swap/permit2/price?${searchParams}`, // or /quote
{
headers: {
"0x-api-key": process.env.ZEROX_API_KEY as string,
"0x-version": "v2",
},
}
);
const data = await res.json();
return Response.json(data);
}
```
#### 3. Add Slippage to Components
Update the price/quote requests to include `slippageBps` parameter:
**In [`app/components/0x/price.tsx`](https://github.com/monad-developers/next-serwist-privy-0x/blob/main/app/components/0x/price.tsx):**
```typescript title="app/components/0x/price.tsx" theme={null}
const [slippageBps, setSlippageBps] = useState(DEFAULT_SLIPPAGE_BPS);
// Add slippageBps to your API request parameters
const priceRequest = useMemo(
() => ({
chainId,
sellToken: sellTokenObject.address,
buyToken: buyTokenObject.address,
sellAmount: parsedSellAmount,
taker,
slippageBps, // Add this
// ... other params
}),
[...dependencies, slippageBps]
);
```
### Slippage Parameter Details
* **Range**: 0-10000 basis points (0%-100%)
* **Default**: 100 (1%)
* **Format**: Basis points (100 bps = 1%)
Reference: [0x API Documentation](https://0x.org/docs/api#tag/Swap/operation/swap::permit2::getPrice)
## Deploying to Vercel
### Using Vercel Dashboard
1. **Connect your repository**:
* Push your code to GitHub
* Visit [vercel.com](https://vercel.com) and import your repository
2. **Configure environment variables**:
* In your Vercel project dashboard, go to Settings → Environment Variables
* Add the same variables from your `.env.local`:
```
NEXT_PUBLIC_PRIVY_APP_ID
NEXT_PUBLIC_PRIVY_CLIENT_ID
NEXT_PUBLIC_VAPID_PUBLIC_KEY
VAPID_PRIVATE_KEY
ZEROX_API_KEY
```
3. **Deploy**: Vercel will automatically build and deploy your app
4. **Update Privy settings**: In your Privy dashboard, add your Vercel domain (e.g., `your-app.vercel.app`) to the allowed origins
PWA features (install prompts, offline support, push notifications) work automatically on HTTPS domains like Vercel deployments.
### Using Vercel CLI
Alternatively, deploy using the Vercel CLI:
1. **Install Vercel CLI**:
```bash theme={null}
npm i -g vercel
```
2. **Login to Vercel**:
```bash theme={null}
vercel login
```
3. **Deploy**:
```bash theme={null}
vercel
```
Follow the prompts to configure your project.
4. **Add environment variables**:
```bash theme={null}
vercel env add NEXT_PUBLIC_PRIVY_APP_ID
vercel env add NEXT_PUBLIC_PRIVY_CLIENT_ID
vercel env add NEXT_PUBLIC_VAPID_PUBLIC_KEY
vercel env add VAPID_PRIVATE_KEY
vercel env add ZEROX_API_KEY
```
Or you can go to the Vercel dashboard and add the environment variables there.
5. **Redeploy with environment variables**:
```bash theme={null}
vercel --prod
```
## Learn more
* Serwist: [docs](https://serwist.pages.dev/) | [guides](https://serwist.pages.dev/docs/next/getting-started)
* Privy: [create a wallet](https://docs.privy.io/wallets/wallets/create/create-a-wallet) | [send a transaction](https://docs.privy.io/wallets/using-wallets/ethereum/send-a-transaction) | [sign a transaction](https://docs.privy.io/wallets/using-wallets/ethereum/sign-a-transaction)
* 0x: [docs](https://docs.0x.org/) | [guides](https://0x.org/docs/0x-swap-api/guides/swap-tokens-with-0x-swap-api)
* Monad: [supported tooling and infra](/tooling-and-infra)