> ## Documentation Index
> Fetch the complete documentation index at: https://docs.monad.xyz/llms.txt
> Use this file to discover all available pages before exploring further.
# 如何使用 GhostGraph 索引代币转账
## 简介
在本指南中,您将在 Monad 测试网上创建一个 ERC20 代币,并使用 [GhostGraph](https://docs.tryghost.xyz/) 索引其转账事件。您将学到:
* 部署一个基本的 ERC20 代币合约
* 在本地测试合约
* 部署到 Monad 测试网
* 使用 GhostGraph 设置事件追踪
## 前置条件
在开始之前,请确保您已具备:
* 已安装 Node.js(v16 或更高版本)
* 已安装 Git
* 已安装 [Foundry](https://github.com/foundry-rs/foundry)
* 一些 MONAD 测试网代币(用于支付 gas 费)
* 基本的 Solidity 与 ERC20 代币知识
## 项目设置
首先,克隆入门仓库:
```sh theme={null}
git clone https://github.com/chrischang/cat-token-tutorial.git
cd cat-token-tutorial
```
## CatToken 合约实现
`src/CatToken.sol` 合约实现了一个基本的固定供应量的 ERC20 代币。代码如下:
```solidity lines title="src/CatToken.sol" theme={null}
// SPDX-License-Identifier: MIT
pragma solidity ^0.8.19;
import "@openzeppelin/contracts/token/ERC20/ERC20.sol";
contract CatToken is ERC20 {
/**
* @dev Constructor that gives msg.sender all existing tokens.
* Initial supply is 1 billion tokens.
*/
constructor() ERC20("CatToken", "CAT") {
// Mint initial supply of 1 billion tokens to deployer
// This will emit a Transfer event that GhostGraph can index
_mint(msg.sender, 1_000_000_000 * 10 ** decimals());
}
}
```
该实现:
* 创建一个名为"CatToken"、符号为"CAT"的代币
* 向部署者地址铸造 10 亿代币
* 使用 OpenZeppelin 久经考验的 ERC20 实现
## 测试合约
打开测试文件 `test/CatToken.t.sol`:
```solidity lines title="test/CatToken.t.sol" theme={null}
// SPDX-License-Identifier: MIT
pragma solidity ^0.8.19;
import "forge-std/Test.sol";
import "../src/CatToken.sol";
contract CatTokenTest is Test {
CatToken public token;
address public owner;
address public user;
function setUp() public {
owner = address(this);
user = address(0x1);
token = new CatToken();
}
function testInitialSupply() public view {
assertEq(token.totalSupply(), 1_000_000_000 * 10**18);
assertEq(token.balanceOf(owner), 1_000_000_000 * 10**18);
}
function testTransfer() public {
uint256 amount = 1_000_000 * 10**18;
token.transfer(user, amount);
assertEq(token.balanceOf(user), amount);
assertEq(token.balanceOf(owner), 999_000_000 * 10**18);
}
}
```
运行测试:
```sh theme={null}
forge test -vv
```
## 部署设置
### 1. 创建 `.env` 文件:
```sh theme={null}
cp .env.example .env
```
### 2. 将您的凭据添加到 `.env` 文件中:
```sh theme={null}
PRIVATE_KEY=your_private_key_here
MONAD_TESTNET_RPC=https://testnet-rpc.monad.xyz
```
### 3. 创建部署脚本 `script/DeployCatToken.s.sol`:
```solidity lines title="script/DeployCatToken.s.sol" theme={null}
// SPDX-License-Identifier: MIT
pragma solidity ^0.8.19;
import "forge-std/Script.sol";
import "../src/CatToken.sol";
contract DeployCatToken is Script {
function run() external {
// Retrieve private key from environment
uint256 deployerPrivateKey = vm.envUint("PRIVATE_KEY");
vm.startBroadcast(deployerPrivateKey);
CatToken token = new CatToken();
vm.stopBroadcast();
// Log the token address - this will be needed for GhostGraph indexing and submit transactions
console.log("CatToken deployed to:", address(token));
}
}
```
## 在 Monad 测试网部署 CatToken
### 1. 加载环境变量:
```sh theme={null}
source .env
```
### 2. 部署合约:
```sh theme={null}
forge script script/DeployCatToken.s.sol \
--rpc-url $MONAD_TESTNET_RPC \
--broadcast
```
保存已部署的合约地址以供后续步骤使用。
请记得将 `TOKEN_ADDRESS` 添加到您的 `.env` 文件中。
您现在应该拥有:
```sh theme={null}
PRIVATE_KEY=your_private_key_here
MONAD_TESTNET_RPC=https://testnet-rpc.monad.xyz
TOKEN_ADDRESS=0x...
```
## 验证智能合约
### 1. 加载环境变量:
```sh theme={null}
source .env
```
### 2. 验证合约:
```sh theme={null}
forge verify-contract \
--rpc-url $MONAD_TESTNET_RPC \
--verifier sourcify \
--verifier-url 'https://sourcify-api-monad.blockvision.org/' \
$TOKEN_ADDRESS \
src/CatToken.sol:CatToken
```
验证成功后,您应该会在 [MonadVision](https://testnet.monadvision.com) 上看到已验证的合约。您应该会看到一个对勾以及说明合约源代码已验证的横幅。
 ## 用于链上代币转账交易的脚本
我们进行一些链上代币转账交易,以触发 GhostGraph 将要索引的 `Transfer` 事件。
查看转账脚本 `script/TransferCatTokens.s.sol`:
```solidity lines title="script/TransferCatTokens.s.sol" theme={null}
// SPDX-License-Identifier: MIT
pragma solidity ^0.8.19;
import "forge-std/Script.sol";
import "../src/CatToken.sol";
contract TransferCatTokens is Script {
function run() external {
uint256 deployerPrivateKey = vm.envUint("PRIVATE_KEY");
address token = vm.envAddress("TOKEN_ADDRESS");
vm.startBroadcast(deployerPrivateKey);
// Send tokens to test addresses
CatToken(token).transfer(address(0x1), 1000 * 10**18);
CatToken(token).transfer(address(0x2), 2000 * 10**18);
CatToken(token).transfer(address(0x3), 3000 * 10**18);
vm.stopBroadcast();
}
}
```
运行以下命令执行转账:
```sh theme={null}
forge script script/TransferCatTokens.s.sol \
--rpc-url $MONAD_TESTNET_RPC \
--broadcast
```
您现在已经部署了 ERC-20 合约并在 Monad 测试网上提交了交易。让我们使用 GhostGraph 来追踪这些链上事件。
## 设置 GhostGraph 索引
1. 访问 [GhostGraph](https://tryghost.xyz/) 并点击注册账户
2. 创建一个新的 GhostGraph
## 用于链上代币转账交易的脚本
我们进行一些链上代币转账交易,以触发 GhostGraph 将要索引的 `Transfer` 事件。
查看转账脚本 `script/TransferCatTokens.s.sol`:
```solidity lines title="script/TransferCatTokens.s.sol" theme={null}
// SPDX-License-Identifier: MIT
pragma solidity ^0.8.19;
import "forge-std/Script.sol";
import "../src/CatToken.sol";
contract TransferCatTokens is Script {
function run() external {
uint256 deployerPrivateKey = vm.envUint("PRIVATE_KEY");
address token = vm.envAddress("TOKEN_ADDRESS");
vm.startBroadcast(deployerPrivateKey);
// Send tokens to test addresses
CatToken(token).transfer(address(0x1), 1000 * 10**18);
CatToken(token).transfer(address(0x2), 2000 * 10**18);
CatToken(token).transfer(address(0x3), 3000 * 10**18);
vm.stopBroadcast();
}
}
```
运行以下命令执行转账:
```sh theme={null}
forge script script/TransferCatTokens.s.sol \
--rpc-url $MONAD_TESTNET_RPC \
--broadcast
```
您现在已经部署了 ERC-20 合约并在 Monad 测试网上提交了交易。让我们使用 GhostGraph 来追踪这些链上事件。
## 设置 GhostGraph 索引
1. 访问 [GhostGraph](https://tryghost.xyz/) 并点击注册账户
2. 创建一个新的 GhostGraph
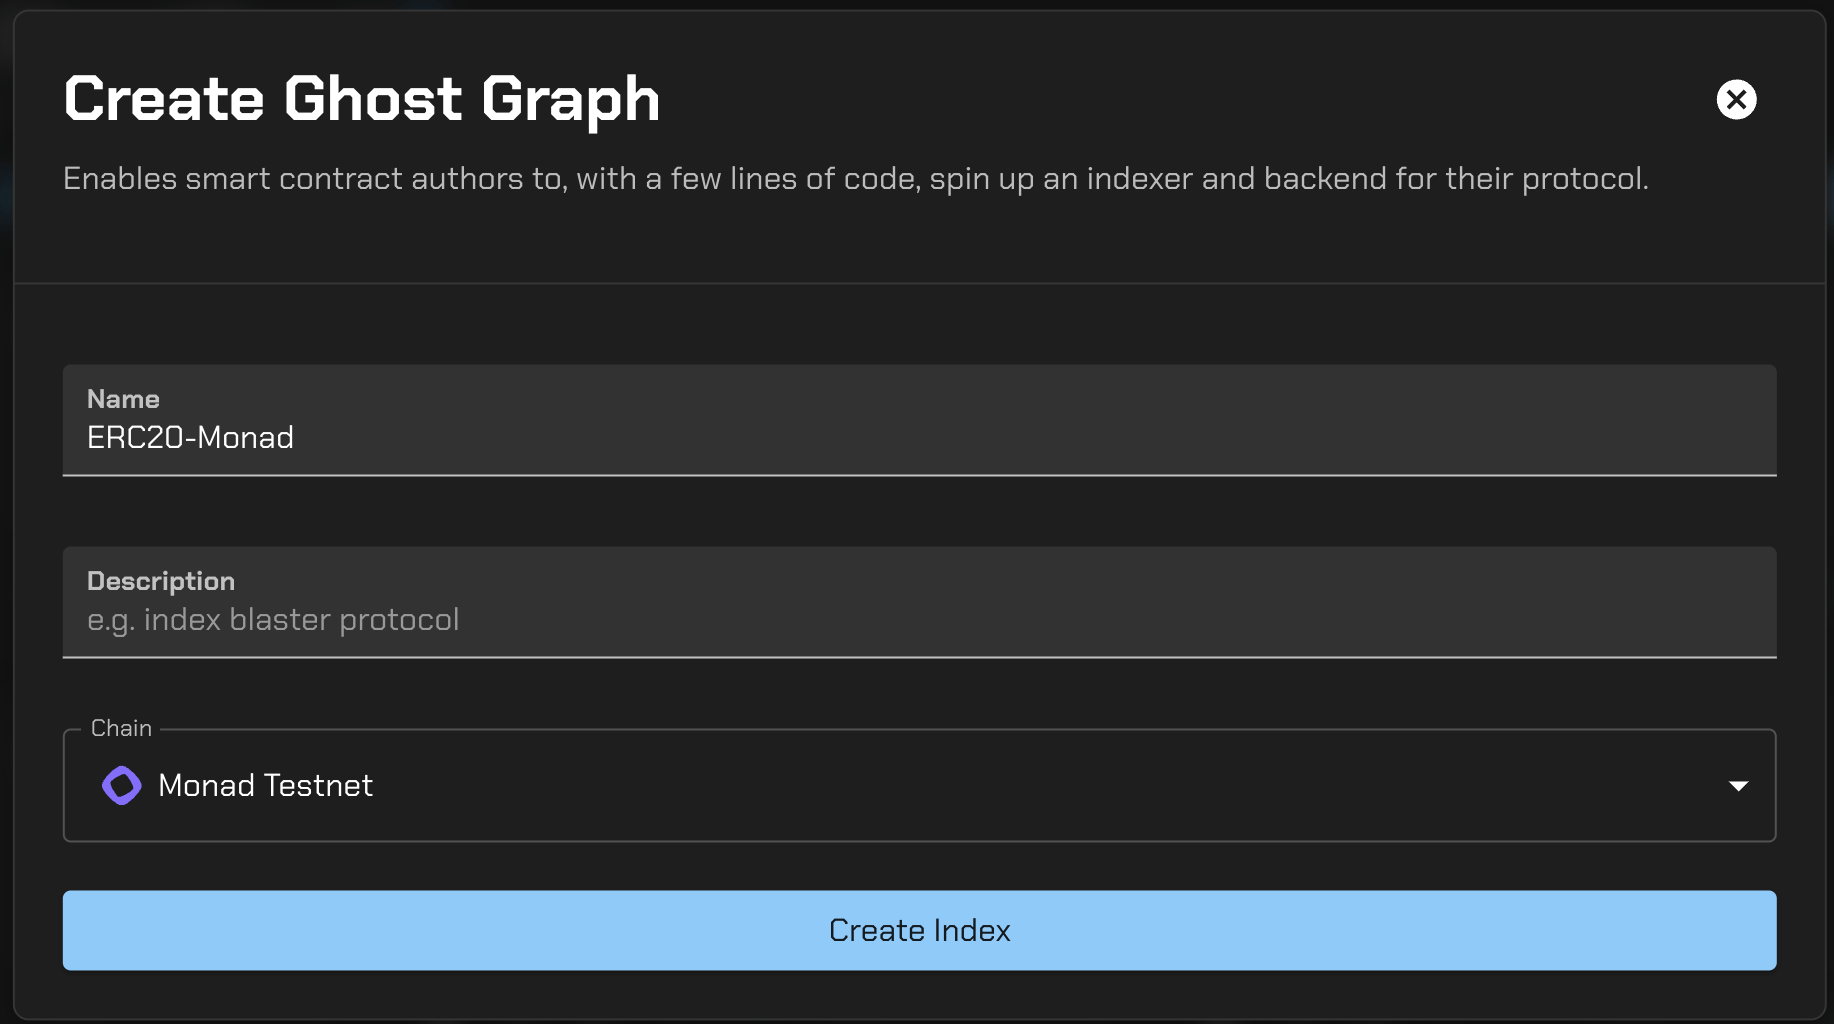 3. 将下面的内容复制粘贴到 `events.sol` 文件中。我们希望追踪代币流动。让我们在此处插入这个事件。了解更多关于事件的信息:[https://docs.tryghost.xyz/ghostgraph/getting-started/define-events](https://docs.tryghost.xyz/ghostgraph/getting-started/define-events)
```solidity lines title="events.sol" theme={null}
interface Events {
event Transfer(address indexed from, address indexed to, uint256 value);
}
```
4. 将下面的内容复制粘贴到 `schema.sol` 文件中。在这种情况下,我们创建了几个结构体,用于将实体保存到 Ghost 数据库中。了解更多关于 schema 的信息:[https://docs.tryghost.xyz/ghostgraph/getting-started/define-schema](https://docs.tryghost.xyz/ghostgraph/getting-started/define-schema)
```solidity lines title="schema.sol" theme={null}
struct Global {
string id;
uint256 totalHolders;
}
struct User {
address id;
uint256 balance;
}
struct Transfer {
string id;
address from;
address to;
uint256 amount;
uint64 block;
address emitter;
uint32 logIndex;
bytes32 transactionHash;
uint32 txIndex;
uint32 timestamp;
}
```
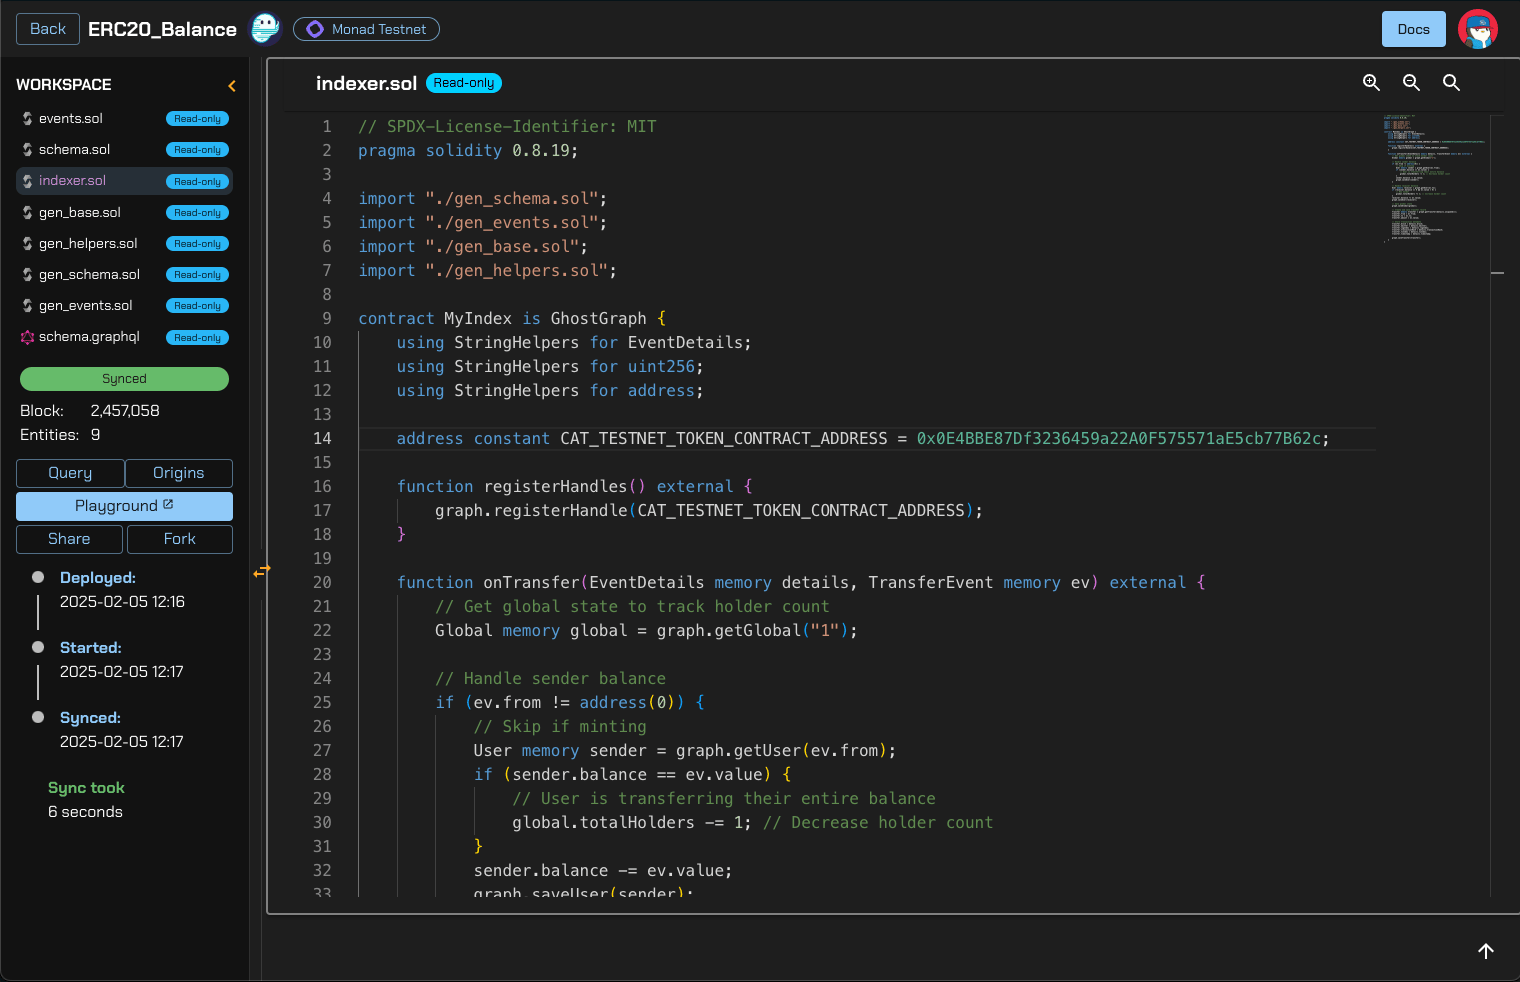
5. 点击 `generate code` 按钮,生成 `indexer.sol` 文件以及一些其他只读文件。这个文件就是承载逻辑和转换的地方。
6. 将下面的内容复制粘贴到 `indexer.sol` 中,务必将您的代币地址填入 `CAT_TESTNET_TOKEN_CONTRACT_ADDRESS` 变量。
```solidity lines title="indexer.sol" theme={null}
// SPDX-License-Identifier: MIT
pragma solidity 0.8.19;
import "./gen_schema.sol";
import "./gen_events.sol";
import "./gen_base.sol";
import "./gen_helpers.sol";
contract MyIndex is GhostGraph {
using StringHelpers for EventDetails;
using StringHelpers for uint256;
using StringHelpers for address;
address constant CAT_TESTNET_TOKEN_CONTRACT_ADDRESS = ;
function registerHandles() external {
graph.registerHandle(CAT_TESTNET_TOKEN_CONTRACT_ADDRESS);
}
function onTransfer(EventDetails memory details, TransferEvent memory ev) external {
// Get global state to track holder count
Global memory global = graph.getGlobal("1");
// Handle sender balance
if (ev.from != address(0)) {
// Skip if minting
User memory sender = graph.getUser(ev.from);
if (sender.balance == ev.value) {
// User is transferring their entire balance
global.totalHolders -= 1; // Decrease holder count
}
sender.balance -= ev.value;
graph.saveUser(sender);
}
// Handle receiver balance
User memory receiver = graph.getUser(ev.to);
if (receiver.balance == 0 && ev.value > 0) {
// New holder
global.totalHolders += 1; // Increase holder count
}
receiver.balance += ev.value;
graph.saveUser(receiver);
// Save global state
graph.saveGlobal(global);
// Create and save transfer record
Transfer memory transfer = graph.getTransfer(details.uniqueId());
transfer.from = ev.from;
transfer.to = ev.to;
transfer.amount = ev.value;
// Store transaction metadata
transfer.block = details.block;
transfer.emitter = details.emitter;
transfer.logIndex = details.logIndex;
transfer.transactionHash = details.transactionHash;
transfer.txIndex = details.txIndex;
transfer.timestamp = details.timestamp;
graph.saveTransfer(transfer);
}
}
```
7. 编译并部署您的 GhostGraph。几秒钟后,您应该会看到 GhostGraph 已成功索引您的合约。
3. 将下面的内容复制粘贴到 `events.sol` 文件中。我们希望追踪代币流动。让我们在此处插入这个事件。了解更多关于事件的信息:[https://docs.tryghost.xyz/ghostgraph/getting-started/define-events](https://docs.tryghost.xyz/ghostgraph/getting-started/define-events)
```solidity lines title="events.sol" theme={null}
interface Events {
event Transfer(address indexed from, address indexed to, uint256 value);
}
```
4. 将下面的内容复制粘贴到 `schema.sol` 文件中。在这种情况下,我们创建了几个结构体,用于将实体保存到 Ghost 数据库中。了解更多关于 schema 的信息:[https://docs.tryghost.xyz/ghostgraph/getting-started/define-schema](https://docs.tryghost.xyz/ghostgraph/getting-started/define-schema)
```solidity lines title="schema.sol" theme={null}
struct Global {
string id;
uint256 totalHolders;
}
struct User {
address id;
uint256 balance;
}
struct Transfer {
string id;
address from;
address to;
uint256 amount;
uint64 block;
address emitter;
uint32 logIndex;
bytes32 transactionHash;
uint32 txIndex;
uint32 timestamp;
}
```
5. 点击 `generate code` 按钮,生成 `indexer.sol` 文件以及一些其他只读文件。这个文件就是承载逻辑和转换的地方。
6. 将下面的内容复制粘贴到 `indexer.sol` 中,务必将您的代币地址填入 `CAT_TESTNET_TOKEN_CONTRACT_ADDRESS` 变量。
```solidity lines title="indexer.sol" theme={null}
// SPDX-License-Identifier: MIT
pragma solidity 0.8.19;
import "./gen_schema.sol";
import "./gen_events.sol";
import "./gen_base.sol";
import "./gen_helpers.sol";
contract MyIndex is GhostGraph {
using StringHelpers for EventDetails;
using StringHelpers for uint256;
using StringHelpers for address;
address constant CAT_TESTNET_TOKEN_CONTRACT_ADDRESS = ;
function registerHandles() external {
graph.registerHandle(CAT_TESTNET_TOKEN_CONTRACT_ADDRESS);
}
function onTransfer(EventDetails memory details, TransferEvent memory ev) external {
// Get global state to track holder count
Global memory global = graph.getGlobal("1");
// Handle sender balance
if (ev.from != address(0)) {
// Skip if minting
User memory sender = graph.getUser(ev.from);
if (sender.balance == ev.value) {
// User is transferring their entire balance
global.totalHolders -= 1; // Decrease holder count
}
sender.balance -= ev.value;
graph.saveUser(sender);
}
// Handle receiver balance
User memory receiver = graph.getUser(ev.to);
if (receiver.balance == 0 && ev.value > 0) {
// New holder
global.totalHolders += 1; // Increase holder count
}
receiver.balance += ev.value;
graph.saveUser(receiver);
// Save global state
graph.saveGlobal(global);
// Create and save transfer record
Transfer memory transfer = graph.getTransfer(details.uniqueId());
transfer.from = ev.from;
transfer.to = ev.to;
transfer.amount = ev.value;
// Store transaction metadata
transfer.block = details.block;
transfer.emitter = details.emitter;
transfer.logIndex = details.logIndex;
transfer.transactionHash = details.transactionHash;
transfer.txIndex = details.txIndex;
transfer.timestamp = details.timestamp;
graph.saveTransfer(transfer);
}
}
```
7. 编译并部署您的 GhostGraph。几秒钟后,您应该会看到 GhostGraph 已成功索引您的合约。
 8. 点击 playground 会带您进入 GraphQL playground,您可以在这里确保数据被正确索引。让我们将下面的内容复制粘贴到 playground 中,然后点击运行按钮从 GhostGraph 获取数据。
```graphql lines title="GraphQL Playground" theme={null}
query FetchRecentTransfers {
transfers(
orderBy: "block",
orderDirection: "desc"
limit: 50
) {
items {
amount
block
emitter
from
id
logIndex
timestamp
to
transactionHash
txIndex
}
}
}
```
8. 点击 playground 会带您进入 GraphQL playground,您可以在这里确保数据被正确索引。让我们将下面的内容复制粘贴到 playground 中,然后点击运行按钮从 GhostGraph 获取数据。
```graphql lines title="GraphQL Playground" theme={null}
query FetchRecentTransfers {
transfers(
orderBy: "block",
orderDirection: "desc"
limit: 50
) {
items {
amount
block
emitter
from
id
logIndex
timestamp
to
transactionHash
txIndex
}
}
}
```
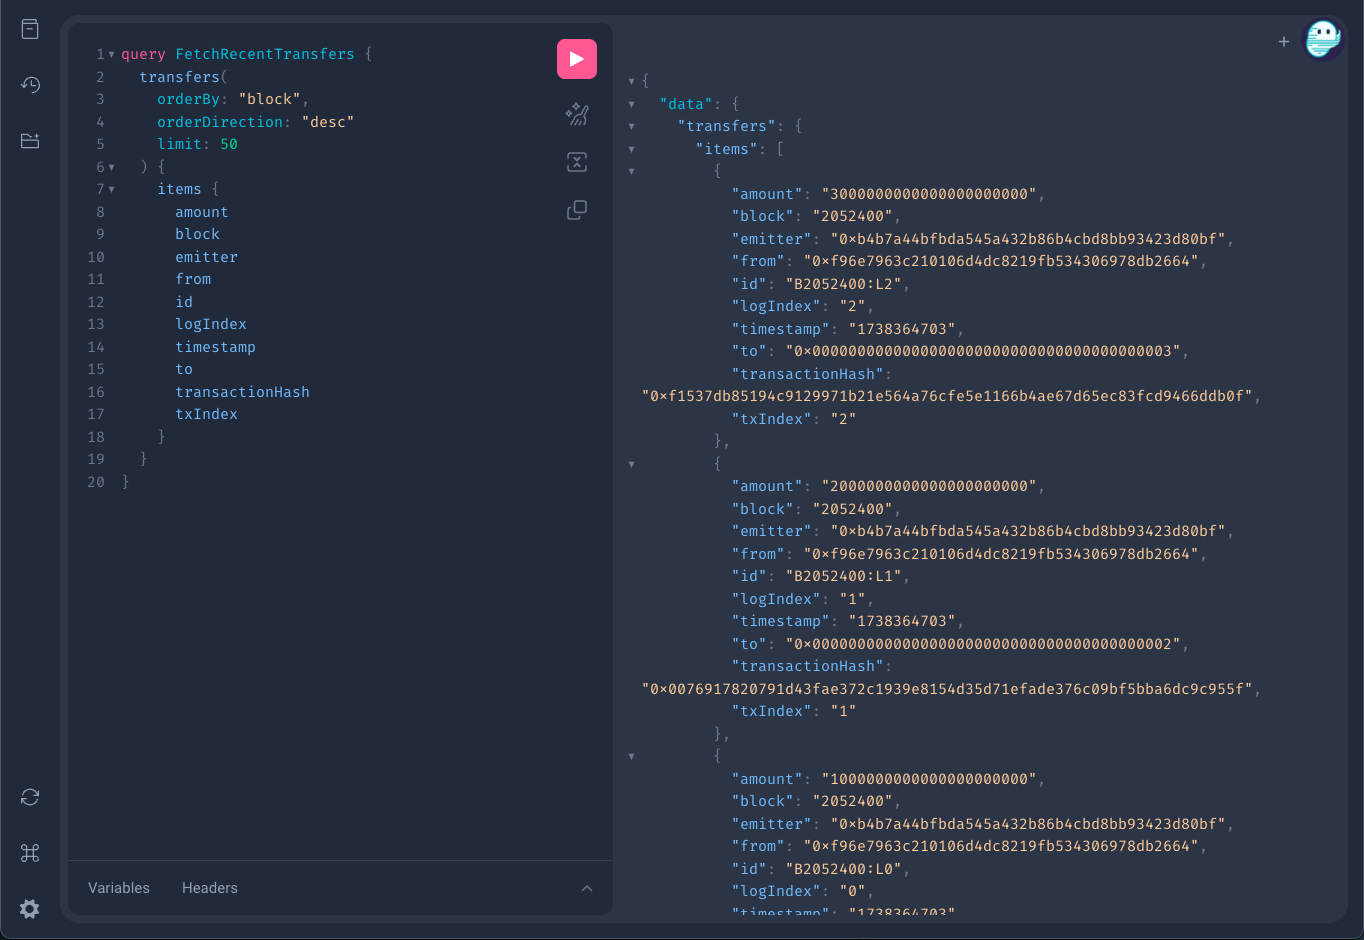 尝试再次运行转账脚本以提交更多交易。您应该会看到 GhostGraph 自动索引新的交易。
## 结论
您现已成功创建了一个 GhostGraph 来追踪您合约的链上数据。下一步是将其连接到您的前端。
Ghost 团队制作了完整的端到端教程,可查看[这里](https://docs.tryghost.xyz/blog/connect_ghost_graph_to_frontend/)。
尝试再次运行转账脚本以提交更多交易。您应该会看到 GhostGraph 自动索引新的交易。
## 结论
您现已成功创建了一个 GhostGraph 来追踪您合约的链上数据。下一步是将其连接到您的前端。
Ghost 团队制作了完整的端到端教程,可查看[这里](https://docs.tryghost.xyz/blog/connect_ghost_graph_to_frontend/)。