> ## Documentation Index
> Fetch the complete documentation index at: https://docs.monad.xyz/llms.txt
> Use this file to discover all available pages before exploring further.
# 如何使用 Next.js Serwist 0x Privy 嵌入式钱包模板
本指南将带您使用 [模板](https://github.com/monad-developers/next-serwist-privy-0x),该模板使用 [Next.js](https://nextjs.org/docs)、[Serwist](https://serwist.pages.dev/)(离线能力)、[0x](https://0x.org/docs/)(代币交易) 和 [Privy 嵌入式钱包](https://docs.privy.io/wallets/wallets/create/create-a-wallet)(身份验证)在 Monad 上构建渐进式 Web 应用(PWA)。
## 前置条件
* [Node.js](https://nodejs.org/)(v18 或更高版本)
* 一个 [Privy 账户](https://www.privy.io/)
* 一个 [0x 账户](https://www.0x.org/)
1. 创建您的 Privy 应用:
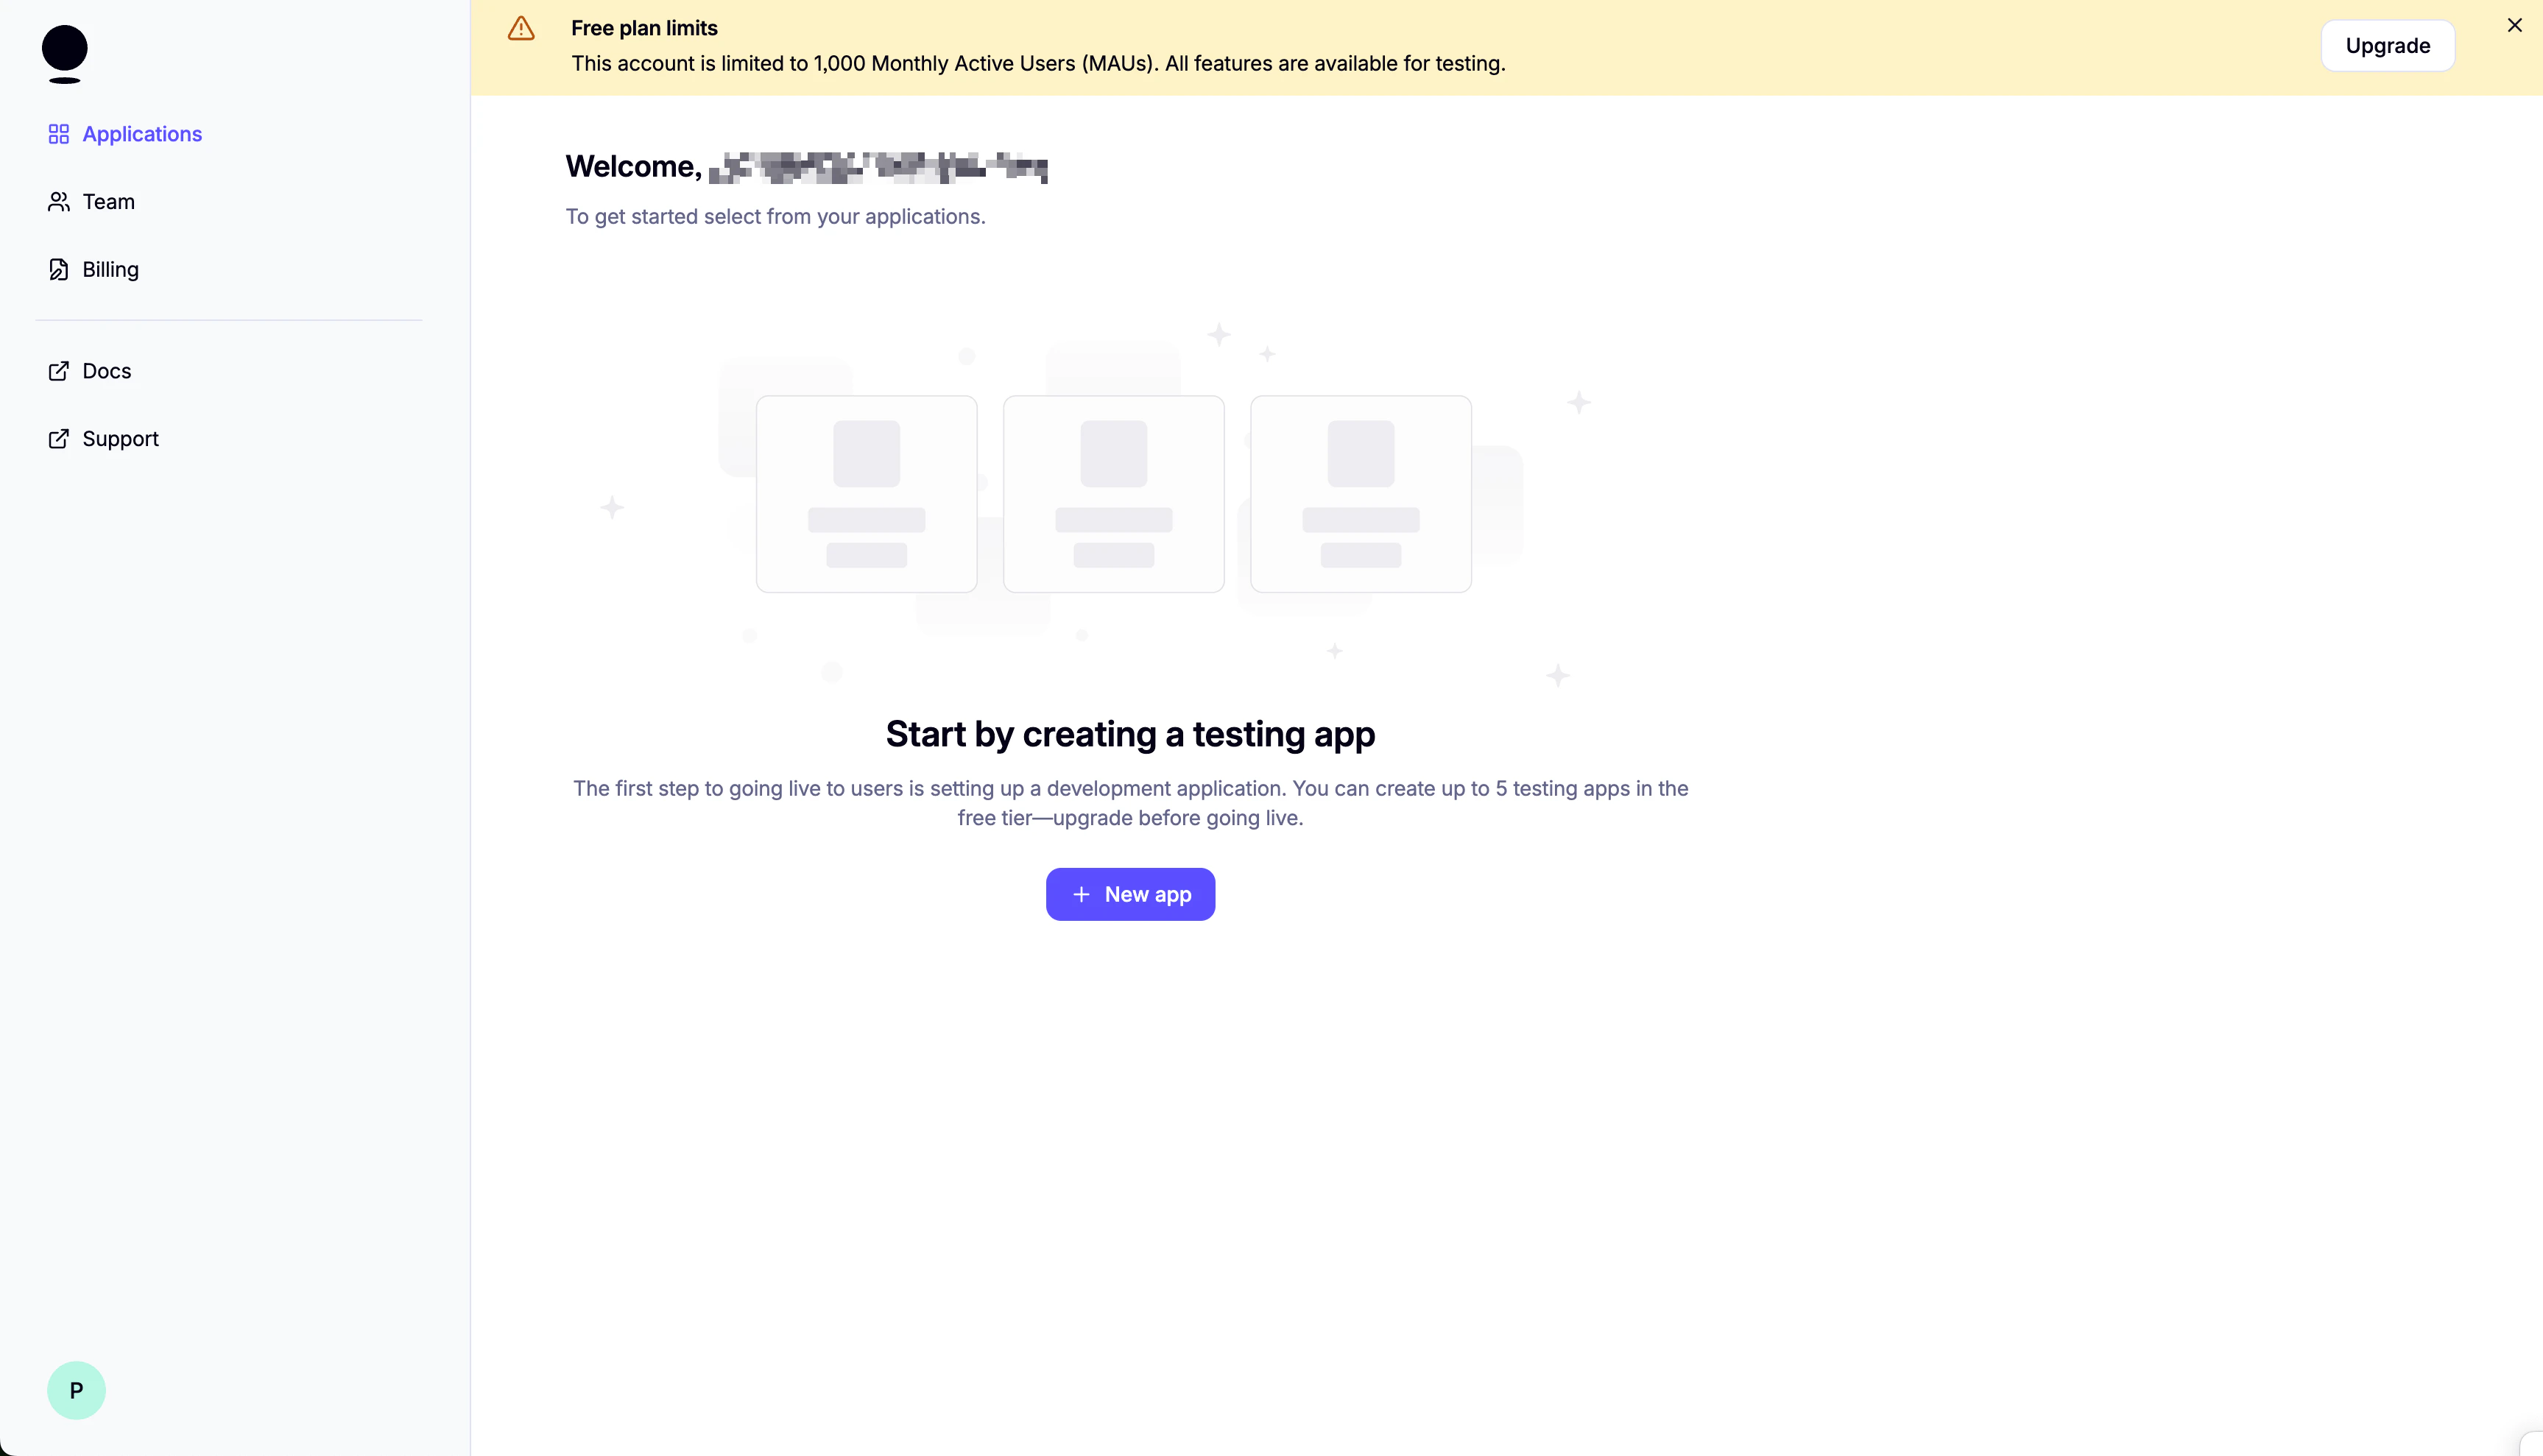 选择 "Web" 作为平台。然后点击 "Create app"。
 在下一个页面,请确保保存您的 App ID。
2. 设置登录方式:
在下一个页面,请确保保存您的 App ID。
2. 设置登录方式:
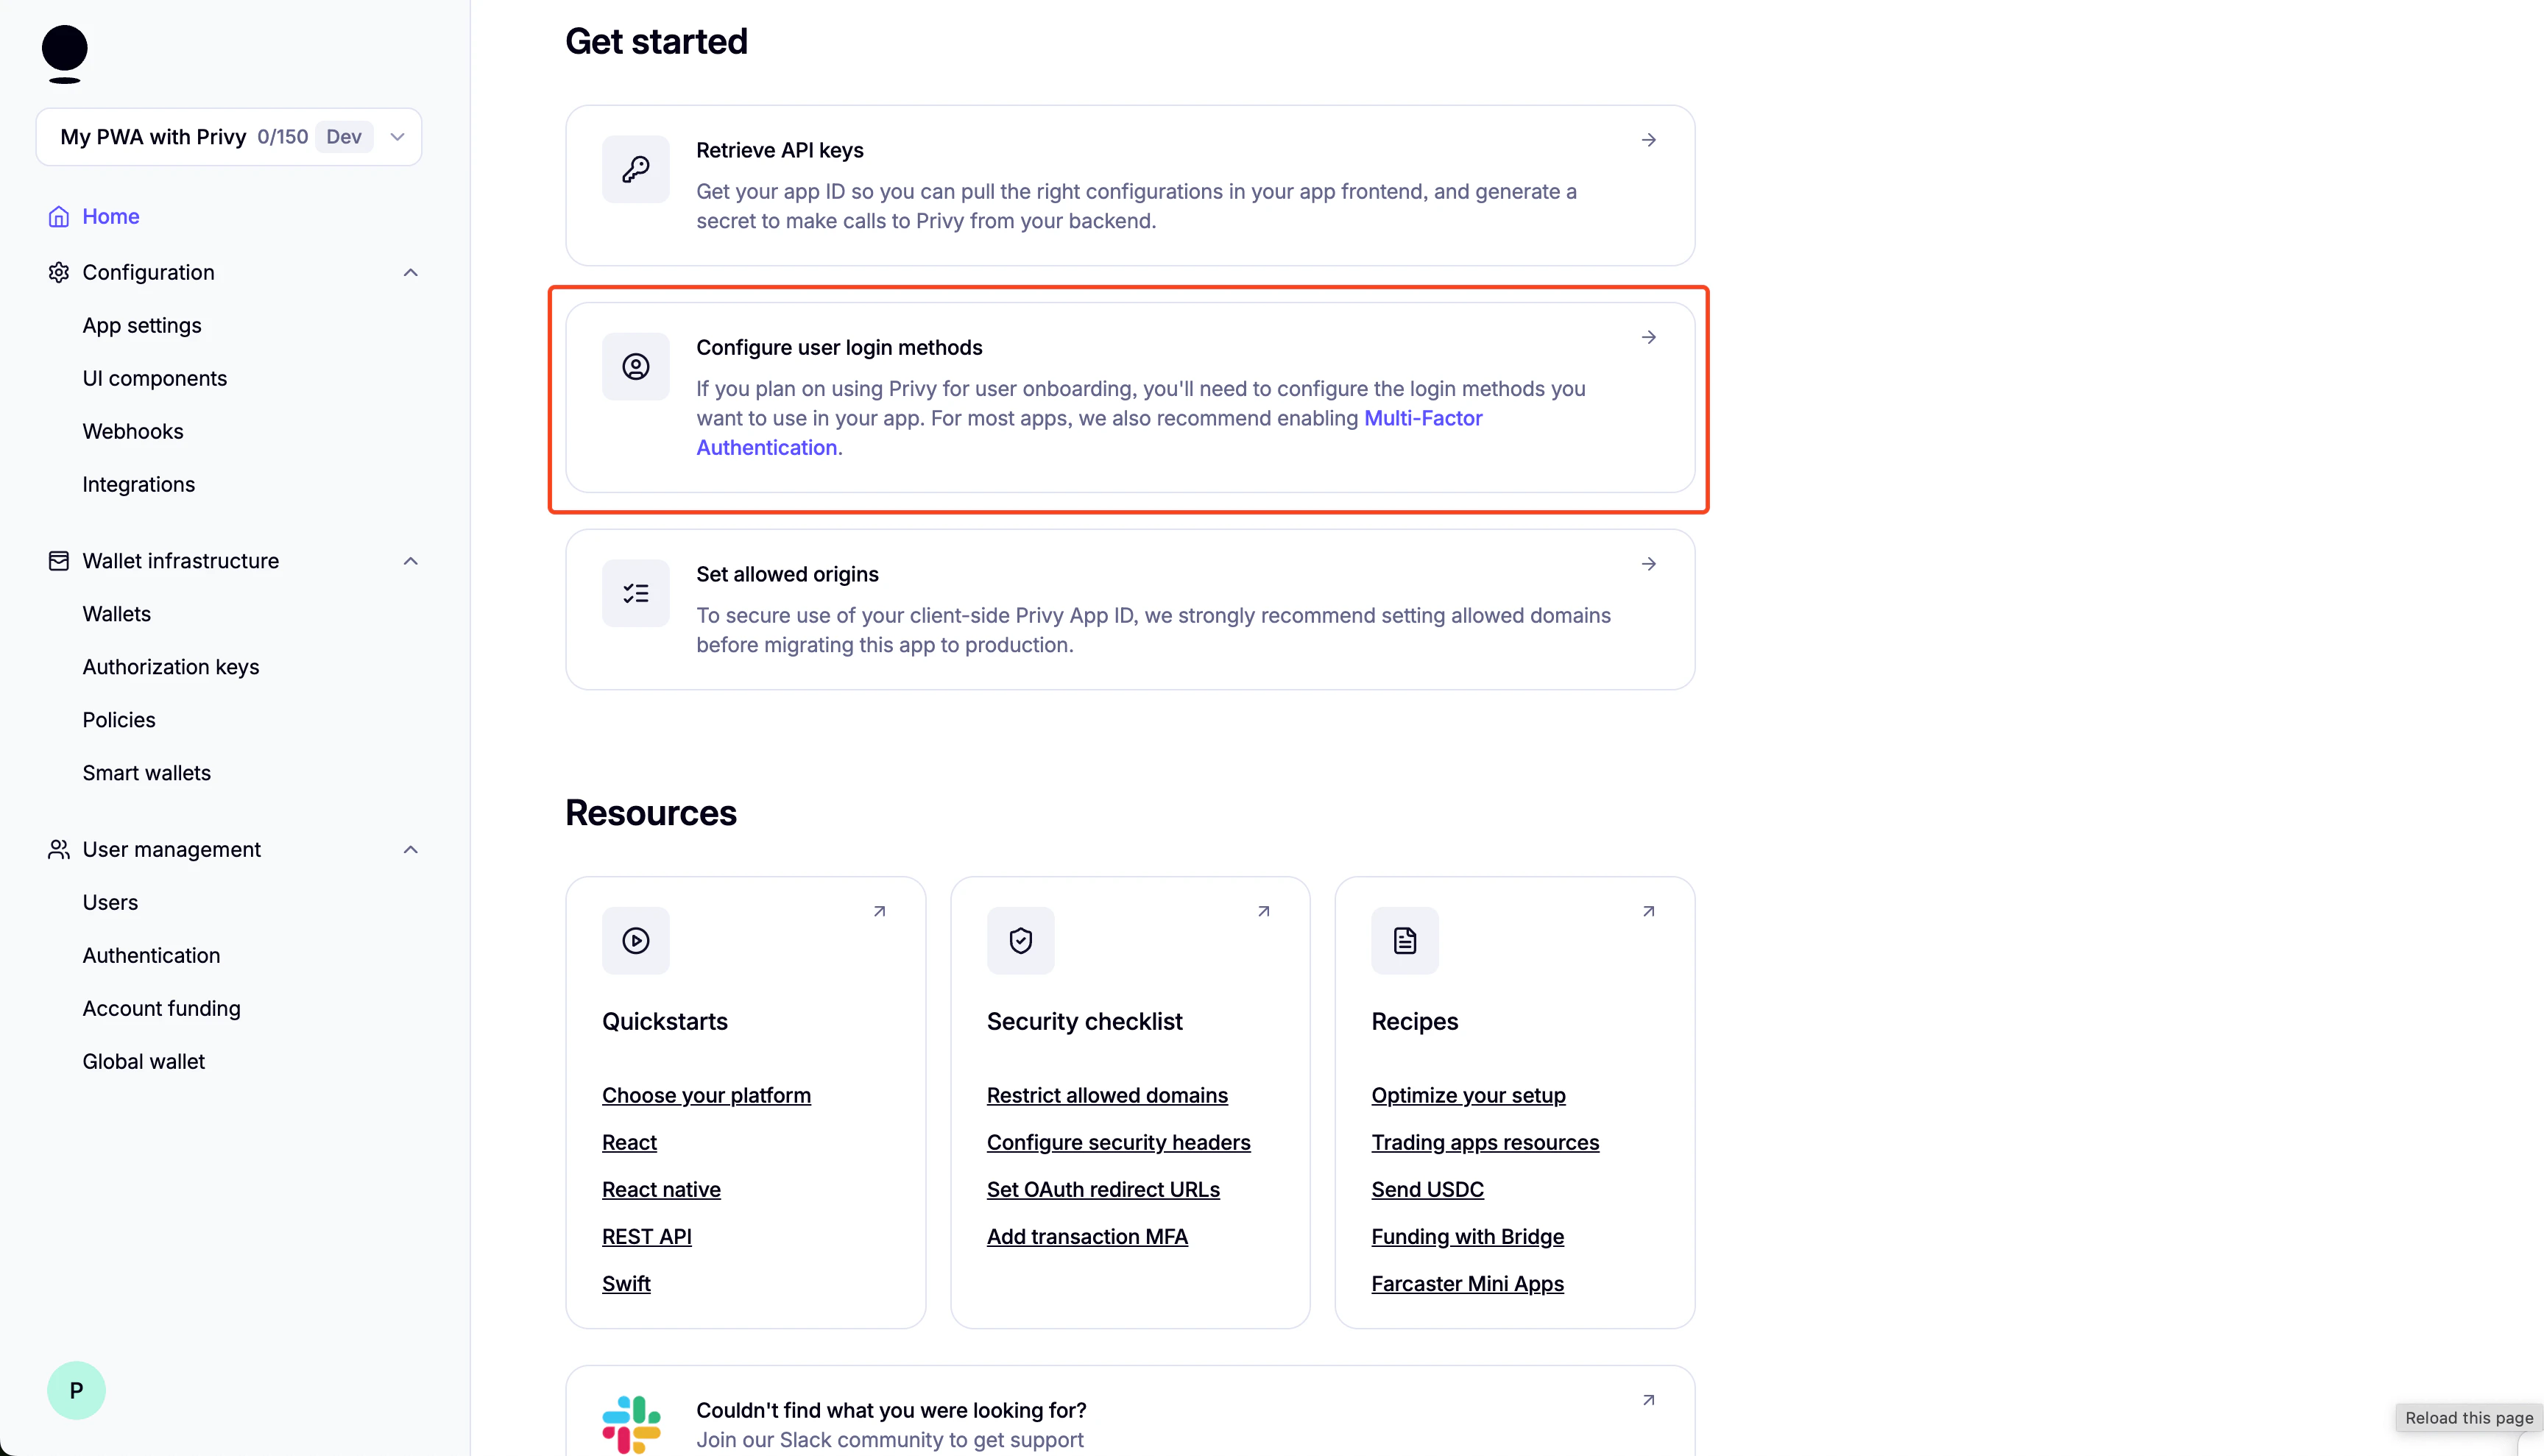 3. 禁用外部钱包:
 4. 向下滚动并启用 "Automatically create embedded wallets on login" 并选择 "EVM Wallets":
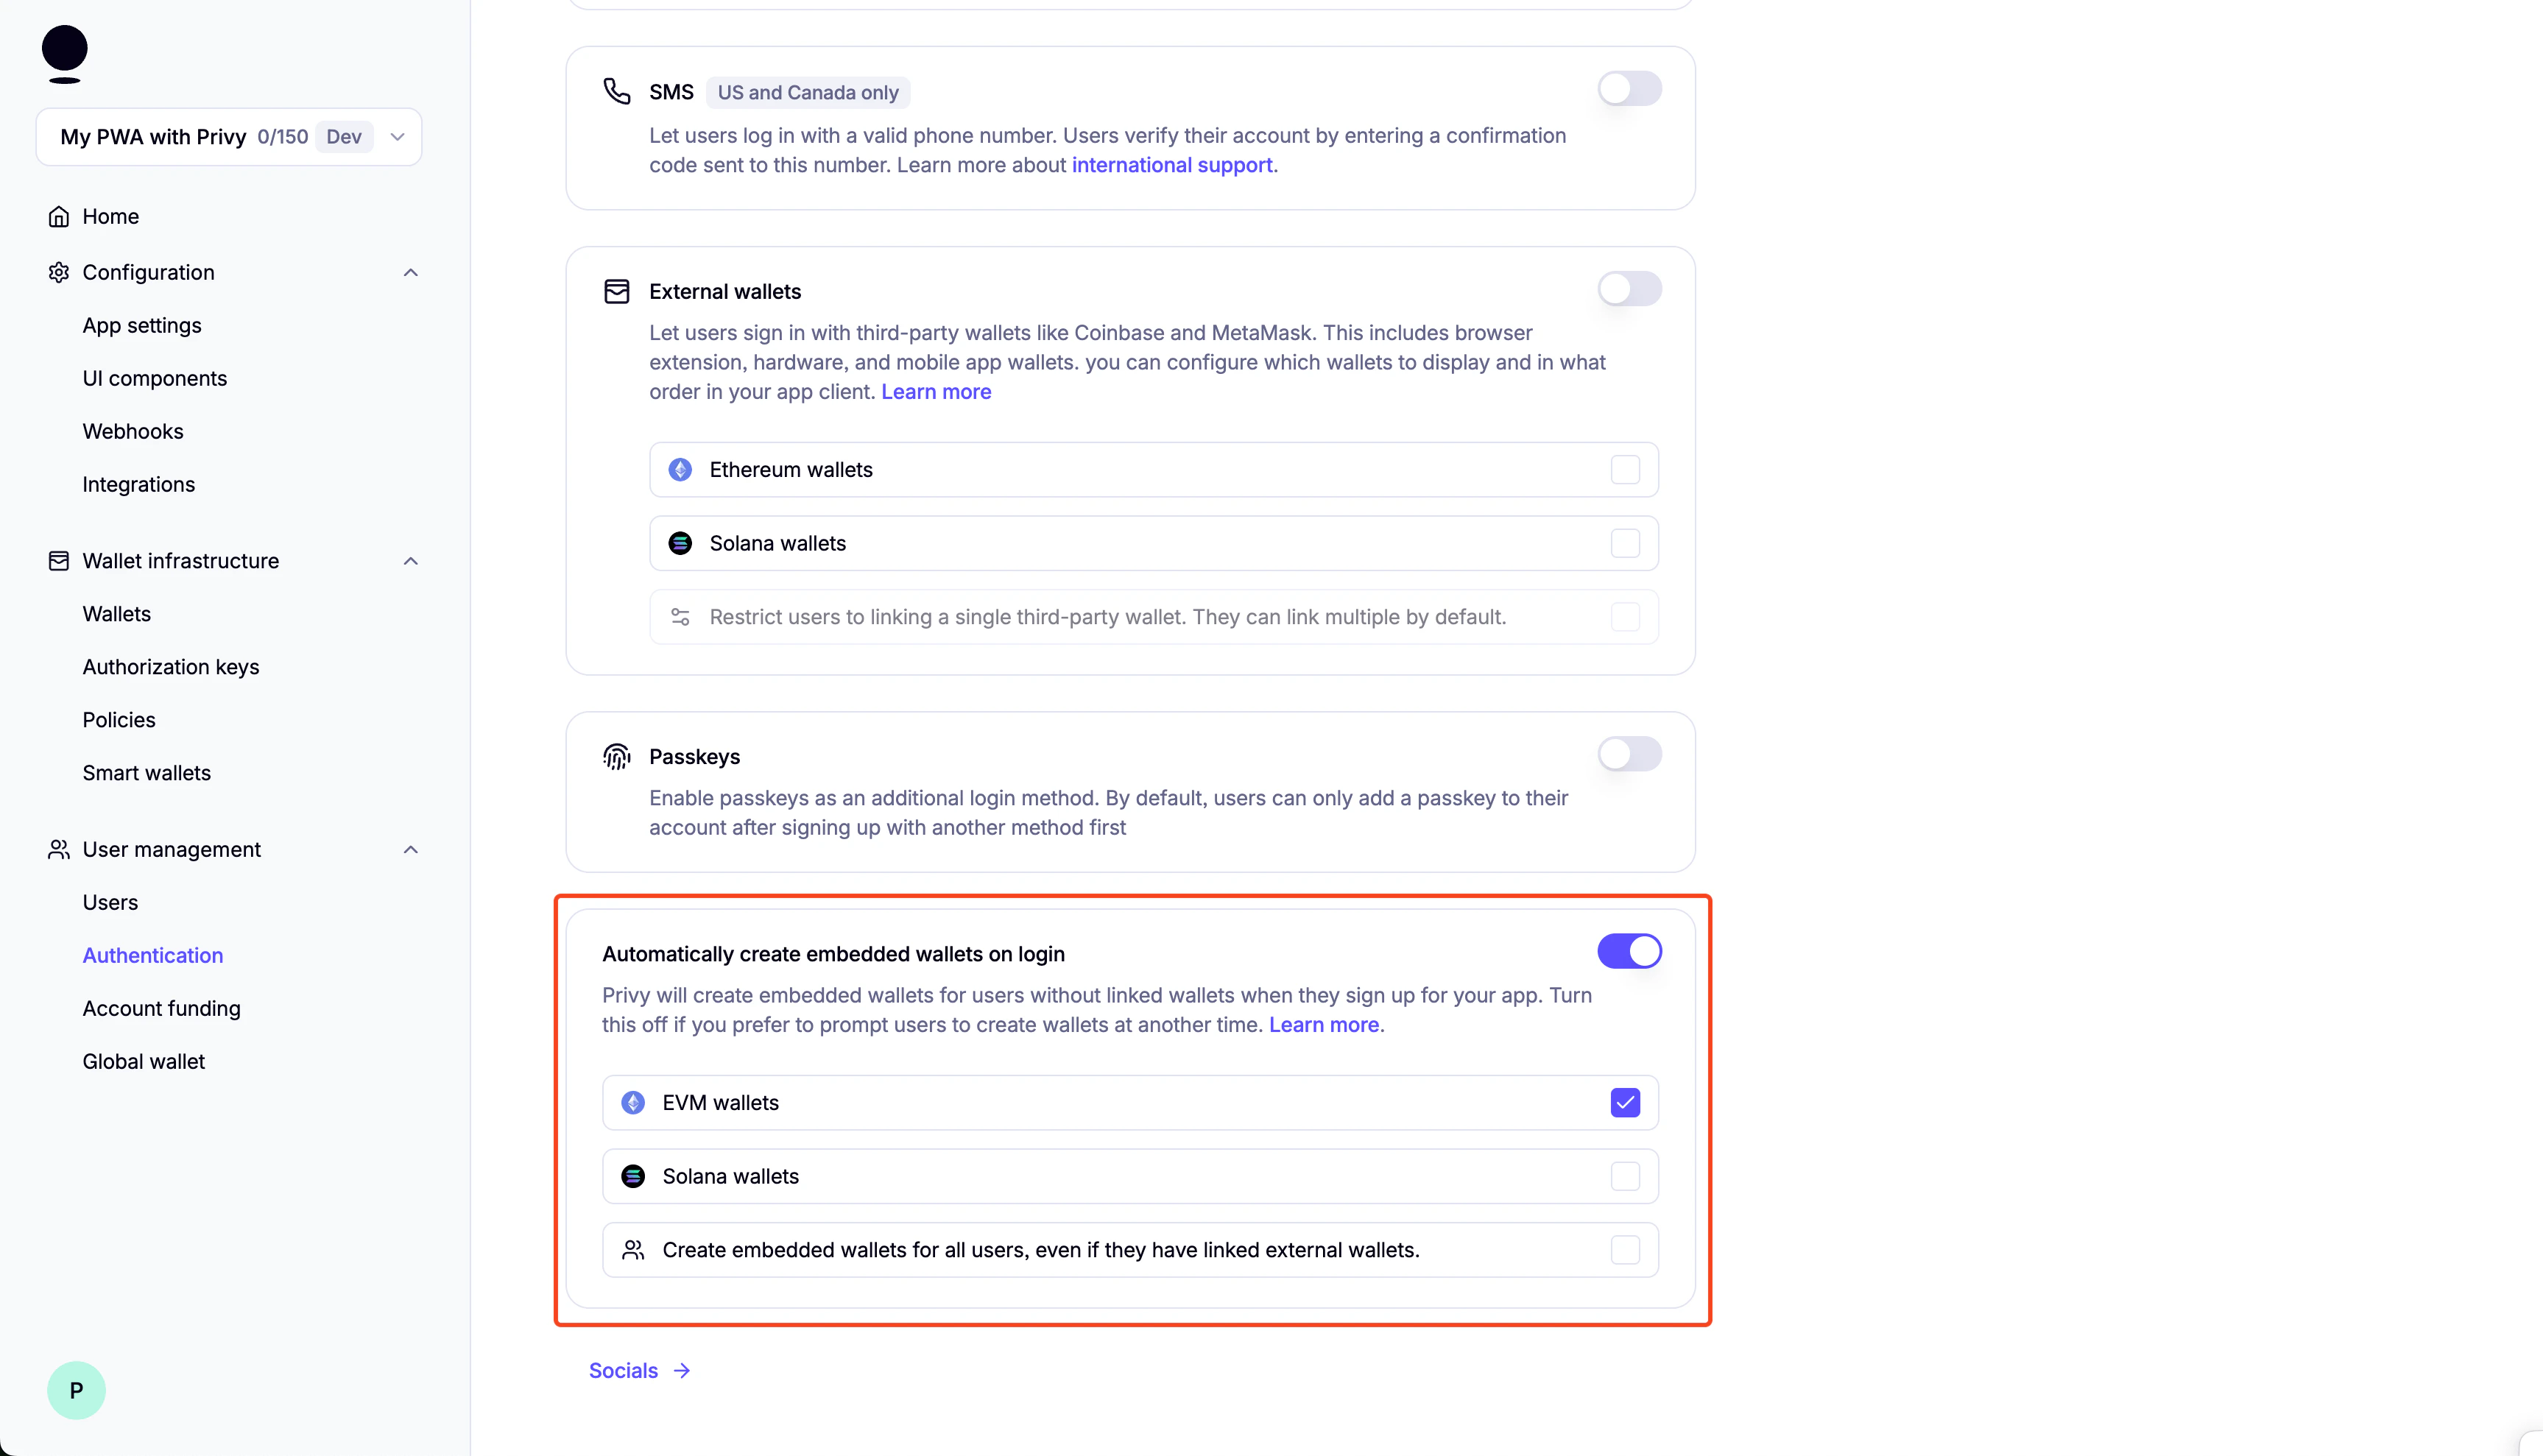 您可以启用 "Test Accounts" 用于测试目的。
 1. 创建您的 0x 账户:
前往 [0x 仪表盘](https://dashboard.0x.org/create-account) 并创建您的账户。
在下一页,请确保保存您的 API Key。
2. 获取您的 API Key:
要获取您的 API key,请创建一个应用,然后前往 API Keys。
复制该 API key 并保存以备后用。
## 设置
1. 克隆仓库:
```bash theme={null}
git clone https://github.com/monad-developers/next-serwist-privy-0x.git
```
2. `cd` 进入项目目录:
```bash theme={null}
cd next-serwist-privy-0x
```
3. 安装依赖:
```bash theme={null}
npm install
```
4. 在根目录创建 `.env.local` 文件:
```bash theme={null}
cp .env.example .env.local
```
5. 开始向 `.env.local` 文件添加环境变量:
```bash theme={null}
# Privy
NEXT_PUBLIC_PRIVY_APP_ID=your_privy_app_id_here
NEXT_PUBLIC_PRIVY_CLIENT_ID= # optional, you can leave this empty
# VAPID Keys for push notifications
NEXT_PUBLIC_VAPID_PUBLIC_KEY=your_vapid_public_key_here
VAPID_PRIVATE_KEY=your_vapid_private_key_here
# 0x Configuration
ZEROX_API_KEY=your_0x_api_key_here
```
如果您丢失了 Privy App ID,可以在 Privy 仪表盘中找到。
6. 为 Web 推送通知生成 VAPID 密钥:
```bash theme={null}
npx web-push generate-vapid-keys --json
```
将生成的密钥复制到您的 .env.local 文件中(替换步骤 5 中的占位值)。
7. 运行应用:
**开发模式**:
```bash theme={null}
npm run dev
```
应用将在 [http://localhost:3000](http://localhost:3000) 上可用。
**生产模式**:
完整的 PWA 功能(包括安装提示):
```bash theme={null}
npm run build && npm run start
```
## 模板文件夹结构
```
next-serwist-privy-0x/
├── app/
│ ├── components/ # React components
│ │ ├── 0x/ # 0x Protocol integration
│ │ ├── InstallPWA.tsx # PWA install prompt
│ │ ├── SwapComponent.tsx # Token swap interface
│ │ └── ...
│ ├── api/ # API routes
│ │ ├── price/ # Token price endpoints
│ │ └── quote/ # Swap quote endpoints
│ ├── ~offline/ # Offline page
│ └── ...
├── public/ # Static assets
├── utils/ # Utility functions
└── ...
```
## 更改应用名称
* 编辑 [`public/manifest.json`](https://github.com/monad-developers/next-serwist-privy-0x/blob/main/public/manifest.json):
* 修改 `name` 和 `short_name` 字段
* 运行 `npm run build` 更新应用
## 通知设置
要接收此应用的推送通知,您需要在浏览器和/或系统设置中启用通知:
### 浏览器设置
1. 点击地址栏中的锁形图标 🔒
2. 将 "Notifications" 设置为 "Allow"
3. 或前往 Settings → Privacy and security → Site Settings → Notifications
1. 点击地址栏中的盾牌图标 🛡️
2. 如有需要,为此站点关闭 "Enhanced Tracking Protection"
3. 在出现提示时允许通知
4. 或前往 Settings → Privacy & Security → Permissions → Notifications
1. 前往 Safari → Settings → Websites → Notifications
2. 找到您的站点并将其设置为 "Allow"
### 系统设置
1. System Preferences → Notifications & Focus
2. 找到您的浏览器并确保通知已启用
3. 在浏览器设置中勾选 "Allow notifications from websites"
1. Settings → System → Notifications & actions
2. 确保您的浏览器可以发送通知
3. 检查浏览器通知设置
1. Settings → Notifications → \[您的浏览器]
2. 启用 "Allow Notifications"
3. 同时在浏览器设置中启用
1. Settings → Apps → \[您的浏览器] → Notifications
2. 启用通知
3. 检查浏览器通知权限
### 需要后端集成
这需要后端实现:
* 在用户订阅时 **保存订阅数据**(参见代码中的 TODO 注释)
* 在用户取消订阅时 **删除订阅数据**
* **实现 [`/notification` 端点](https://github.com/monad-developers/next-serwist-privy-0x/blob/main/app/notification/route.ts)** 以发送实际的推送通知
* 使用 **`web-push` 库** 或类似方案进行服务器端通知投递
### 自定义通知内容
要自定义推送通知内容,请编辑 [`app/notification/route.ts`](https://github.com/monad-developers/next-serwist-privy-0x/blob/main/app/notification/route.ts) ,并修改 `sendNotification` 调用中的 `title`、`message`、`icon` 及其他属性。
## 修改应用图标和启动画面
### 应用图标
将 [`public/icons/`](https://github.com/monad-developers/next-serwist-privy-0x/tree/main/public/icons) 目录下的图标文件替换为您的自定义图标:
* **`icon-512x512.png`** - 主应用图标(512×512px)
* **`android-chrome-192x192.png`** - Android 图标(192×192px)
* **`apple-touch-icon.png`** - iOS 主屏幕图标(180×180px)
同时更新 favicon:
* **[`public/favicon.ico`](https://github.com/monad-developers/next-serwist-privy-0x/blob/main/public/favicon.ico)** - 浏览器 favicon
* **[`app/favicon.ico`](https://github.com/monad-developers/next-serwist-privy-0x/blob/main/app/favicon.ico)** - Next.js 应用 favicon
### 启动画面
启动画面根据您的应用图标和在以下位置定义的主题颜色自动生成: [`manifest.json`](https://github.com/monad-developers/next-serwist-privy-0x/blob/main/public/manifest.json)。要自定义:
1. 在以下位置更新 `theme_color` 和 `background_color`: [`manifest.json`](https://github.com/monad-developers/next-serwist-privy-0x/blob/main/public/manifest.json)
2. 确保您的主图标(`icon-512x512.png`)代表您的品牌
3. 运行 `npm run build` 以应用更改
使用 [PWA Asset Generator](https://www.pwabuilder.com/imageGenerator) 等工具从单张源图片生成所有所需的图标尺寸。
## 添加更多代币
该模板目前支持 WMON 和 USDT 代币。要添加更多可交易代币,请按以下步骤操作:
### 1. 查找代币信息
在添加代币之前,您需要以下信息:
* **合约地址**:代币的智能合约地址
* **符号**:代币的符号(例如 "ETH"、"USDC")
* **名称**:代币的完整名称
* **小数位数**:小数位数(大多数 ERC-20 代币为 18)
* **Logo URI**:代币 logo 图像的 URL
您可以在 0x Swap API 支持的 DEX 上找到这些信息。
要获取 0x Swap API 支持的 DEX 列表,您可以查询 [sources](https://api.0x.org/sources) 端点。参考文档见 [getSources](https://0x.org/docs/api#tag/Sources/operation/sources::getSources) 页面。
### 2. 更新代币常量
编辑 [`utils/constants.ts`](https://github.com/monad-developers/next-serwist-privy-0x/blob/main/utils/constants.ts) 并在三处添加您的新代币:
#### A. 添加到 MONAD\_TESTNET\_TOKENS 数组
```typescript title="utils/constants.ts" theme={null}
export const MONAD_TESTNET_TOKENS: Token[] = [
// ... existing tokens ...
{
chainId: 1,
name: "Your Token Name",
symbol: "YOUR_SYMBOL",
decimals: 18,
address: "0xYourTokenContractAddress",
logoURI: "https://your-token-logo-url.png",
},
];
```
#### B. 添加到 MONAD\_TESTNET\_TOKENS\_BY\_SYMBOL 记录
```typescript title="utils/constants.ts" theme={null}
export const MONAD_TESTNET_TOKENS_BY_SYMBOL: Record = {
// ... existing tokens ...
your_symbol: {
// lowercase key
chainId: 1,
name: "Your Token Name",
symbol: "YOUR_SYMBOL",
decimals: 18,
address: "0xYourTokenContractAddress",
logoURI: "https://your-token-logo-url.png",
},
};
```
#### C. 添加到 MONAD\_TESTNET\_TOKENS\_BY\_ADDRESS 记录
```typescript title="utils/constants.ts" theme={null}
export const MONAD_TESTNET_TOKENS_BY_ADDRESS: Record = {
// ... existing tokens ...
"0xyourtokencontractaddress": {
// lowercase address
chainId: 1,
name: "Your Token Name",
symbol: "YOUR_SYMBOL",
decimals: 18,
address: "0xYourTokenContractAddress", // original case
logoURI: "https://your-token-logo-url.png",
},
};
```
### 3. 示例:添加 shMON
以下是添加 USDC 的完整示例:
```typescript title="utils/constants.ts" theme={null}
// In MONAD_TESTNET_TOKENS array
{
chainId: 1,
name: "shMonad",
symbol: "shMON",
decimals: 18,
address: "0x3a98250F98Dd388C211206983453837C8365BDc1",
logoURI: "put_your_logo_url_here_or_use_the_default_logo",
},
// In MONAD_TESTNET_TOKENS_BY_SYMBOL record
shmon: {
chainId: 1,
name: "shMonad",
symbol: "shMON",
decimals: 18,
address: "0x3a98250F98Dd388C211206983453837C8365BDc1",
logoURI: "put_your_logo_url_here_or_use_the_default_logo",
},
// In MONAD_TESTNET_TOKENS_BY_ADDRESS record
"0x3a98250F98Dd388C211206983453837C8365BDc1": {
chainId: 1,
name: "shMonad",
symbol: "shMON",
decimals: 18,
address: "0x3a98250F98Dd388C211206983453837C8365BDc1",
logoURI: "put_your_logo_url_here_or_use_the_default_logo",
},
```
### 4. 重要说明
* **小数位数**:大多数代币使用 18 位小数,但某些代币(例如 USDT、USDC)使用 6 位
* **Logo URL**:使用永久、可靠的图像 URL。考虑自行托管 logo 以获得更好的可靠性
* **测试**:在生产环境使用前,先用小额进行充分测试
* **0x 协议支持**:确保该代币在您的目标网络上受 0x 协议支持
### 5. 重新构建并测试
添加代币后:
```bash theme={null}
npm run build
npm run start
```
新代币将自动出现在 swap 界面的代币选择下拉框中。
## 配置滑点容忍度
滑点容忍度决定了您在交易中愿意接受的价格波动幅度。该应用目前使用 0x API 的默认滑点容忍度 1%(100 个基点)。
### 添加滑点配置
#### 1. 更新常量
在此处添加滑点选项: [`utils/constants.ts`](https://github.com/monad-developers/next-serwist-privy-0x/blob/main/utils/constants.ts):
```typescript title="utils/constants.ts" theme={null}
export const DEFAULT_SLIPPAGE_BPS = 100; // 1% in basis points
export const SLIPPAGE_OPTIONS = [
{ label: "0.1%", value: 10 },
{ label: "0.5%", value: 50 },
{ label: "1%", value: 100 },
{ label: "2%", value: 200 },
{ label: "3%", value: 300 },
];
```
#### 2. 更新 API 路由
为两个 API 路由都添加 `slippageBps` 参数:
**[`app/api/price/route.ts`](https://github.com/monad-developers/next-serwist-privy-0x/blob/main/app/api/price/route.ts) and [`app/api/quote/route.ts`](https://github.com/monad-developers/next-serwist-privy-0x/blob/main/app/api/quote/route.ts):**
```typescript title="app/api/price/route.ts" theme={null}
export async function GET(request: NextRequest) {
const searchParams = request.nextUrl.searchParams;
// Add default slippage if not provided
if (!searchParams.has("slippageBps")) {
searchParams.set("slippageBps", "100"); // 1% default
}
const res = await fetch(
`https://api.0x.org/swap/permit2/price?${searchParams}`, // or /quote
{
headers: {
"0x-api-key": process.env.ZEROX_API_KEY as string,
"0x-version": "v2",
},
}
);
const data = await res.json();
return Response.json(data);
}
```
#### 3. 将滑点添加到组件
更新价格/报价请求以包含 `slippageBps` 参数:
**In [`app/components/0x/price.tsx`](https://github.com/monad-developers/next-serwist-privy-0x/blob/main/app/components/0x/price.tsx):**
```typescript title="app/components/0x/price.tsx" theme={null}
const [slippageBps, setSlippageBps] = useState(DEFAULT_SLIPPAGE_BPS);
// Add slippageBps to your API request parameters
const priceRequest = useMemo(
() => ({
chainId,
sellToken: sellTokenObject.address,
buyToken: buyTokenObject.address,
sellAmount: parsedSellAmount,
taker,
slippageBps, // Add this
// ... other params
}),
[...dependencies, slippageBps]
);
```
### 滑点参数细节
* **范围**:0-10000 个基点(0%-100%)
* **默认**:100(1%)
* **格式**:基点(100 bps = 1%)
参考:[0x API 文档](https://0x.org/docs/api#tag/Swap/operation/swap::permit2::getPrice)
## 部署到 Vercel
### 使用 Vercel 仪表盘
1. **连接您的仓库**:
* 将您的代码推送到 GitHub
* 访问 [vercel.com](https://vercel.com) 并导入您的仓库
2. **配置环境变量**:
* 在您的 Vercel 项目仪表盘,前往 Settings → Environment Variables
* 添加与您的 `.env.local` 相同的变量:
```
NEXT_PUBLIC_PRIVY_APP_ID
NEXT_PUBLIC_PRIVY_CLIENT_ID
NEXT_PUBLIC_VAPID_PUBLIC_KEY
VAPID_PRIVATE_KEY
ZEROX_API_KEY
```
3. **部署**:Vercel 将自动构建并部署您的应用
4. **更新 Privy 设置**:在您的 Privy 仪表盘中,将您的 Vercel 域名(例如 `your-app.vercel.app`)添加到允许的来源
PWA 功能(安装提示、离线支持、推送通知)会在 HTTPS 域名上(如 Vercel 部署)自动生效。
### 使用 Vercel CLI
或者,使用 Vercel CLI 部署:
1. **安装 Vercel CLI**:
```bash theme={null}
npm i -g vercel
```
2. **登录 Vercel**:
```bash theme={null}
vercel login
```
3. **部署**:
```bash theme={null}
vercel
```
按照提示配置您的项目。
4. **添加环境变量**:
```bash theme={null}
vercel env add NEXT_PUBLIC_PRIVY_APP_ID
vercel env add NEXT_PUBLIC_PRIVY_CLIENT_ID
vercel env add NEXT_PUBLIC_VAPID_PUBLIC_KEY
vercel env add VAPID_PRIVATE_KEY
vercel env add ZEROX_API_KEY
```
您也可以前往 Vercel 仪表盘在那里添加环境变量。
5. **使用环境变量重新部署**:
```bash theme={null}
vercel --prod
```
## 了解更多
* Serwist:[文档](https://serwist.pages.dev/) | [指南](https://serwist.pages.dev/docs/next/getting-started)
* Privy:[创建钱包](https://docs.privy.io/wallets/wallets/create/create-a-wallet) | [发送交易](https://docs.privy.io/wallets/using-wallets/ethereum/send-a-transaction) | [签署交易](https://docs.privy.io/wallets/using-wallets/ethereum/sign-a-transaction)
* 0x:[文档](https://docs.0x.org/) | [指南](https://0x.org/docs/0x-swap-api/guides/swap-tokens-with-0x-swap-api)
* Monad:[支持的工具和基础设施](/zh/tooling-and-infra)
1. 创建您的 0x 账户:
前往 [0x 仪表盘](https://dashboard.0x.org/create-account) 并创建您的账户。
在下一页,请确保保存您的 API Key。
2. 获取您的 API Key:
要获取您的 API key,请创建一个应用,然后前往 API Keys。
复制该 API key 并保存以备后用。
## 设置
1. 克隆仓库:
```bash theme={null}
git clone https://github.com/monad-developers/next-serwist-privy-0x.git
```
2. `cd` 进入项目目录:
```bash theme={null}
cd next-serwist-privy-0x
```
3. 安装依赖:
```bash theme={null}
npm install
```
4. 在根目录创建 `.env.local` 文件:
```bash theme={null}
cp .env.example .env.local
```
5. 开始向 `.env.local` 文件添加环境变量:
```bash theme={null}
# Privy
NEXT_PUBLIC_PRIVY_APP_ID=your_privy_app_id_here
NEXT_PUBLIC_PRIVY_CLIENT_ID= # optional, you can leave this empty
# VAPID Keys for push notifications
NEXT_PUBLIC_VAPID_PUBLIC_KEY=your_vapid_public_key_here
VAPID_PRIVATE_KEY=your_vapid_private_key_here
# 0x Configuration
ZEROX_API_KEY=your_0x_api_key_here
```
如果您丢失了 Privy App ID,可以在 Privy 仪表盘中找到。
6. 为 Web 推送通知生成 VAPID 密钥:
```bash theme={null}
npx web-push generate-vapid-keys --json
```
将生成的密钥复制到您的 .env.local 文件中(替换步骤 5 中的占位值)。
7. 运行应用:
**开发模式**:
```bash theme={null}
npm run dev
```
应用将在 [http://localhost:3000](http://localhost:3000) 上可用。
**生产模式**:
完整的 PWA 功能(包括安装提示):
```bash theme={null}
npm run build && npm run start
```
## 模板文件夹结构
```
next-serwist-privy-0x/
├── app/
│ ├── components/ # React components
│ │ ├── 0x/ # 0x Protocol integration
│ │ ├── InstallPWA.tsx # PWA install prompt
│ │ ├── SwapComponent.tsx # Token swap interface
│ │ └── ...
│ ├── api/ # API routes
│ │ ├── price/ # Token price endpoints
│ │ └── quote/ # Swap quote endpoints
│ ├── ~offline/ # Offline page
│ └── ...
├── public/ # Static assets
├── utils/ # Utility functions
└── ...
```
## 更改应用名称
* 编辑 [`public/manifest.json`](https://github.com/monad-developers/next-serwist-privy-0x/blob/main/public/manifest.json):
* 修改 `name` 和 `short_name` 字段
* 运行 `npm run build` 更新应用
## 通知设置
要接收此应用的推送通知,您需要在浏览器和/或系统设置中启用通知:
### 浏览器设置
1. 点击地址栏中的锁形图标 🔒
2. 将 "Notifications" 设置为 "Allow"
3. 或前往 Settings → Privacy and security → Site Settings → Notifications
1. 点击地址栏中的盾牌图标 🛡️
2. 如有需要,为此站点关闭 "Enhanced Tracking Protection"
3. 在出现提示时允许通知
4. 或前往 Settings → Privacy & Security → Permissions → Notifications
1. 前往 Safari → Settings → Websites → Notifications
2. 找到您的站点并将其设置为 "Allow"
### 系统设置
1. System Preferences → Notifications & Focus
2. 找到您的浏览器并确保通知已启用
3. 在浏览器设置中勾选 "Allow notifications from websites"
1. Settings → System → Notifications & actions
2. 确保您的浏览器可以发送通知
3. 检查浏览器通知设置
1. Settings → Notifications → \[您的浏览器]
2. 启用 "Allow Notifications"
3. 同时在浏览器设置中启用
1. Settings → Apps → \[您的浏览器] → Notifications
2. 启用通知
3. 检查浏览器通知权限
### 需要后端集成
这需要后端实现:
* 在用户订阅时 **保存订阅数据**(参见代码中的 TODO 注释)
* 在用户取消订阅时 **删除订阅数据**
* **实现 [`/notification` 端点](https://github.com/monad-developers/next-serwist-privy-0x/blob/main/app/notification/route.ts)** 以发送实际的推送通知
* 使用 **`web-push` 库** 或类似方案进行服务器端通知投递
### 自定义通知内容
要自定义推送通知内容,请编辑 [`app/notification/route.ts`](https://github.com/monad-developers/next-serwist-privy-0x/blob/main/app/notification/route.ts) ,并修改 `sendNotification` 调用中的 `title`、`message`、`icon` 及其他属性。
## 修改应用图标和启动画面
### 应用图标
将 [`public/icons/`](https://github.com/monad-developers/next-serwist-privy-0x/tree/main/public/icons) 目录下的图标文件替换为您的自定义图标:
* **`icon-512x512.png`** - 主应用图标(512×512px)
* **`android-chrome-192x192.png`** - Android 图标(192×192px)
* **`apple-touch-icon.png`** - iOS 主屏幕图标(180×180px)
同时更新 favicon:
* **[`public/favicon.ico`](https://github.com/monad-developers/next-serwist-privy-0x/blob/main/public/favicon.ico)** - 浏览器 favicon
* **[`app/favicon.ico`](https://github.com/monad-developers/next-serwist-privy-0x/blob/main/app/favicon.ico)** - Next.js 应用 favicon
### 启动画面
启动画面根据您的应用图标和在以下位置定义的主题颜色自动生成: [`manifest.json`](https://github.com/monad-developers/next-serwist-privy-0x/blob/main/public/manifest.json)。要自定义:
1. 在以下位置更新 `theme_color` 和 `background_color`: [`manifest.json`](https://github.com/monad-developers/next-serwist-privy-0x/blob/main/public/manifest.json)
2. 确保您的主图标(`icon-512x512.png`)代表您的品牌
3. 运行 `npm run build` 以应用更改
使用 [PWA Asset Generator](https://www.pwabuilder.com/imageGenerator) 等工具从单张源图片生成所有所需的图标尺寸。
## 添加更多代币
该模板目前支持 WMON 和 USDT 代币。要添加更多可交易代币,请按以下步骤操作:
### 1. 查找代币信息
在添加代币之前,您需要以下信息:
* **合约地址**:代币的智能合约地址
* **符号**:代币的符号(例如 "ETH"、"USDC")
* **名称**:代币的完整名称
* **小数位数**:小数位数(大多数 ERC-20 代币为 18)
* **Logo URI**:代币 logo 图像的 URL
您可以在 0x Swap API 支持的 DEX 上找到这些信息。
要获取 0x Swap API 支持的 DEX 列表,您可以查询 [sources](https://api.0x.org/sources) 端点。参考文档见 [getSources](https://0x.org/docs/api#tag/Sources/operation/sources::getSources) 页面。
### 2. 更新代币常量
编辑 [`utils/constants.ts`](https://github.com/monad-developers/next-serwist-privy-0x/blob/main/utils/constants.ts) 并在三处添加您的新代币:
#### A. 添加到 MONAD\_TESTNET\_TOKENS 数组
```typescript title="utils/constants.ts" theme={null}
export const MONAD_TESTNET_TOKENS: Token[] = [
// ... existing tokens ...
{
chainId: 1,
name: "Your Token Name",
symbol: "YOUR_SYMBOL",
decimals: 18,
address: "0xYourTokenContractAddress",
logoURI: "https://your-token-logo-url.png",
},
];
```
#### B. 添加到 MONAD\_TESTNET\_TOKENS\_BY\_SYMBOL 记录
```typescript title="utils/constants.ts" theme={null}
export const MONAD_TESTNET_TOKENS_BY_SYMBOL: Record = {
// ... existing tokens ...
your_symbol: {
// lowercase key
chainId: 1,
name: "Your Token Name",
symbol: "YOUR_SYMBOL",
decimals: 18,
address: "0xYourTokenContractAddress",
logoURI: "https://your-token-logo-url.png",
},
};
```
#### C. 添加到 MONAD\_TESTNET\_TOKENS\_BY\_ADDRESS 记录
```typescript title="utils/constants.ts" theme={null}
export const MONAD_TESTNET_TOKENS_BY_ADDRESS: Record = {
// ... existing tokens ...
"0xyourtokencontractaddress": {
// lowercase address
chainId: 1,
name: "Your Token Name",
symbol: "YOUR_SYMBOL",
decimals: 18,
address: "0xYourTokenContractAddress", // original case
logoURI: "https://your-token-logo-url.png",
},
};
```
### 3. 示例:添加 shMON
以下是添加 USDC 的完整示例:
```typescript title="utils/constants.ts" theme={null}
// In MONAD_TESTNET_TOKENS array
{
chainId: 1,
name: "shMonad",
symbol: "shMON",
decimals: 18,
address: "0x3a98250F98Dd388C211206983453837C8365BDc1",
logoURI: "put_your_logo_url_here_or_use_the_default_logo",
},
// In MONAD_TESTNET_TOKENS_BY_SYMBOL record
shmon: {
chainId: 1,
name: "shMonad",
symbol: "shMON",
decimals: 18,
address: "0x3a98250F98Dd388C211206983453837C8365BDc1",
logoURI: "put_your_logo_url_here_or_use_the_default_logo",
},
// In MONAD_TESTNET_TOKENS_BY_ADDRESS record
"0x3a98250F98Dd388C211206983453837C8365BDc1": {
chainId: 1,
name: "shMonad",
symbol: "shMON",
decimals: 18,
address: "0x3a98250F98Dd388C211206983453837C8365BDc1",
logoURI: "put_your_logo_url_here_or_use_the_default_logo",
},
```
### 4. 重要说明
* **小数位数**:大多数代币使用 18 位小数,但某些代币(例如 USDT、USDC)使用 6 位
* **Logo URL**:使用永久、可靠的图像 URL。考虑自行托管 logo 以获得更好的可靠性
* **测试**:在生产环境使用前,先用小额进行充分测试
* **0x 协议支持**:确保该代币在您的目标网络上受 0x 协议支持
### 5. 重新构建并测试
添加代币后:
```bash theme={null}
npm run build
npm run start
```
新代币将自动出现在 swap 界面的代币选择下拉框中。
## 配置滑点容忍度
滑点容忍度决定了您在交易中愿意接受的价格波动幅度。该应用目前使用 0x API 的默认滑点容忍度 1%(100 个基点)。
### 添加滑点配置
#### 1. 更新常量
在此处添加滑点选项: [`utils/constants.ts`](https://github.com/monad-developers/next-serwist-privy-0x/blob/main/utils/constants.ts):
```typescript title="utils/constants.ts" theme={null}
export const DEFAULT_SLIPPAGE_BPS = 100; // 1% in basis points
export const SLIPPAGE_OPTIONS = [
{ label: "0.1%", value: 10 },
{ label: "0.5%", value: 50 },
{ label: "1%", value: 100 },
{ label: "2%", value: 200 },
{ label: "3%", value: 300 },
];
```
#### 2. 更新 API 路由
为两个 API 路由都添加 `slippageBps` 参数:
**[`app/api/price/route.ts`](https://github.com/monad-developers/next-serwist-privy-0x/blob/main/app/api/price/route.ts) and [`app/api/quote/route.ts`](https://github.com/monad-developers/next-serwist-privy-0x/blob/main/app/api/quote/route.ts):**
```typescript title="app/api/price/route.ts" theme={null}
export async function GET(request: NextRequest) {
const searchParams = request.nextUrl.searchParams;
// Add default slippage if not provided
if (!searchParams.has("slippageBps")) {
searchParams.set("slippageBps", "100"); // 1% default
}
const res = await fetch(
`https://api.0x.org/swap/permit2/price?${searchParams}`, // or /quote
{
headers: {
"0x-api-key": process.env.ZEROX_API_KEY as string,
"0x-version": "v2",
},
}
);
const data = await res.json();
return Response.json(data);
}
```
#### 3. 将滑点添加到组件
更新价格/报价请求以包含 `slippageBps` 参数:
**In [`app/components/0x/price.tsx`](https://github.com/monad-developers/next-serwist-privy-0x/blob/main/app/components/0x/price.tsx):**
```typescript title="app/components/0x/price.tsx" theme={null}
const [slippageBps, setSlippageBps] = useState(DEFAULT_SLIPPAGE_BPS);
// Add slippageBps to your API request parameters
const priceRequest = useMemo(
() => ({
chainId,
sellToken: sellTokenObject.address,
buyToken: buyTokenObject.address,
sellAmount: parsedSellAmount,
taker,
slippageBps, // Add this
// ... other params
}),
[...dependencies, slippageBps]
);
```
### 滑点参数细节
* **范围**:0-10000 个基点(0%-100%)
* **默认**:100(1%)
* **格式**:基点(100 bps = 1%)
参考:[0x API 文档](https://0x.org/docs/api#tag/Swap/operation/swap::permit2::getPrice)
## 部署到 Vercel
### 使用 Vercel 仪表盘
1. **连接您的仓库**:
* 将您的代码推送到 GitHub
* 访问 [vercel.com](https://vercel.com) 并导入您的仓库
2. **配置环境变量**:
* 在您的 Vercel 项目仪表盘,前往 Settings → Environment Variables
* 添加与您的 `.env.local` 相同的变量:
```
NEXT_PUBLIC_PRIVY_APP_ID
NEXT_PUBLIC_PRIVY_CLIENT_ID
NEXT_PUBLIC_VAPID_PUBLIC_KEY
VAPID_PRIVATE_KEY
ZEROX_API_KEY
```
3. **部署**:Vercel 将自动构建并部署您的应用
4. **更新 Privy 设置**:在您的 Privy 仪表盘中,将您的 Vercel 域名(例如 `your-app.vercel.app`)添加到允许的来源
PWA 功能(安装提示、离线支持、推送通知)会在 HTTPS 域名上(如 Vercel 部署)自动生效。
### 使用 Vercel CLI
或者,使用 Vercel CLI 部署:
1. **安装 Vercel CLI**:
```bash theme={null}
npm i -g vercel
```
2. **登录 Vercel**:
```bash theme={null}
vercel login
```
3. **部署**:
```bash theme={null}
vercel
```
按照提示配置您的项目。
4. **添加环境变量**:
```bash theme={null}
vercel env add NEXT_PUBLIC_PRIVY_APP_ID
vercel env add NEXT_PUBLIC_PRIVY_CLIENT_ID
vercel env add NEXT_PUBLIC_VAPID_PUBLIC_KEY
vercel env add VAPID_PRIVATE_KEY
vercel env add ZEROX_API_KEY
```
您也可以前往 Vercel 仪表盘在那里添加环境变量。
5. **使用环境变量重新部署**:
```bash theme={null}
vercel --prod
```
## 了解更多
* Serwist:[文档](https://serwist.pages.dev/) | [指南](https://serwist.pages.dev/docs/next/getting-started)
* Privy:[创建钱包](https://docs.privy.io/wallets/wallets/create/create-a-wallet) | [发送交易](https://docs.privy.io/wallets/using-wallets/ethereum/send-a-transaction) | [签署交易](https://docs.privy.io/wallets/using-wallets/ethereum/sign-a-transaction)
* 0x:[文档](https://docs.0x.org/) | [指南](https://0x.org/docs/0x-swap-api/guides/swap-tokens-with-0x-swap-api)
* Monad:[支持的工具和基础设施](/zh/tooling-and-infra)