> ## Documentation Index
> Fetch the complete documentation index at: https://docs.monad.xyz/llms.txt
> Use this file to discover all available pages before exploring further.
# 如何使用 React Native Privy 嵌入式钱包模板
本指南将带您使用 [wallet 模板](https://github.com/monad-developers/react-native-privy-embedded-wallet-template),该模板使用 Expo、React Native 和 Privy 嵌入式钱包在 Monad 上构建移动应用。
开始开发时可以编辑 `app` 目录中的文件。本项目使用 [基于文件的路由](https://docs.expo.dev/router/introduction)。
该模板还有一个 `demo` 分支,您可以切换到该分支查看演示项目。
您可以使用以下命令切换:
```
git checkout demo
```
## 前置条件
* Node.js
* NPM
* Expo CLI(使用以下命令安装:`npm i -g expo-cli`)
* 一个 [Privy 账户](https://dashboard.privy.io/)
- [Android Studio](https://developer.android.com/studio)(API 版本 35 及以上)
* 为 Expo 设置 Android Studio 的指南见 [此处](https://docs.expo.dev/workflow/android-studio-emulator/)
* [XCode](https://apps.apple.com/in/app/xcode/id497799835?mt=12)
* 为 Expo 设置 iOS 模拟器的指南见 [此处](https://docs.expo.dev/workflow/ios-simulator/)
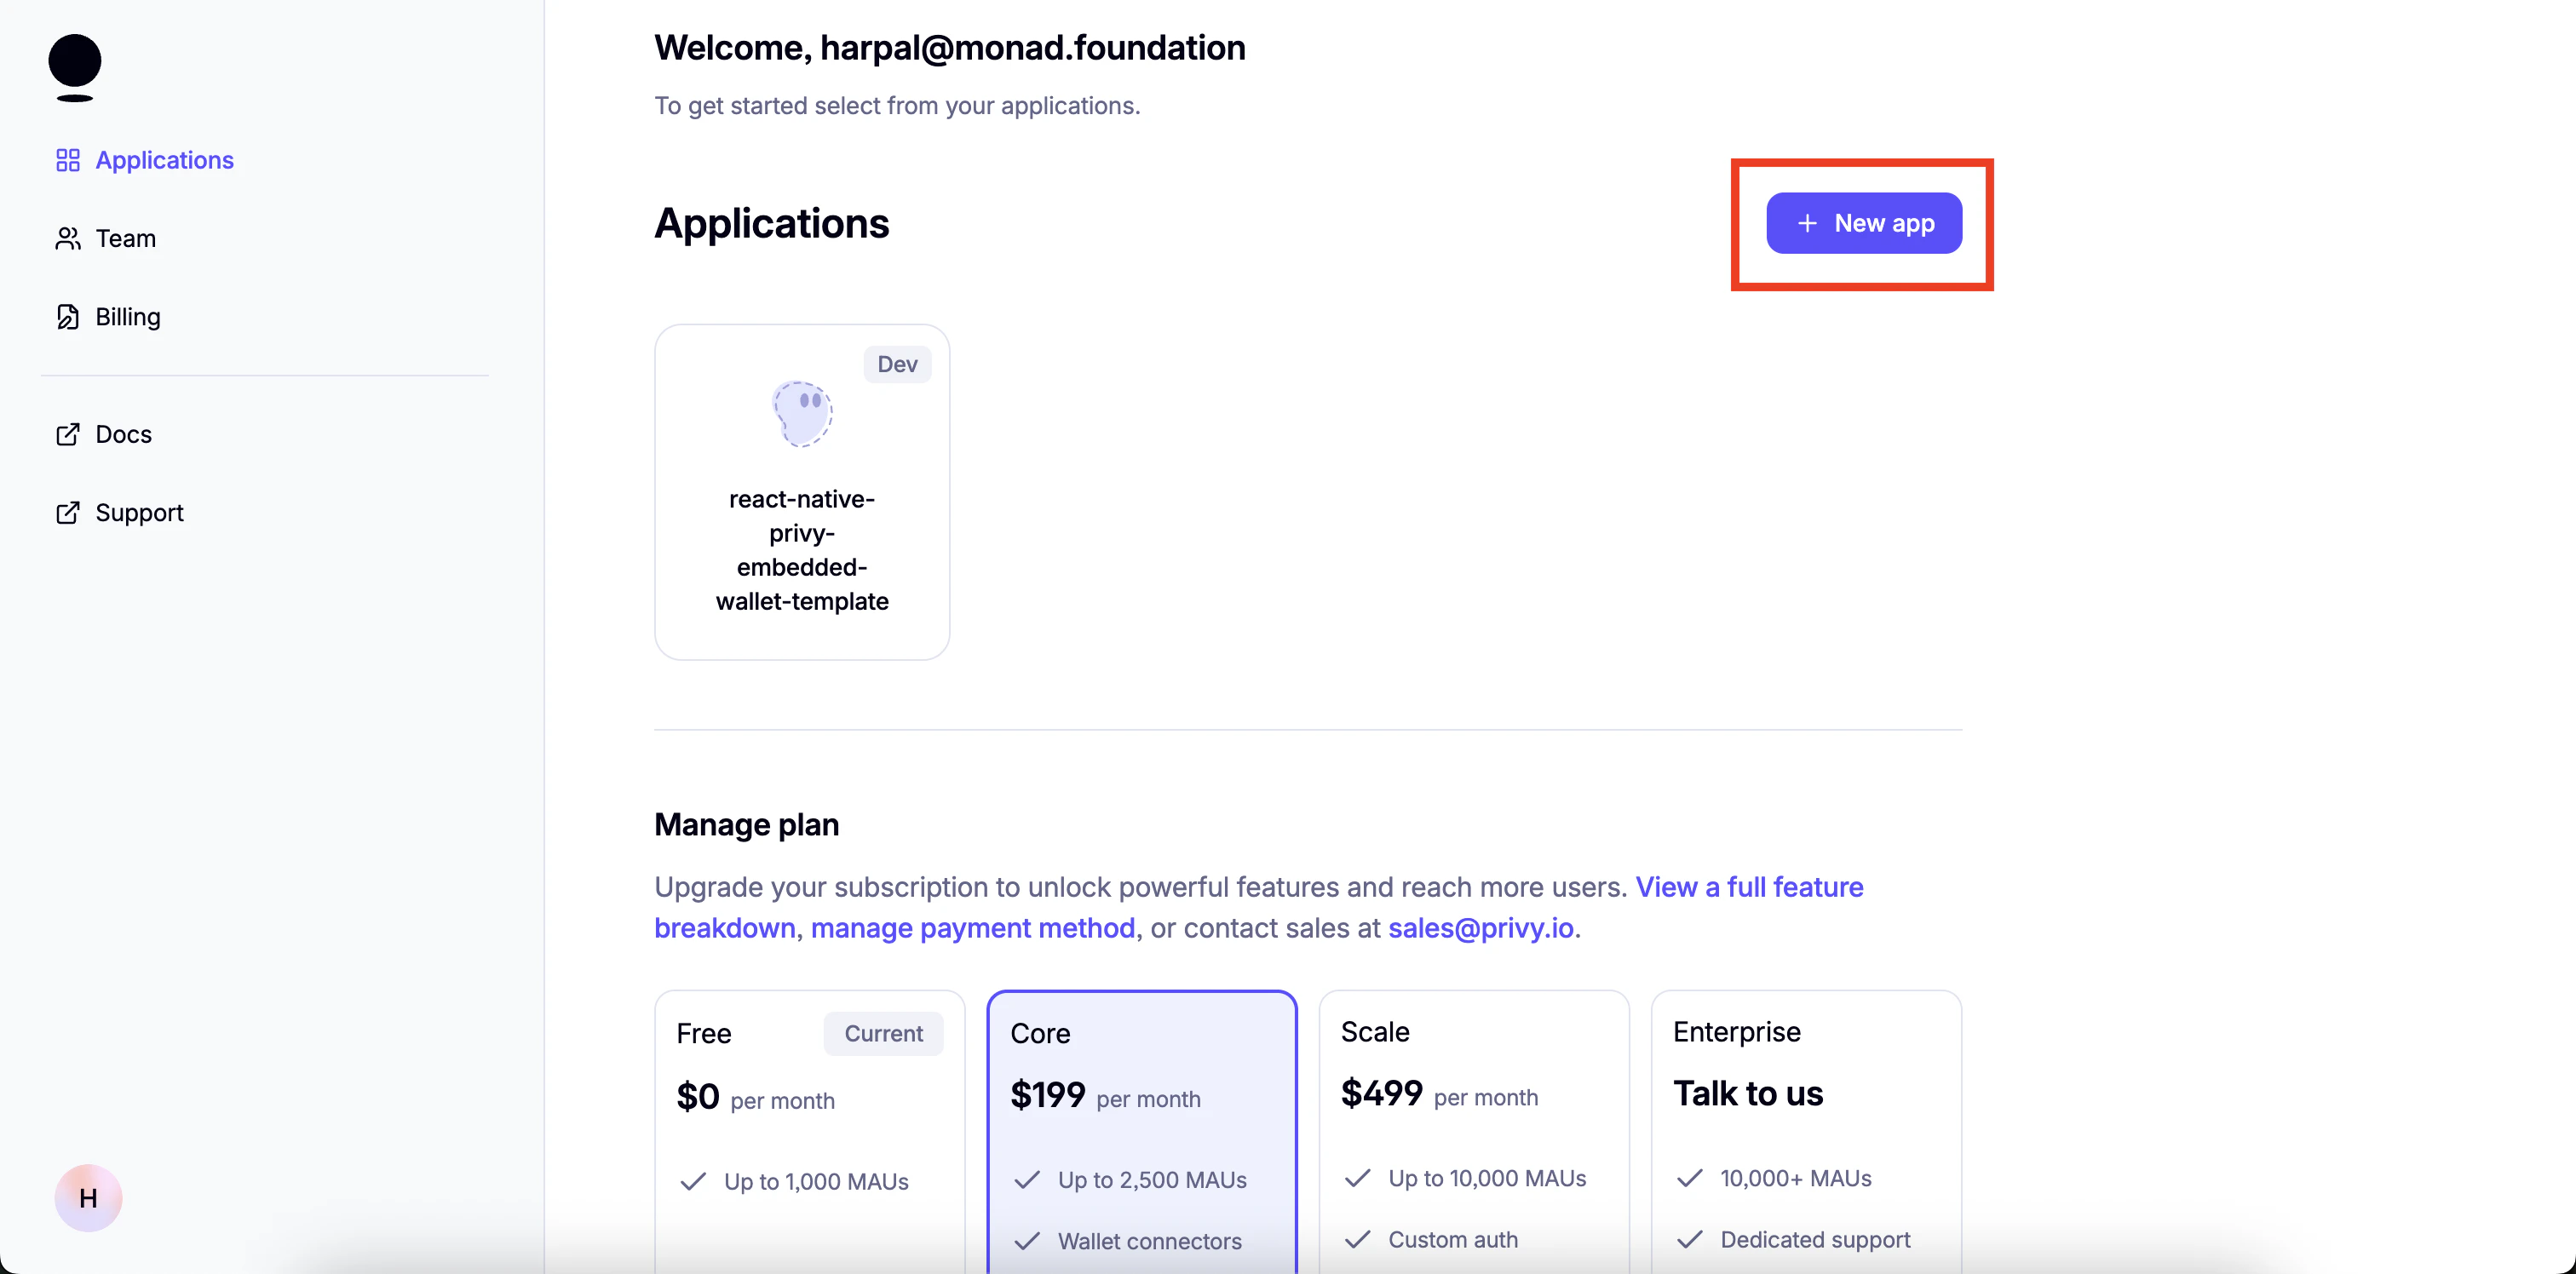
1. 创建应用:

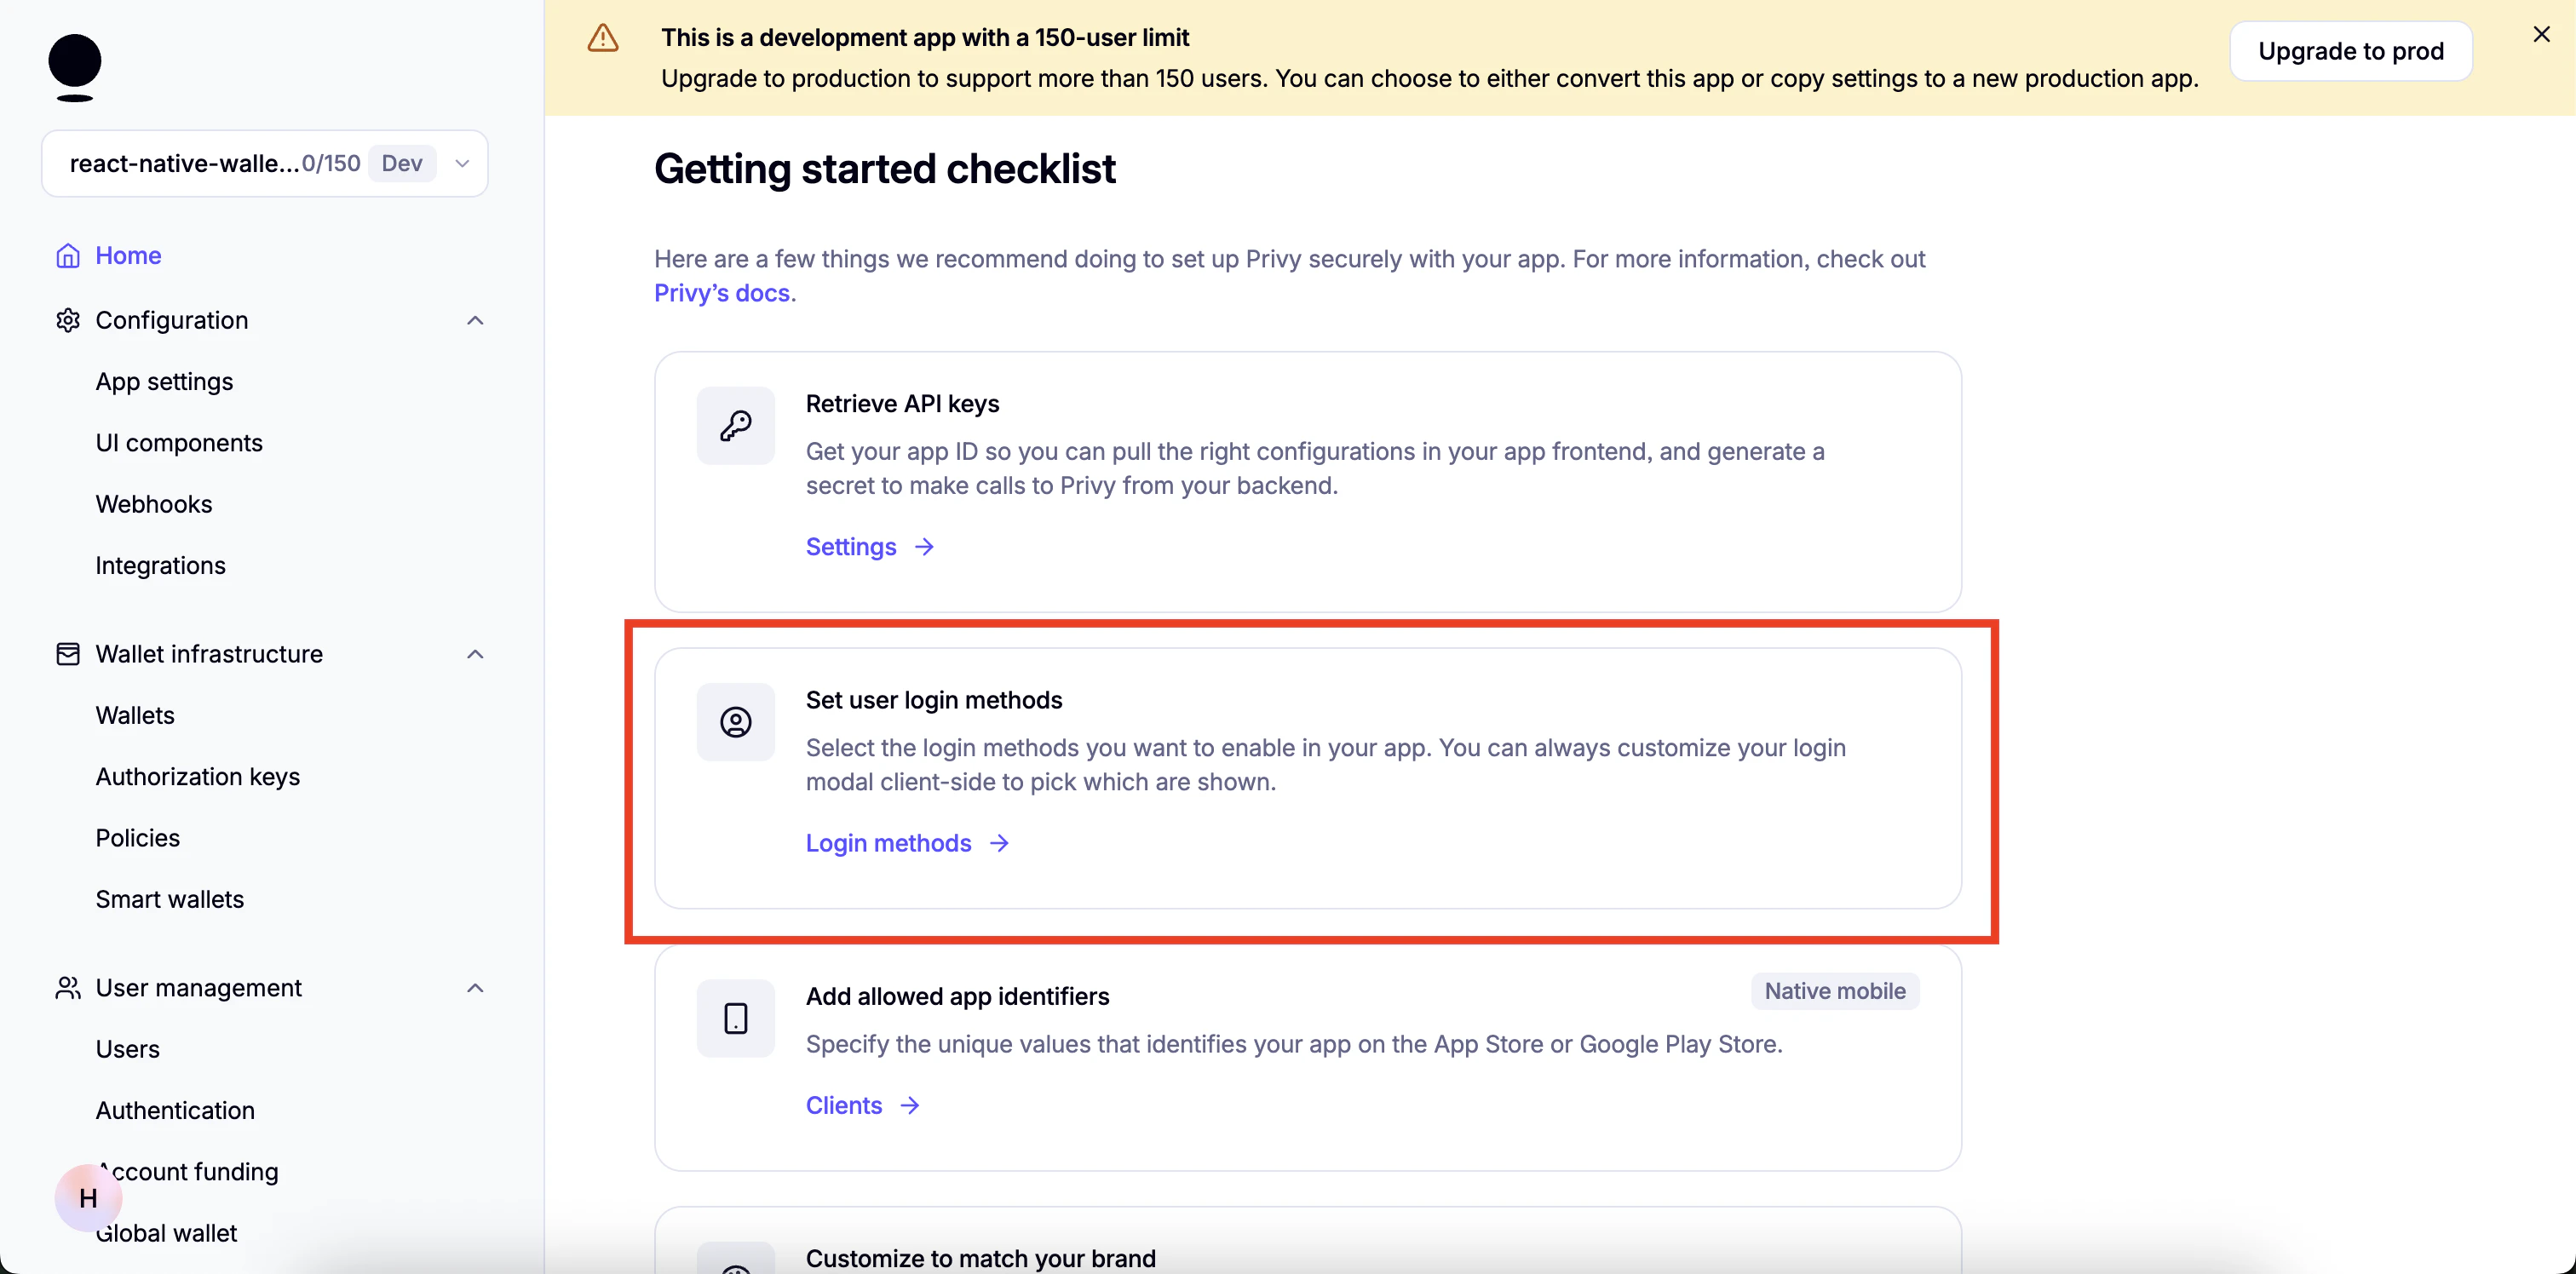
2. 设置登录方式:
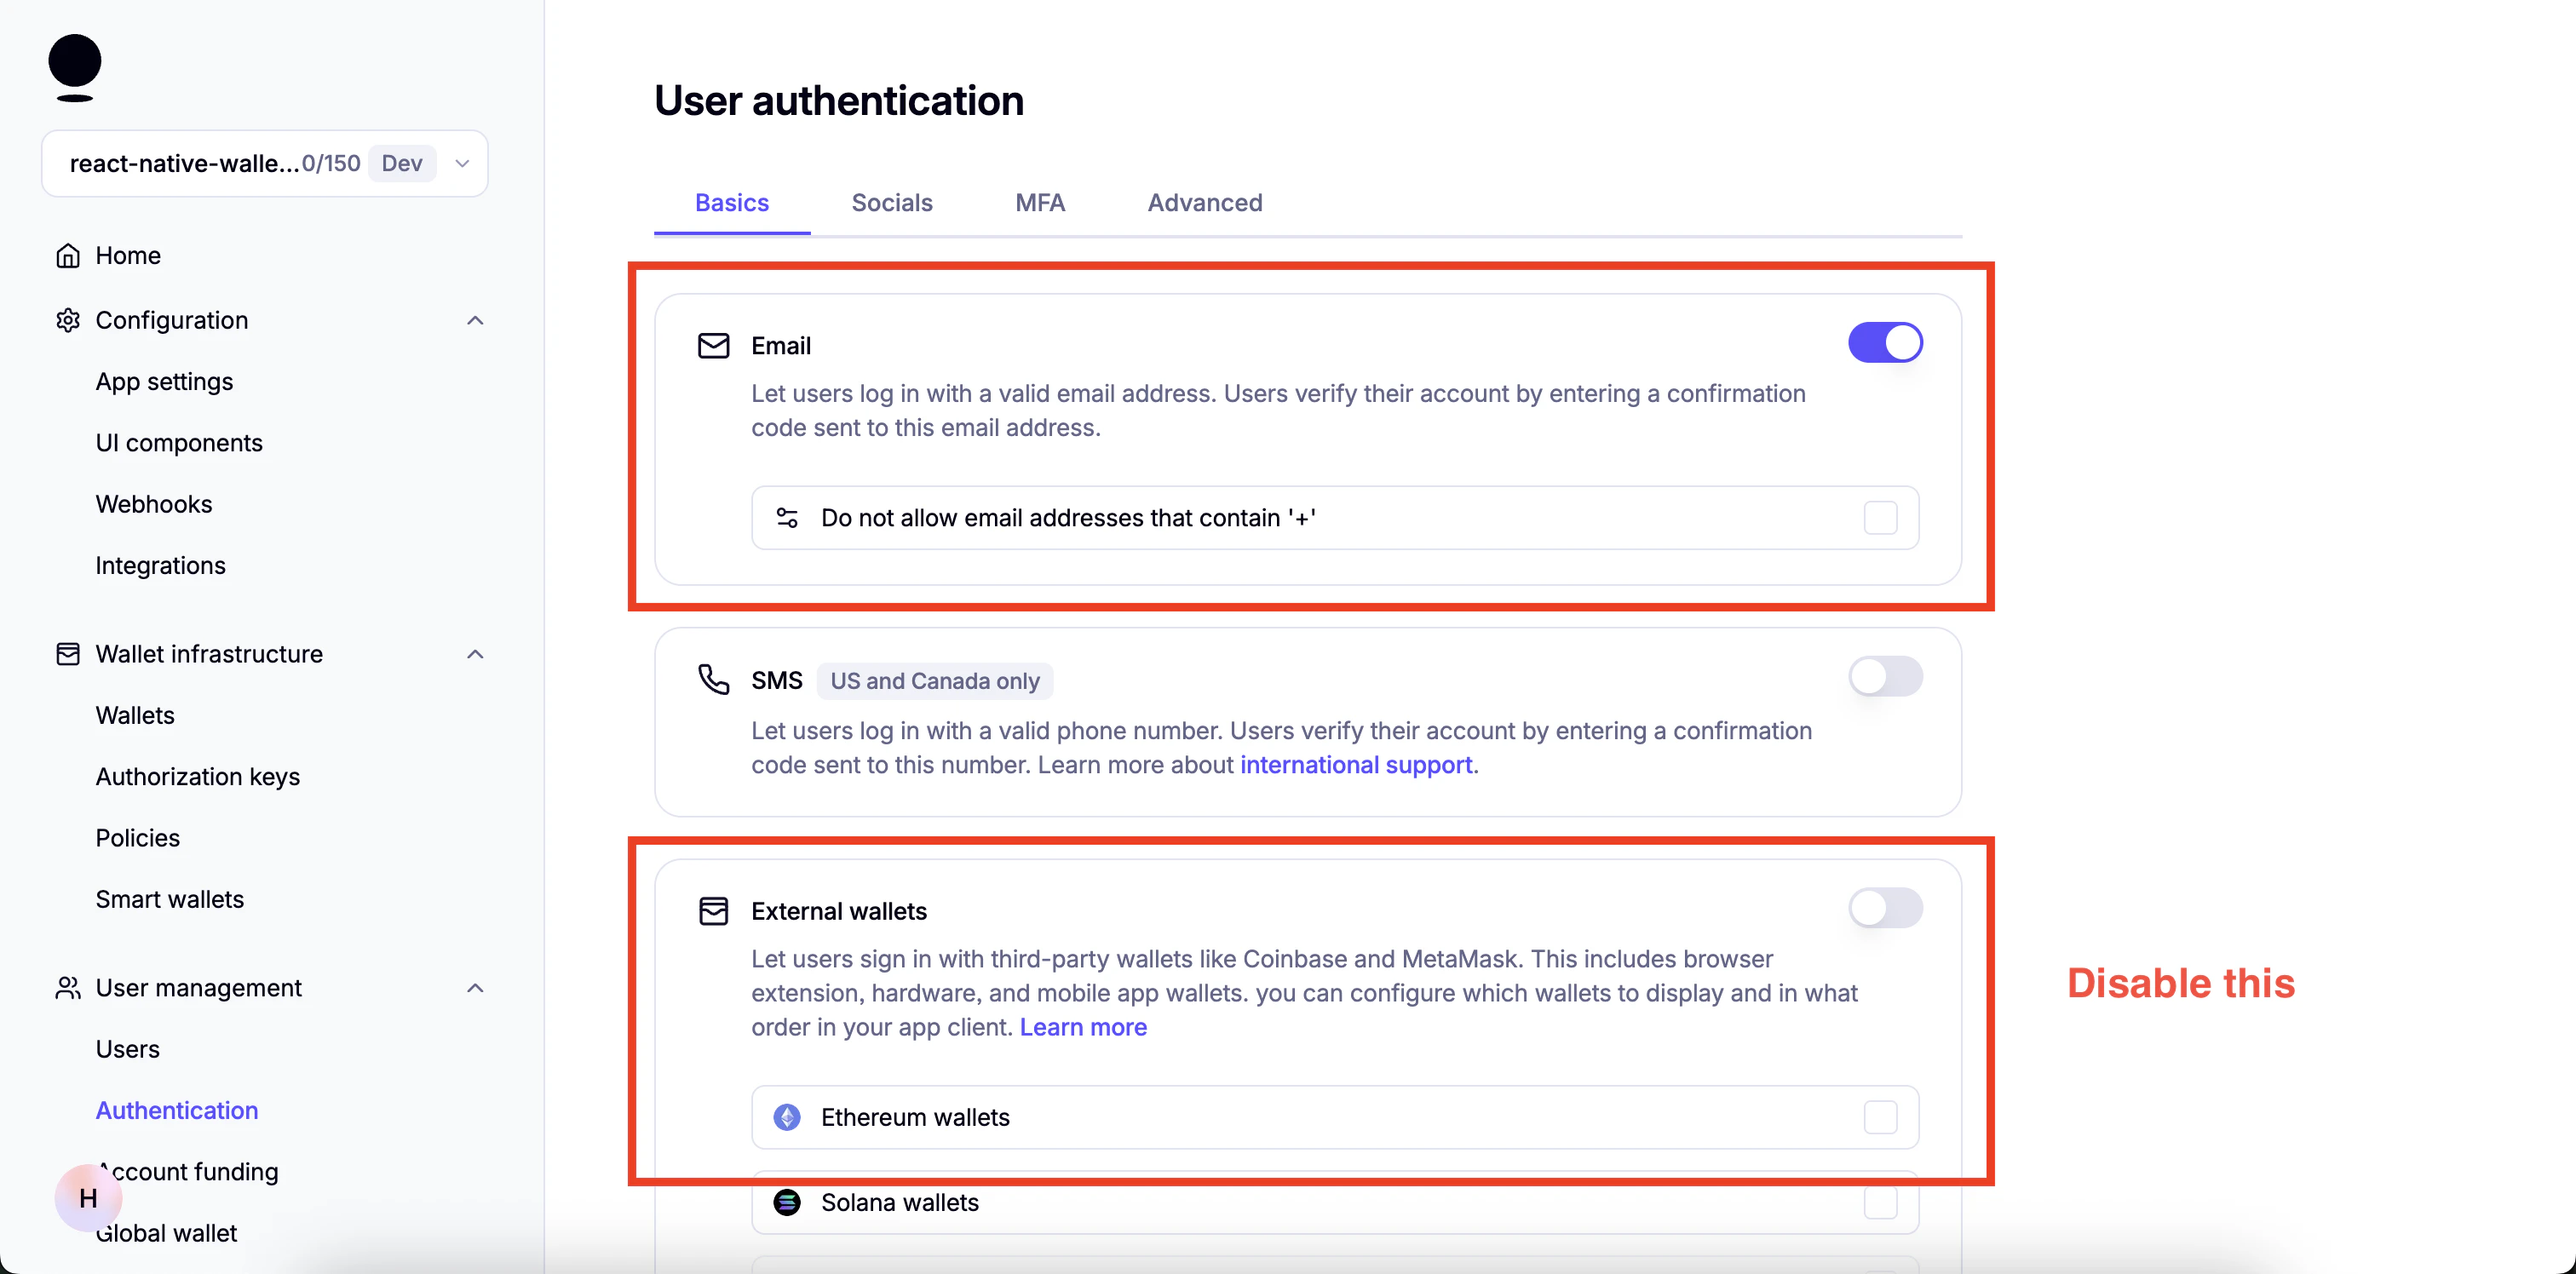
3. 启用邮箱:
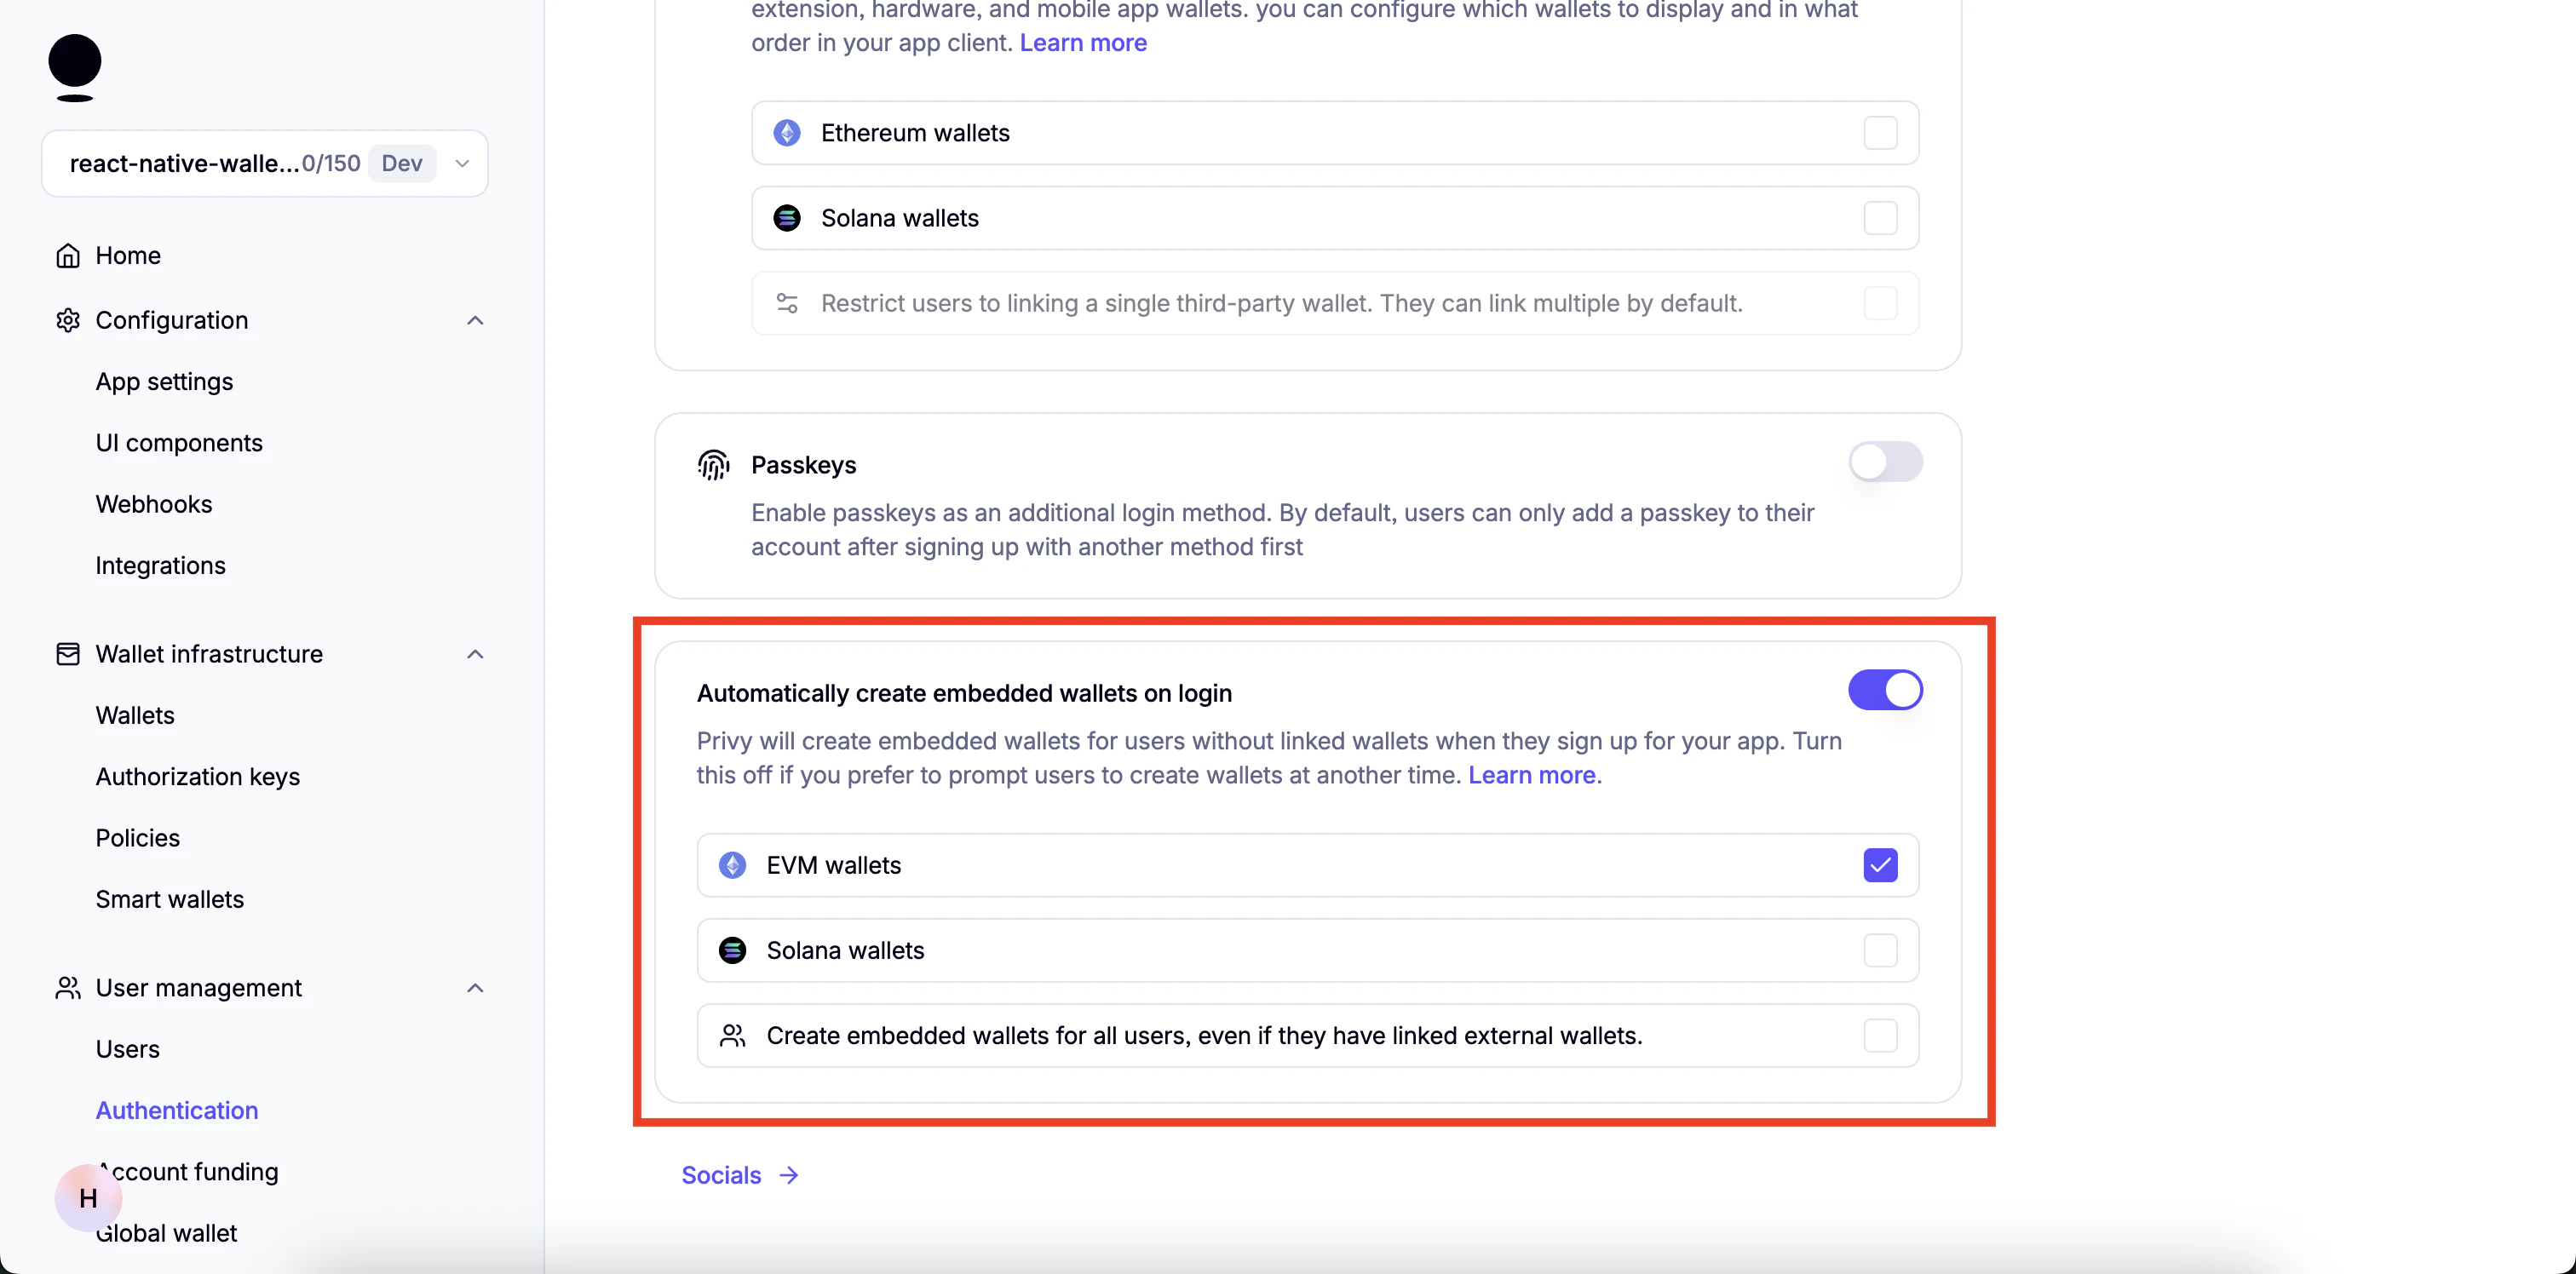
4. 启用 "Automatically create embedded wallets on login" 并选择 "EVM Wallets":
5. 在 Socials 中禁用所有项。
6. 前往 "Advanced" 并确保只启用 "Prioritize options displayed" 下的 "Web2: Email, SMS, and socials":
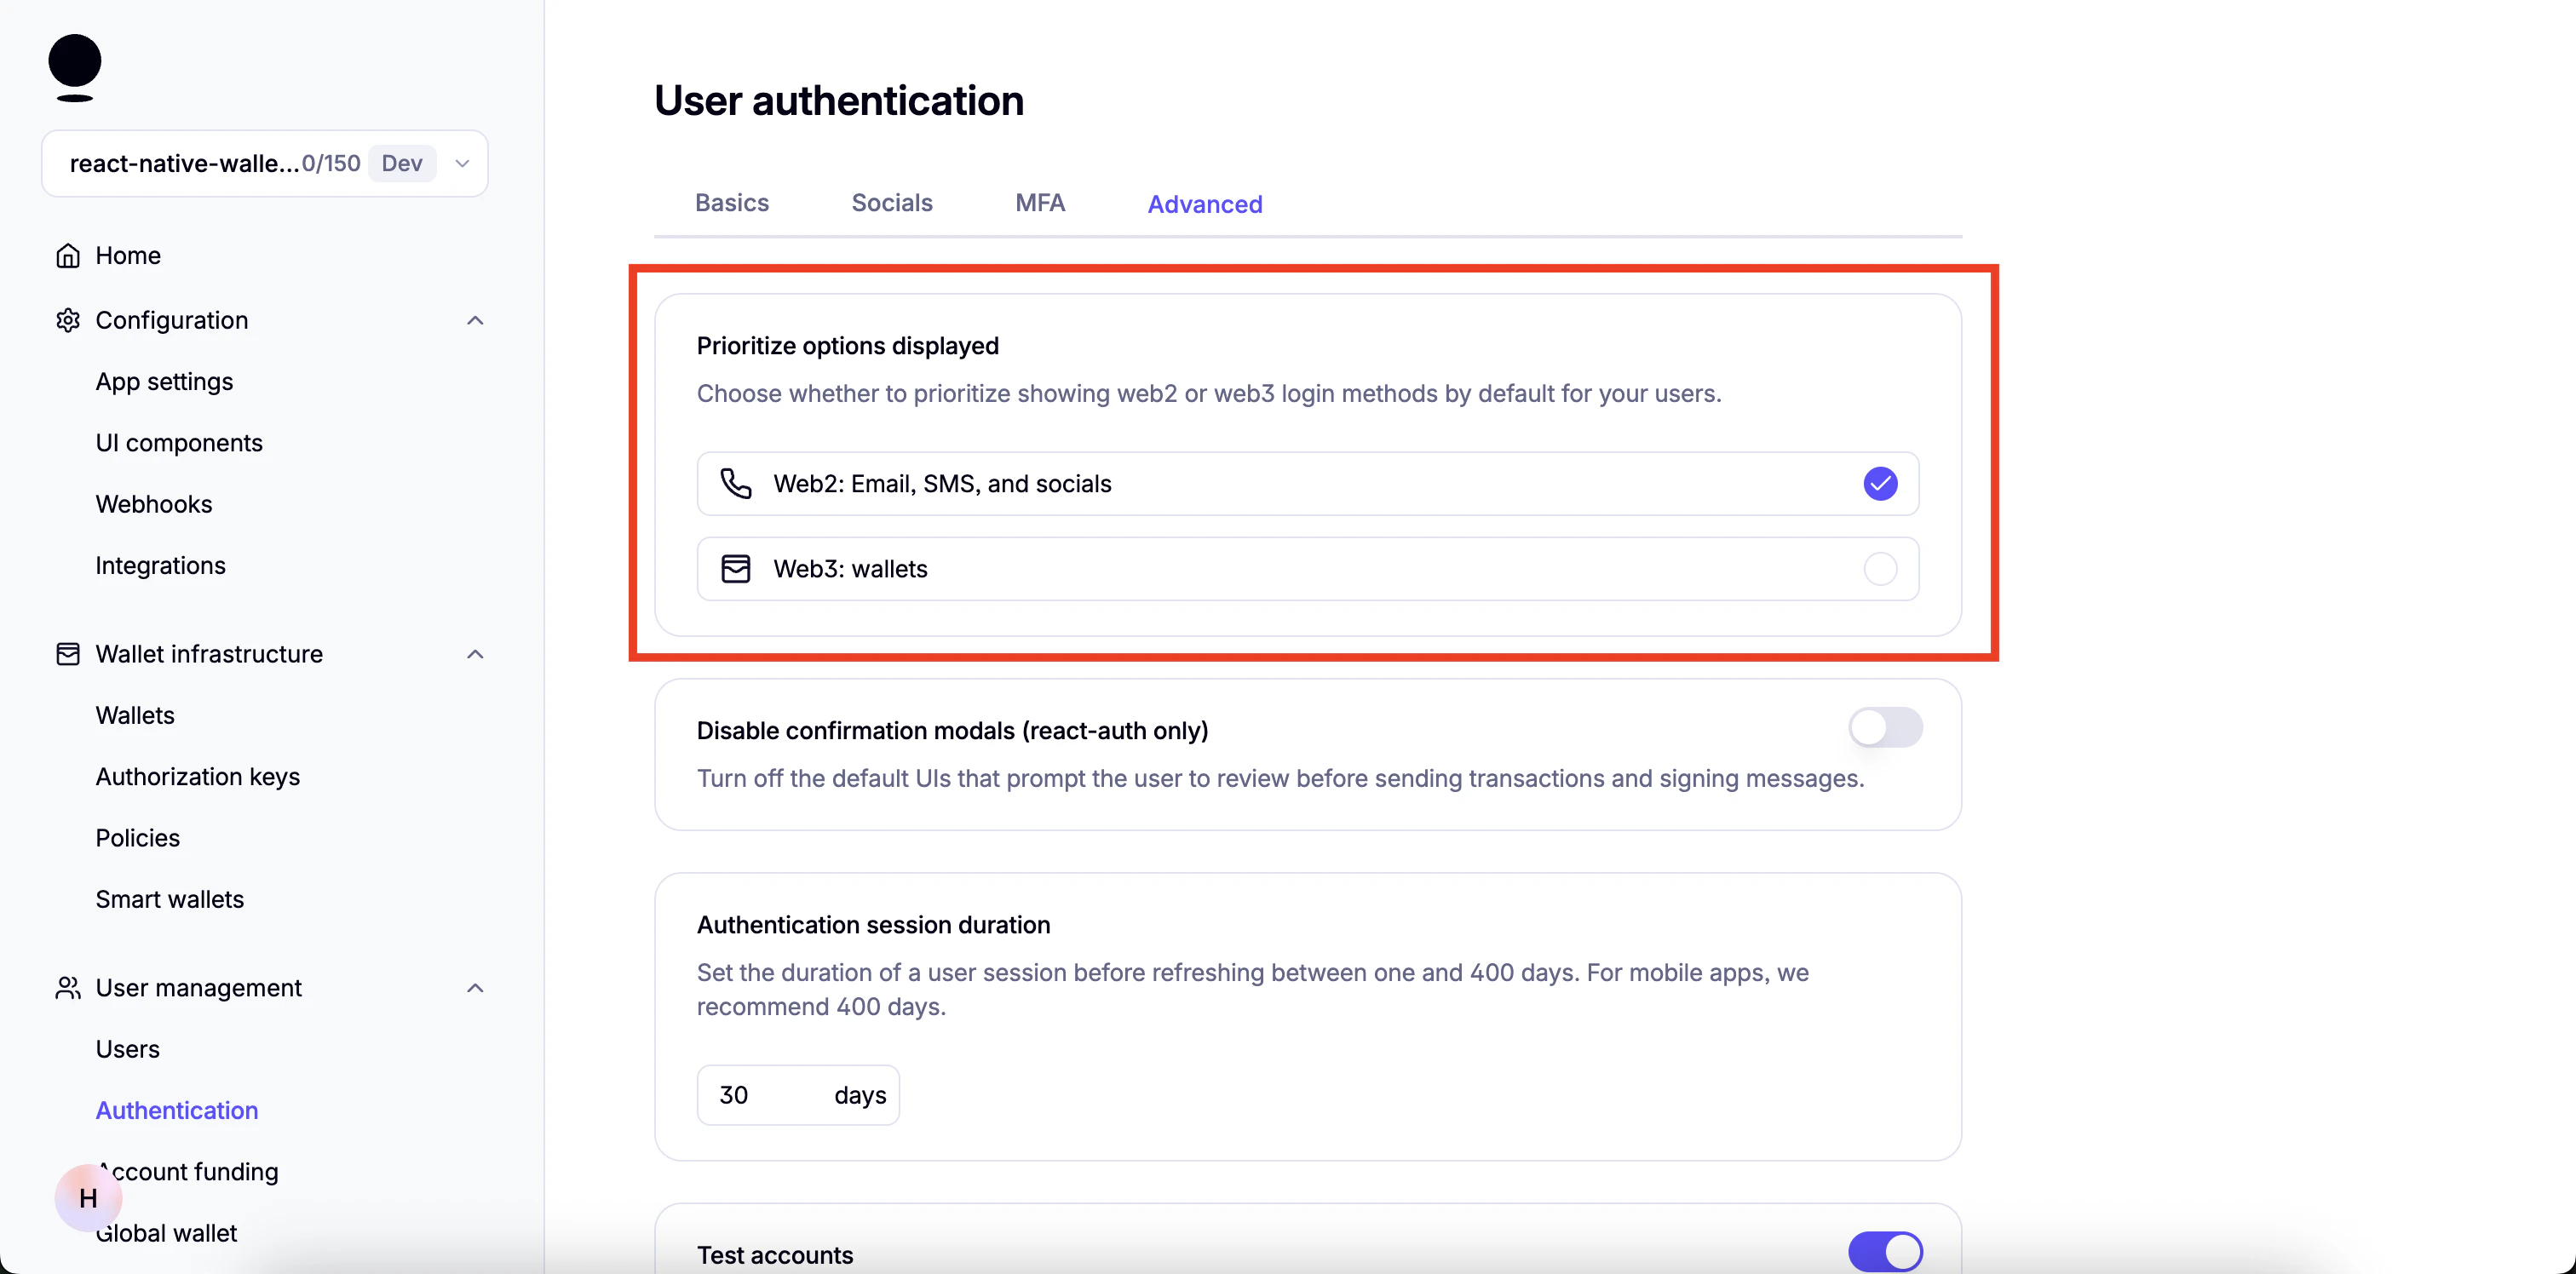
7. 提示:您可以启用 "Test Accounts" 用于测试目的:
 8. 还需要一些其他步骤,我们将在项目依赖安装完成后继续。
## 开始
该模板还有一个 `demo` 分支,您可以切换到该分支查看演示项目。
您可以使用以下命令切换:
```
git checkout demo
```
### 安装依赖
```bash theme={null}
npm install
```
### 设置环境变量
* 创建 `.env.example` 的副本
```bash theme={null}
cp .env.example .env
```
* 向其中添加以下环境变量
```
EXPO_PUBLIC_PRIVY_APP_ID=
EXPO_PUBLIC_PRIVY_CLIENT_ID=
```
1. 前往您的 Privy 仪表盘,点击您 Privy 应用的 `Home`,然后点击 `Retrieve API keys`。
8. 还需要一些其他步骤,我们将在项目依赖安装完成后继续。
## 开始
该模板还有一个 `demo` 分支,您可以切换到该分支查看演示项目。
您可以使用以下命令切换:
```
git checkout demo
```
### 安装依赖
```bash theme={null}
npm install
```
### 设置环境变量
* 创建 `.env.example` 的副本
```bash theme={null}
cp .env.example .env
```
* 向其中添加以下环境变量
```
EXPO_PUBLIC_PRIVY_APP_ID=
EXPO_PUBLIC_PRIVY_CLIENT_ID=
```
1. 前往您的 Privy 仪表盘,点击您 Privy 应用的 `Home`,然后点击 `Retrieve API keys`。
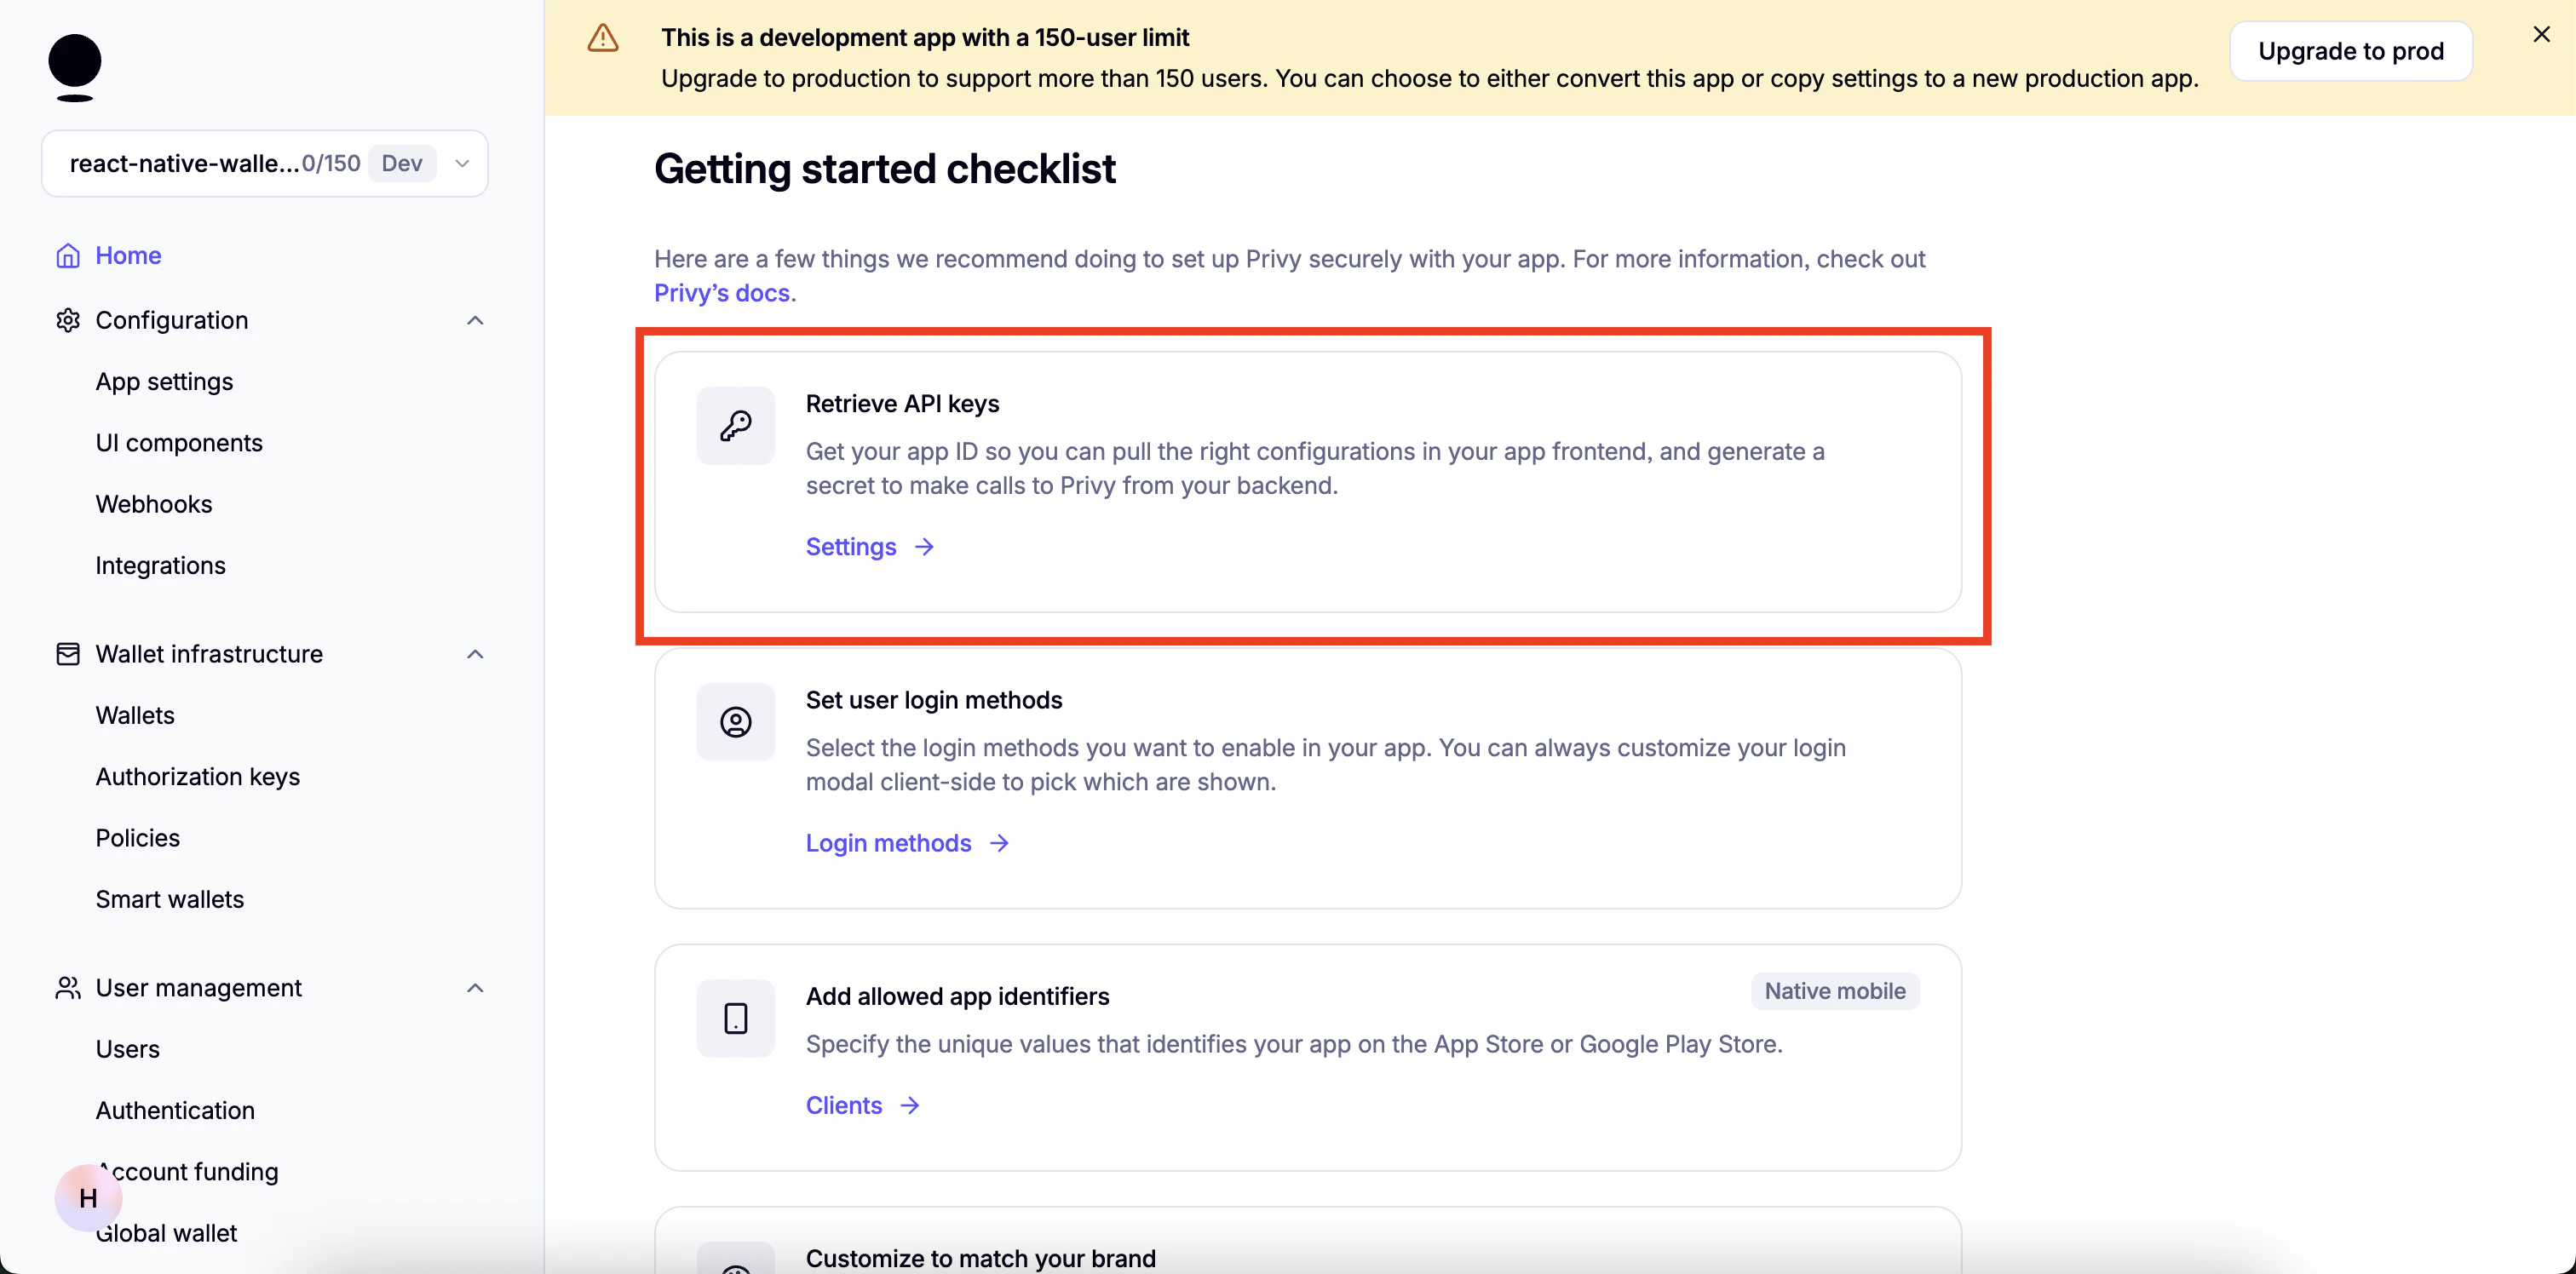 2. 您将在 `API keys` 下找到 `App ID`。
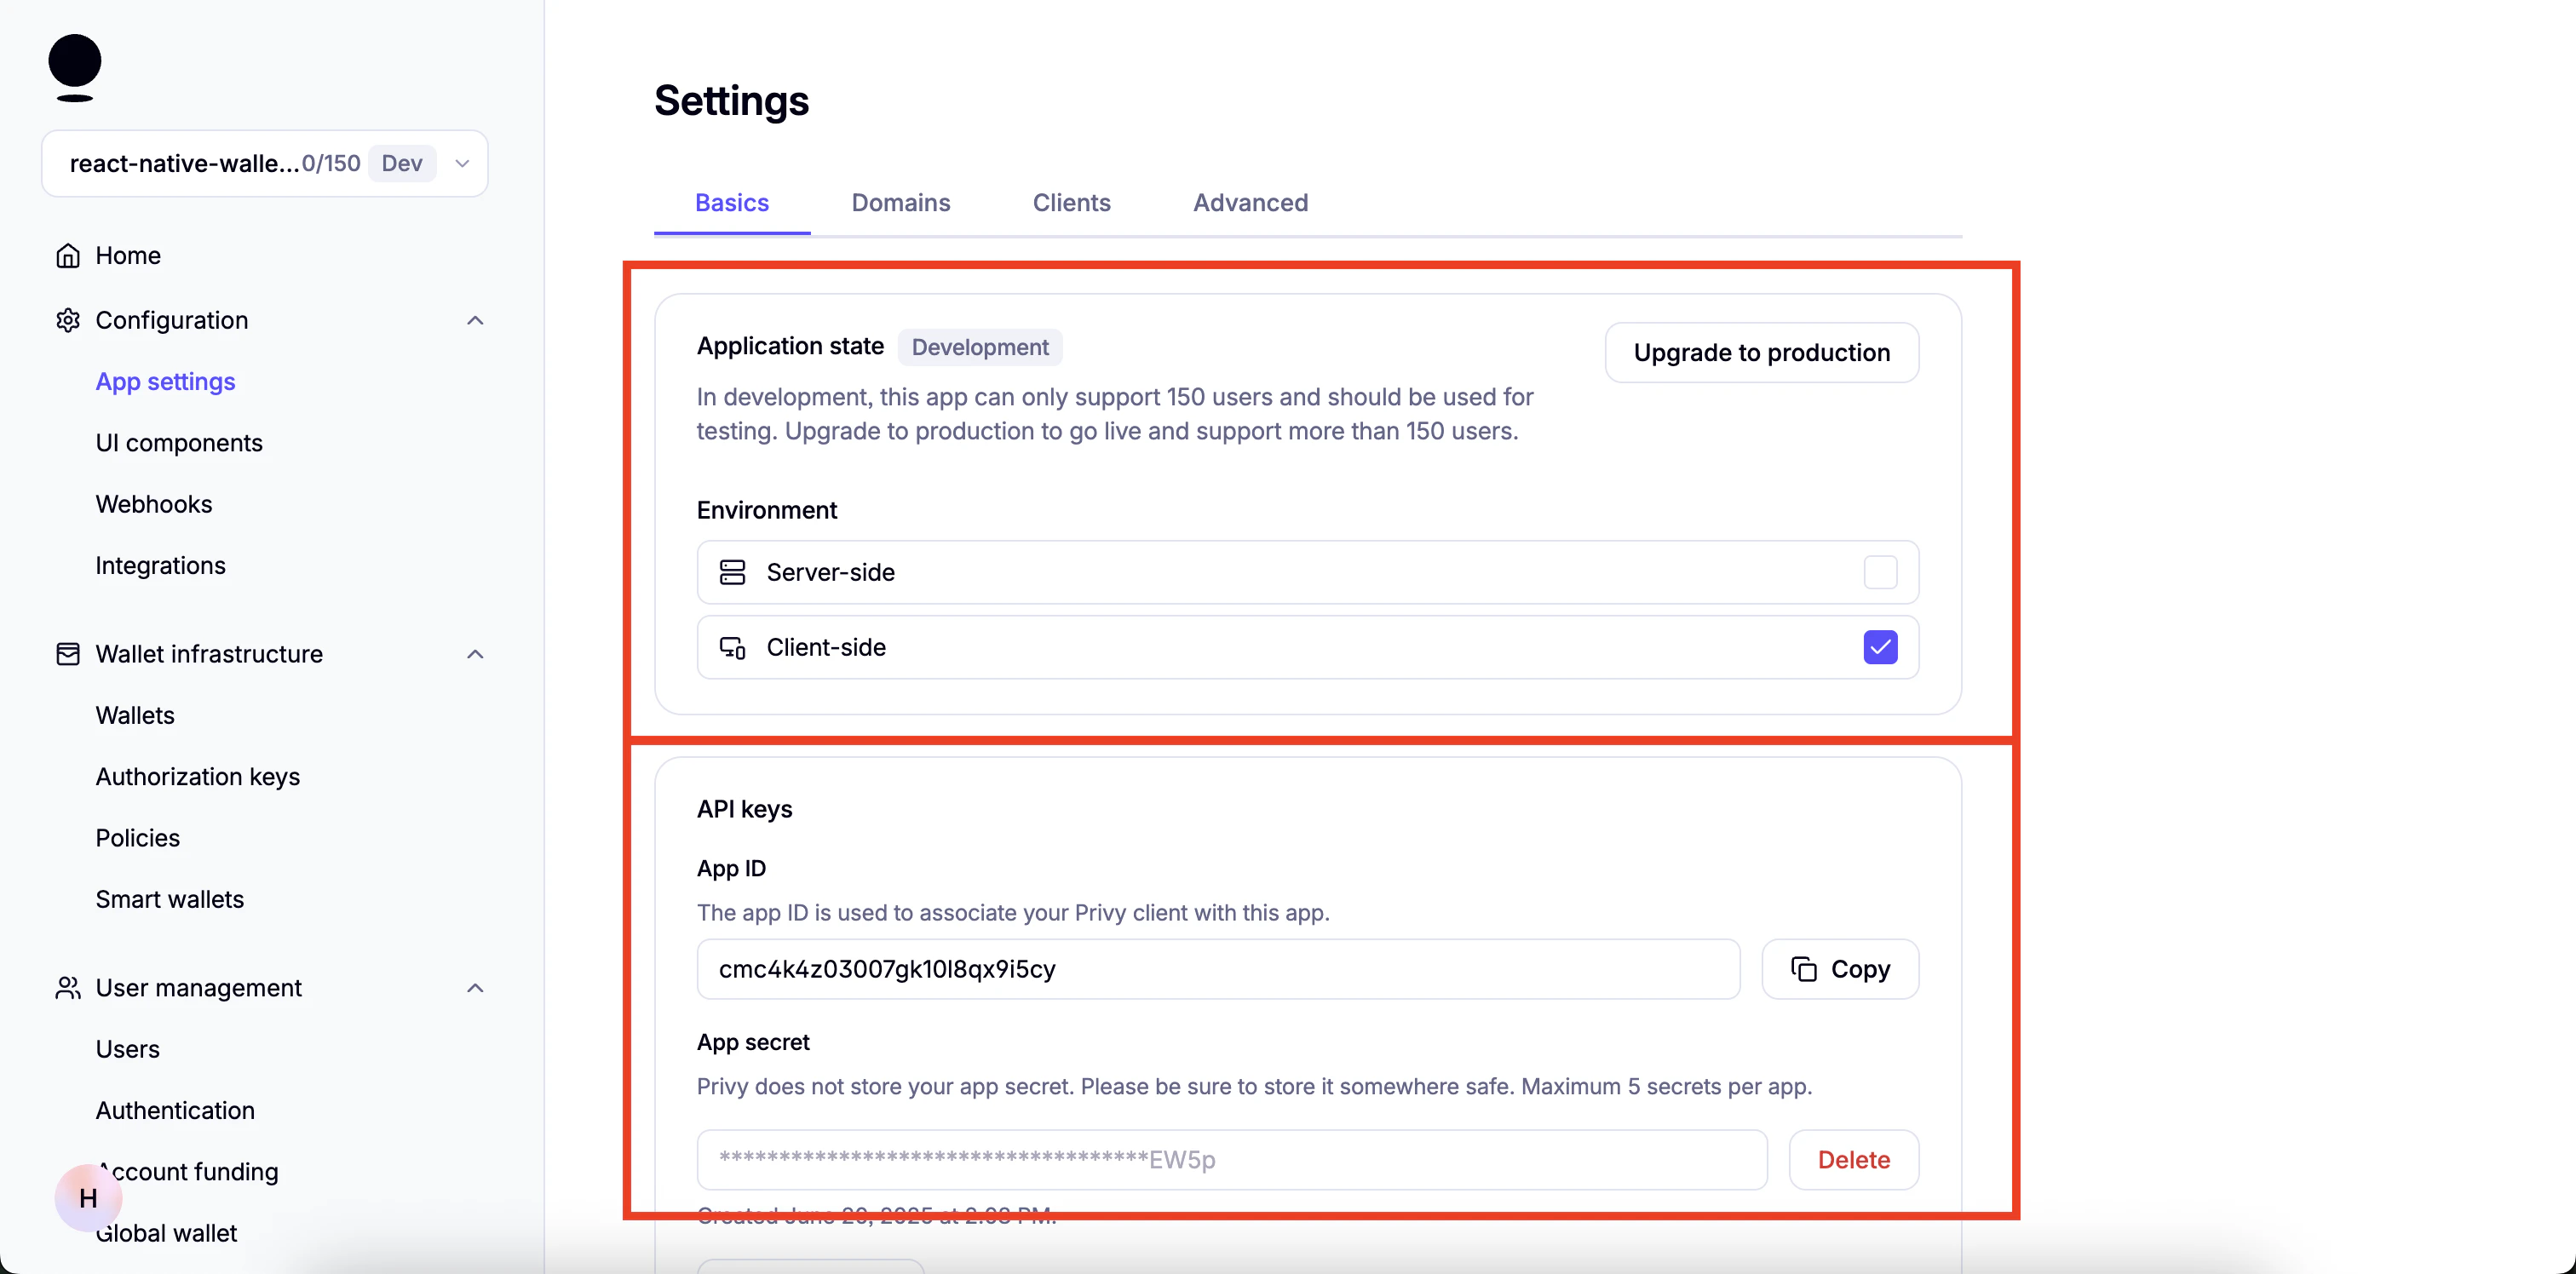 1. 前往您的 Privy 仪表盘,点击您 Privy 应用的 "Home",然后点击 `Retrieve API keys`。
2. 点击顶部的 `Clients` 标签,然后点击 `Edit`。
1. 前往您的 Privy 仪表盘,点击您 Privy 应用的 "Home",然后点击 `Retrieve API keys`。
2. 点击顶部的 `Clients` 标签,然后点击 `Edit`。
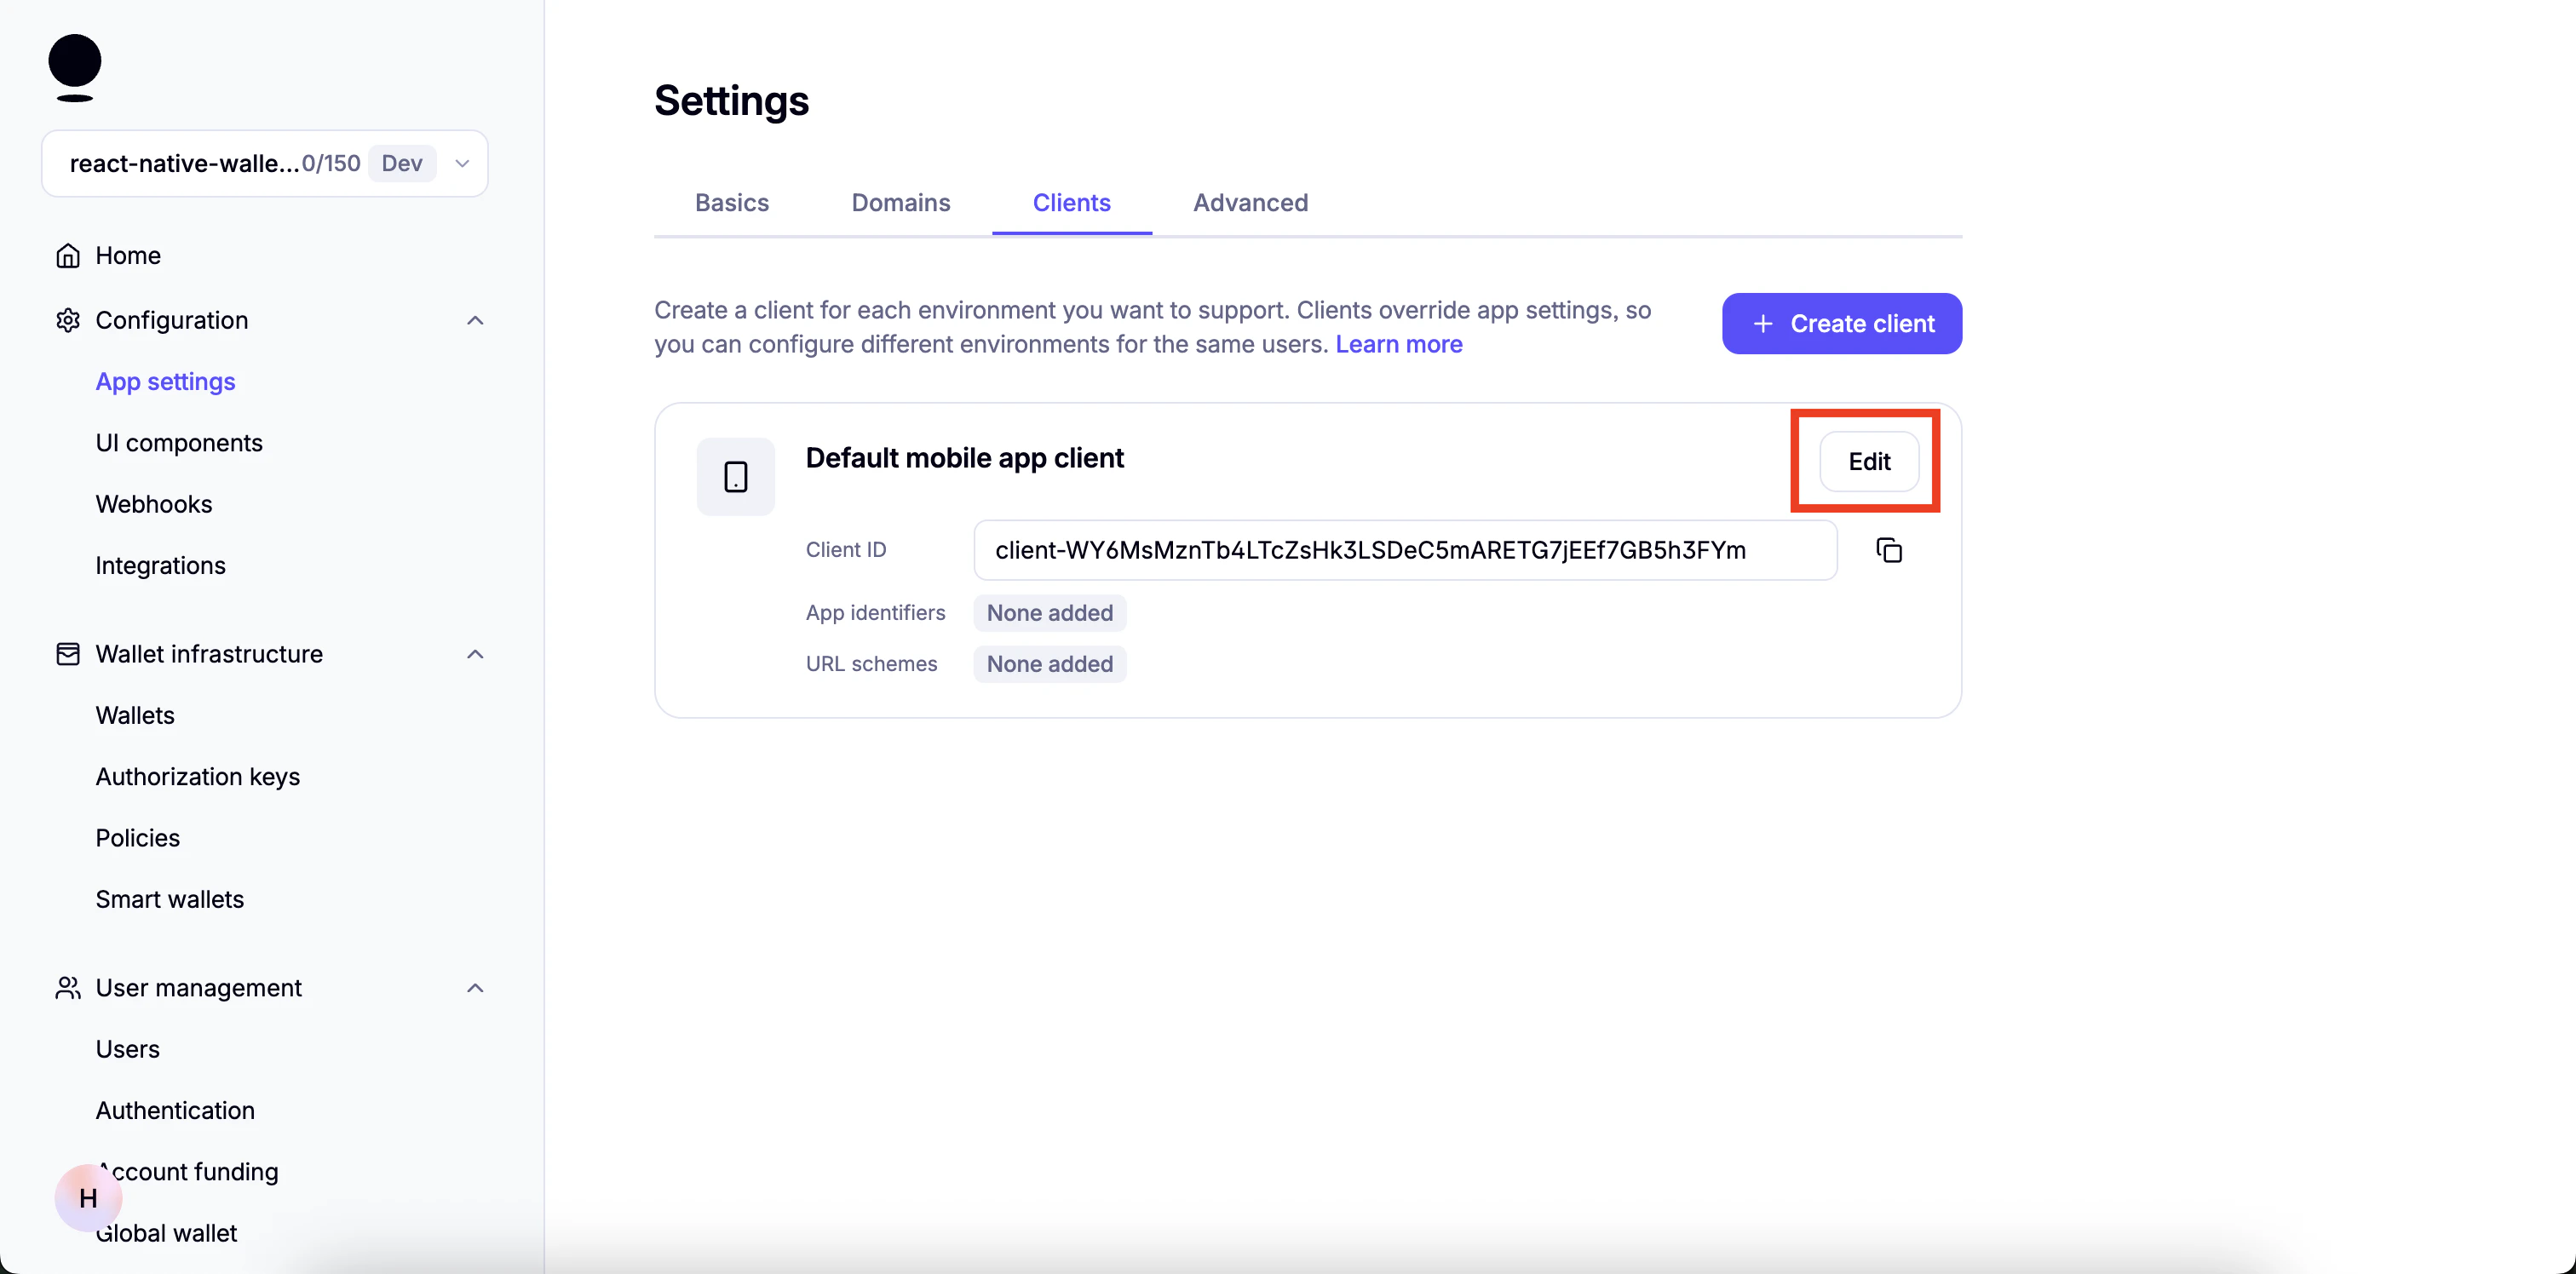 3. 在 `Allowed app identifiers` 下粘贴应用 bundle 的名称并点击 `Add`
您可以在 `app.json` 中找到应用 bundle 名称;Android 上是 `package` 属性,iOS 上是 `bundleIdentifier` 属性
3. 在 `Allowed app identifiers` 下粘贴应用 bundle 的名称并点击 `Add`
您可以在 `app.json` 中找到应用 bundle 名称;Android 上是 `package` 属性,iOS 上是 `bundleIdentifier` 属性
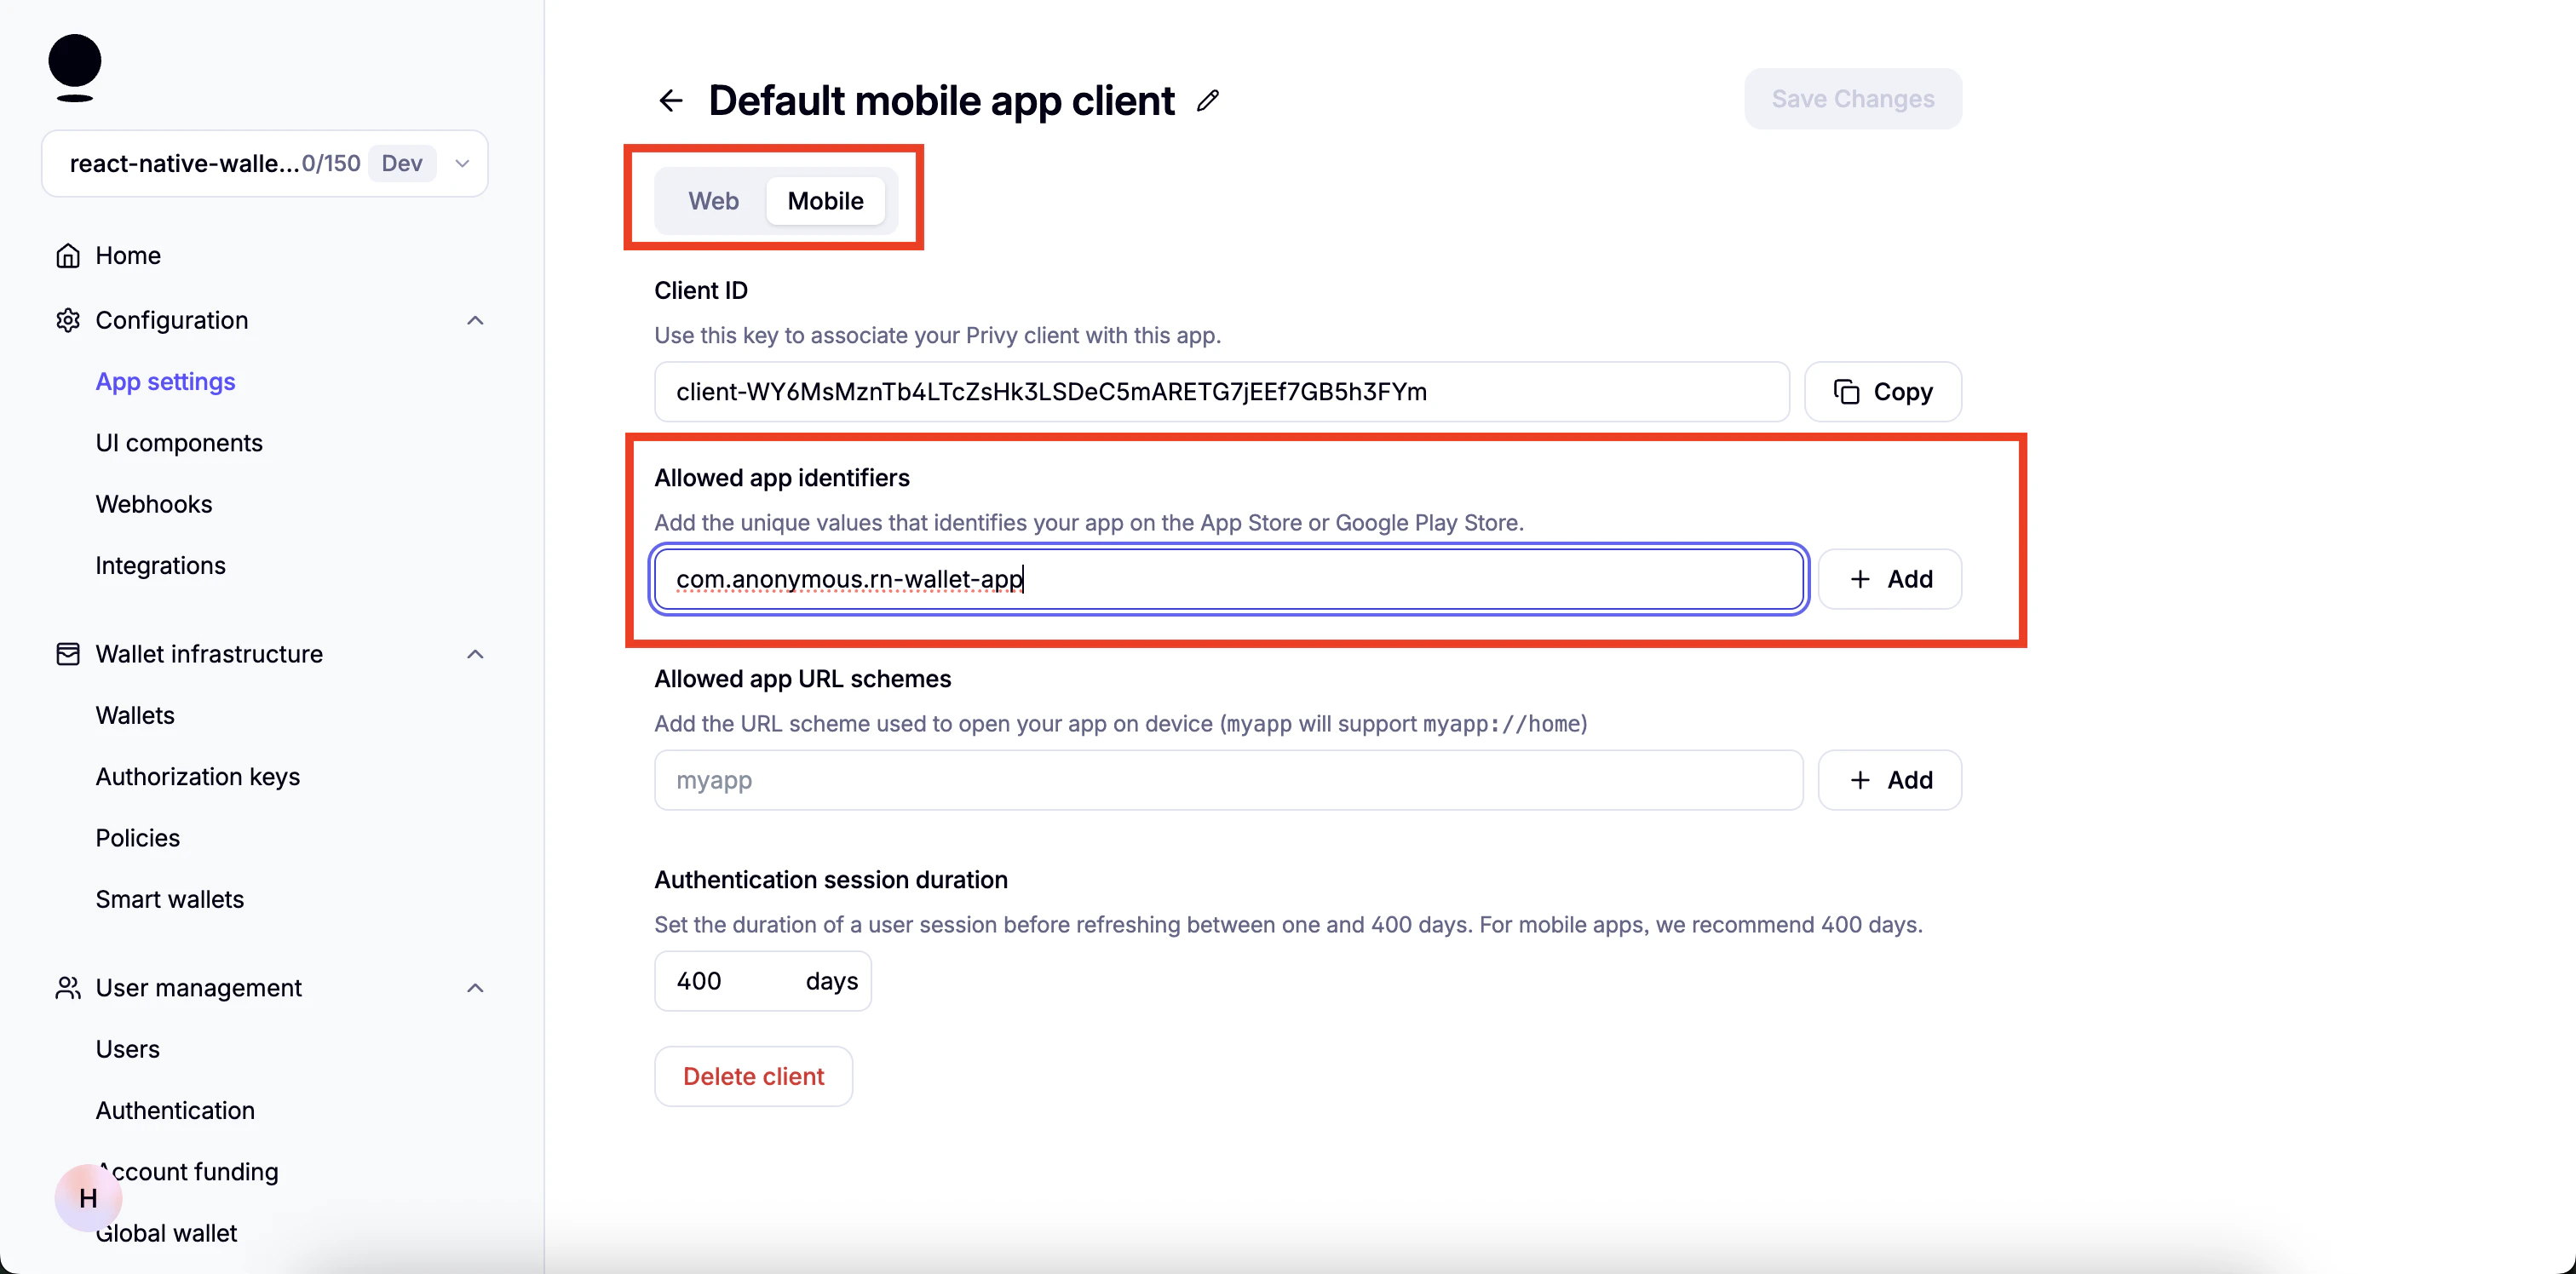 4. 您可以复制 `Client ID` 并将其用作 `EXPO_PUBLIC_PRIVY_CLIENT_ID` 的值。
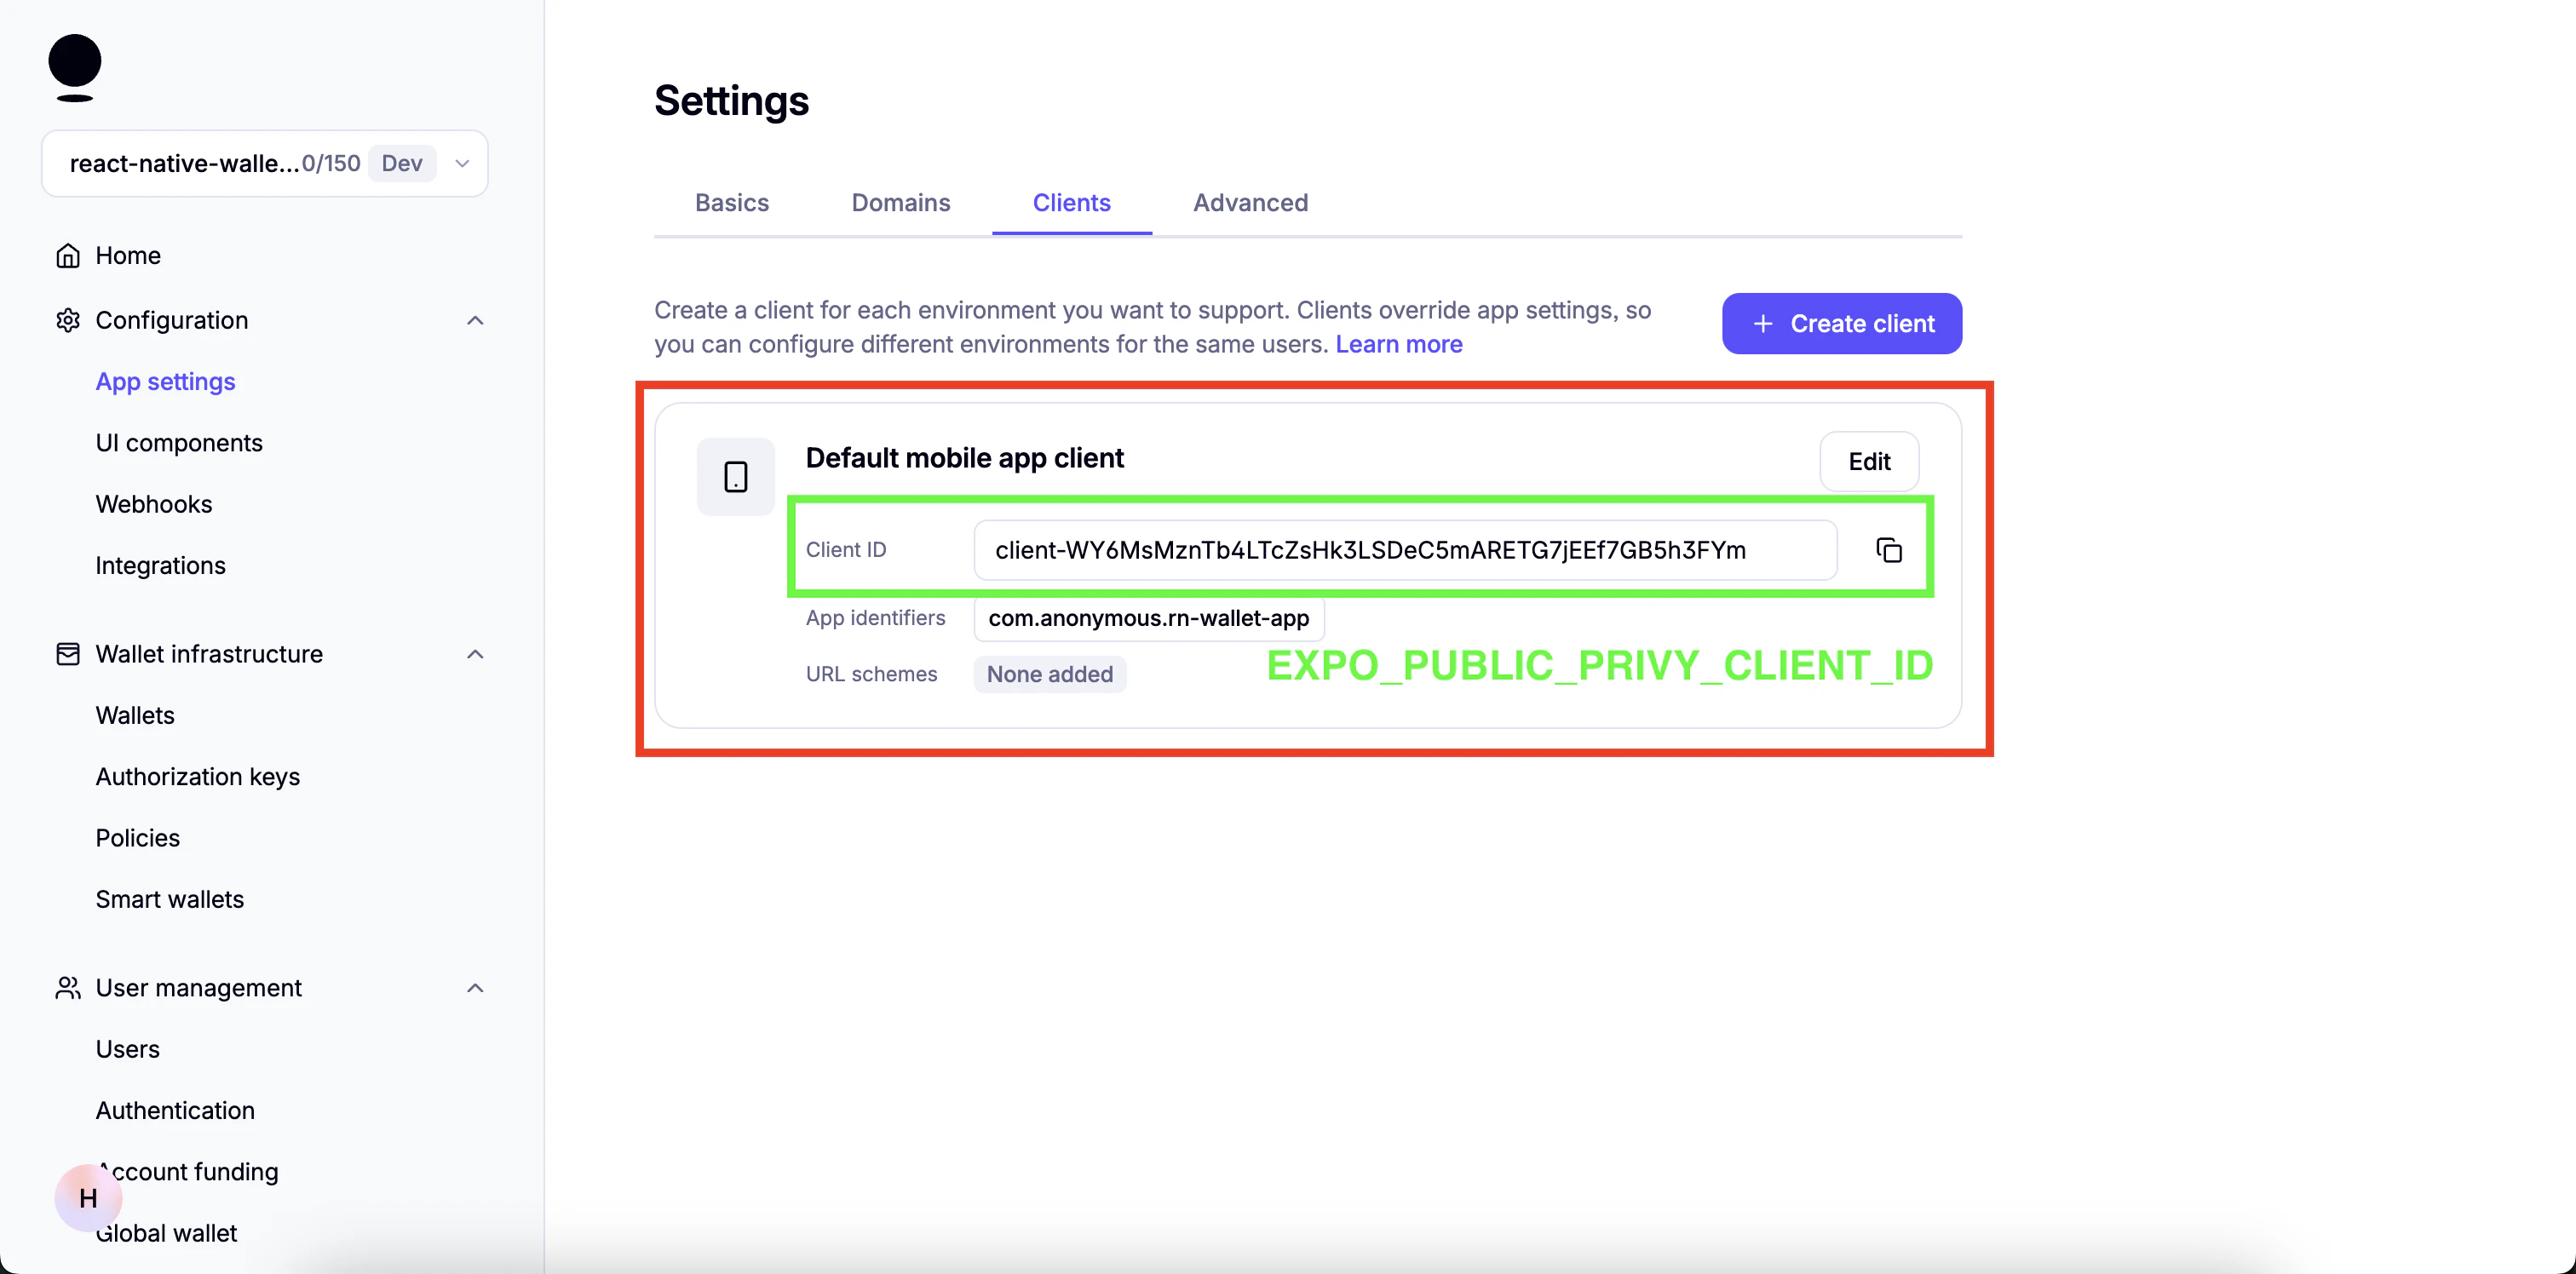 ### 启动应用
以下命令将在对应设备上的 Expo Go 应用中启动应用。
iOS:
```bash theme={null}
npm run ios
```
Android:
```bash theme={null}
npm run android
```
对于原生应用构建,使用以下命令
iOS:
```bash theme={null}
npx expo run:ios
```
Android:
```bash theme={null}
npx expo run:android
```
## 模板的文件夹结构
```
react-native-privy-embedded-wallet-template/
├── app/ # Expo router entrypoint
│ ├── _layout.tsx # Root Layout
│ └── index.tsx # First screen
├── assets/
│ ├── fonts/ # Custom fonts go here
│ └── images/
│ ├── adaptive-icon.png
│ ├── favicon.png
│ ├── icon.png
│ ├── monad-logo-inverted.png
│ └── monad-logo.png
│ └── readme/ # images for the readme, you can delete this
├── constants/
│ └── Colors.ts
├── app.json # App properties
├── babel.config.js
├── eas.json
├── entrypoint.js
├── eslint.config.js
├── metro.config.js # Configuration for Hermes and Polyfills
├── package-lock.json
├── package.json
├── README.md
├── tsconfig.json
├── types/
│ └── react-native-qrcode-styled.d.ts
```
## 修改应用名称
### 启动应用
以下命令将在对应设备上的 Expo Go 应用中启动应用。
iOS:
```bash theme={null}
npm run ios
```
Android:
```bash theme={null}
npm run android
```
对于原生应用构建,使用以下命令
iOS:
```bash theme={null}
npx expo run:ios
```
Android:
```bash theme={null}
npx expo run:android
```
## 模板的文件夹结构
```
react-native-privy-embedded-wallet-template/
├── app/ # Expo router entrypoint
│ ├── _layout.tsx # Root Layout
│ └── index.tsx # First screen
├── assets/
│ ├── fonts/ # Custom fonts go here
│ └── images/
│ ├── adaptive-icon.png
│ ├── favicon.png
│ ├── icon.png
│ ├── monad-logo-inverted.png
│ └── monad-logo.png
│ └── readme/ # images for the readme, you can delete this
├── constants/
│ └── Colors.ts
├── app.json # App properties
├── babel.config.js
├── eas.json
├── entrypoint.js
├── eslint.config.js
├── metro.config.js # Configuration for Hermes and Polyfills
├── package-lock.json
├── package.json
├── README.md
├── tsconfig.json
├── types/
│ └── react-native-qrcode-styled.d.ts
```
## 修改应用名称
| iOS |
Android |

|

|
编辑 `app.json` 文件中的 `name` 属性。
```json theme={null}
{
"expo": {
"name": "wallet-app", <--- Edit this
...
}
}
```
## 修改应用图标和启动画面
### 应用图标
| iOS |
Android |
|
|
|
您可以通过替换 `assets/images/icon.png` 文件来编辑应用图标。
推荐的应用图标尺寸为 `1024x1024`。
如果您将图标文件命名为其他名称,请相应地编辑 `app.json` 中的 `icon` 属性。
```json theme={null}
{
"expo": {
"name": "rn-wallet-app",
...
"icon": "./assets/images/icon.png", <--- Change this
...
}
}
```
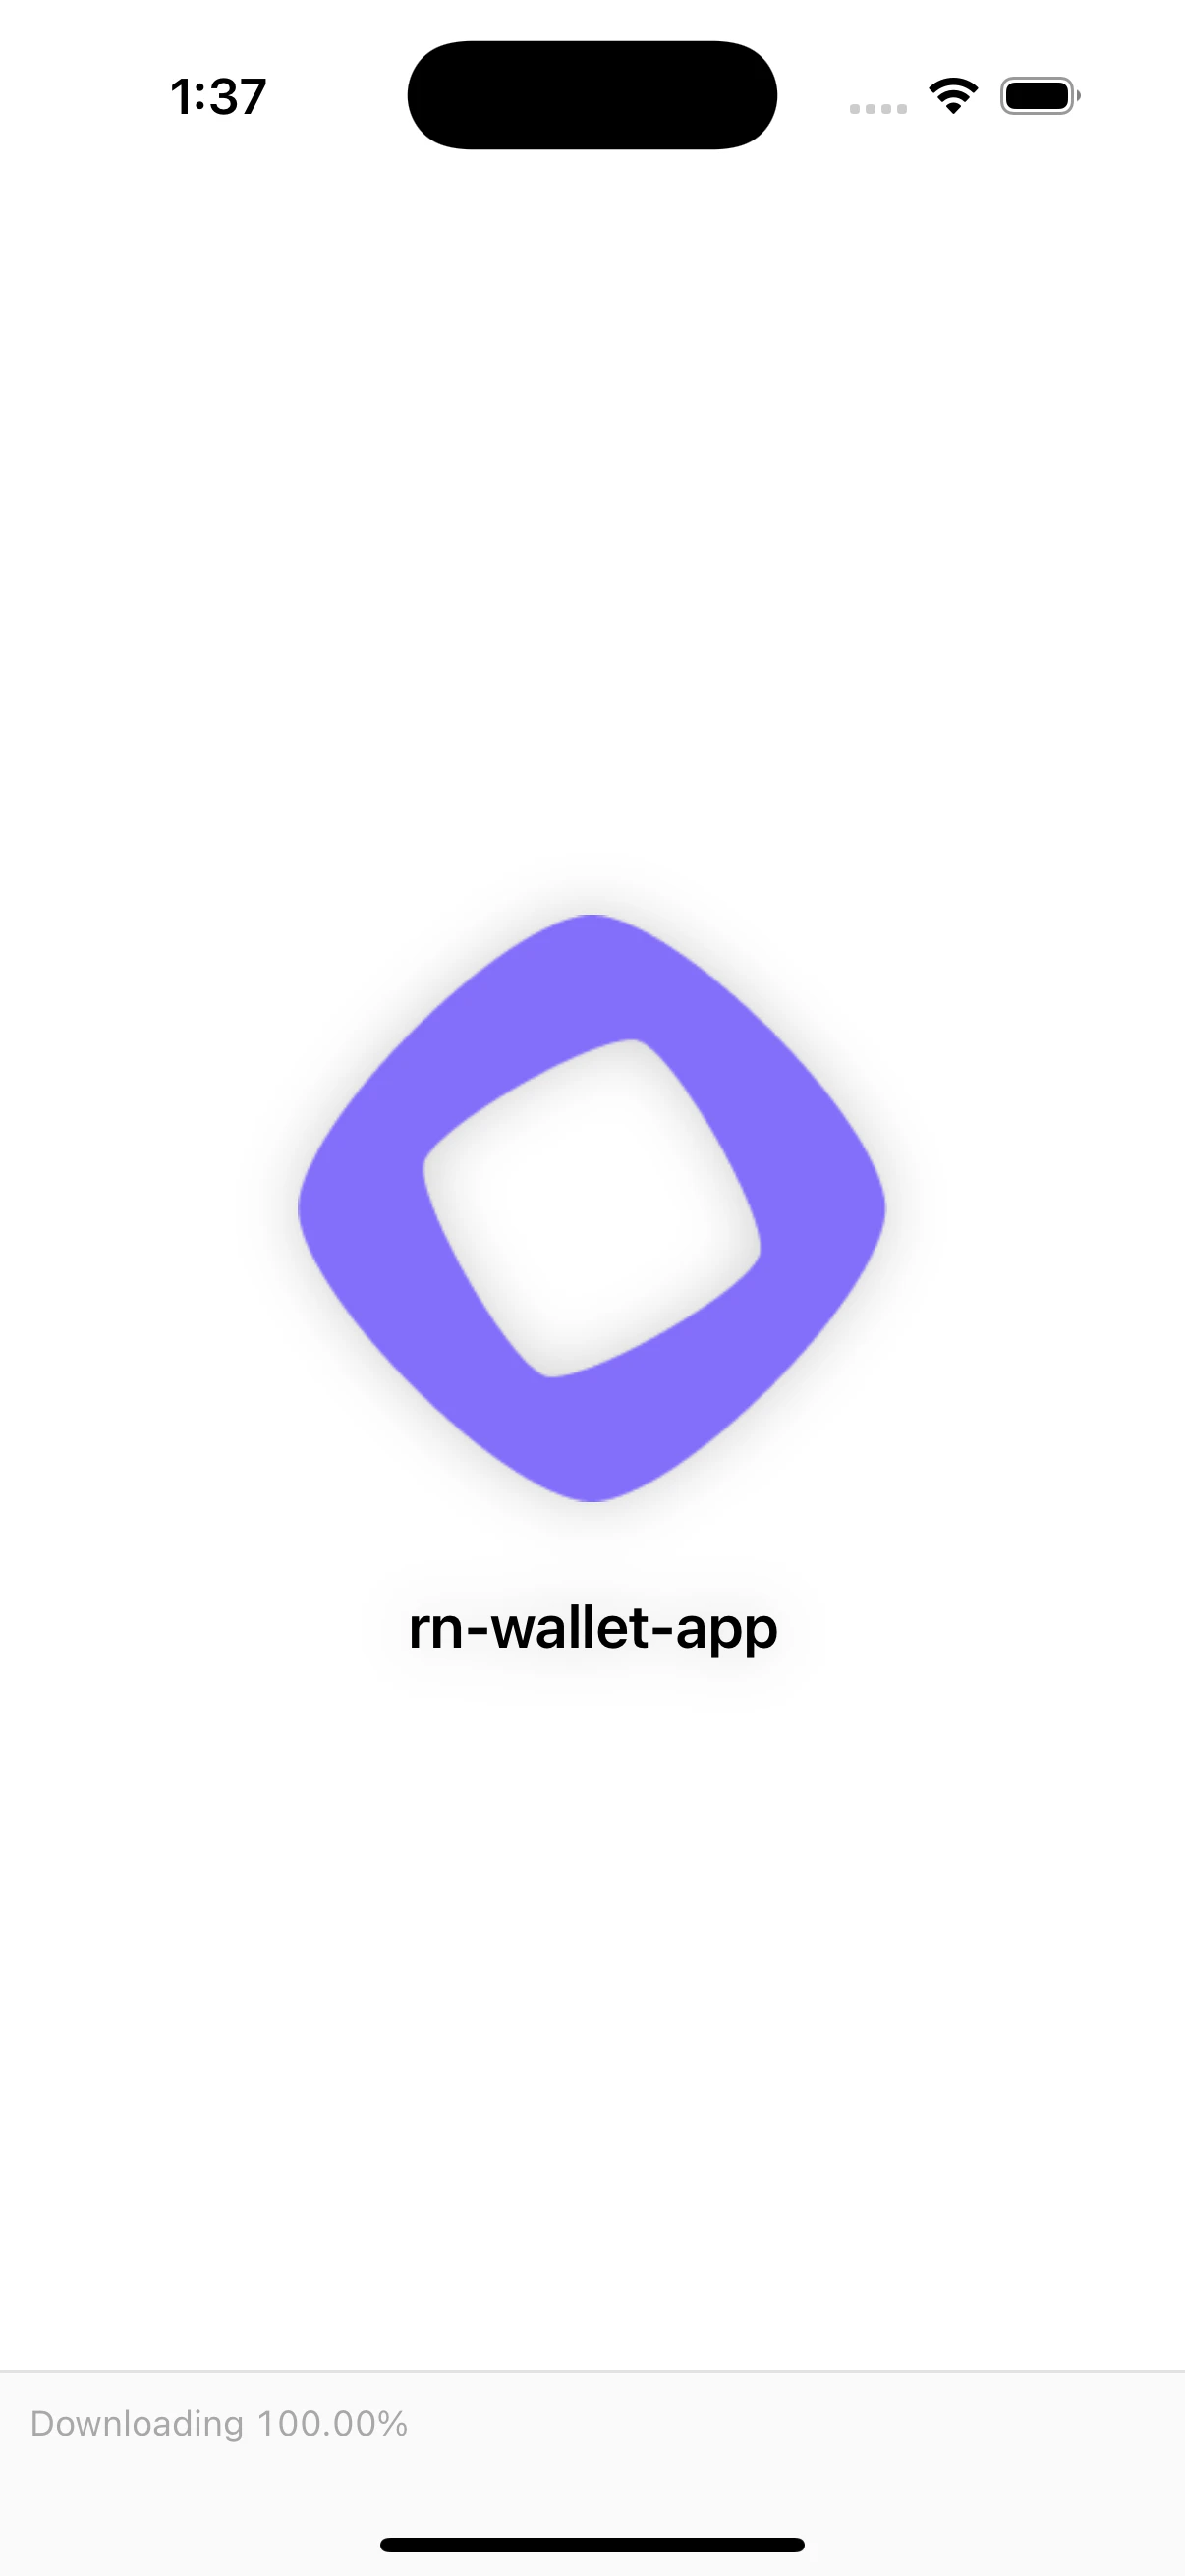
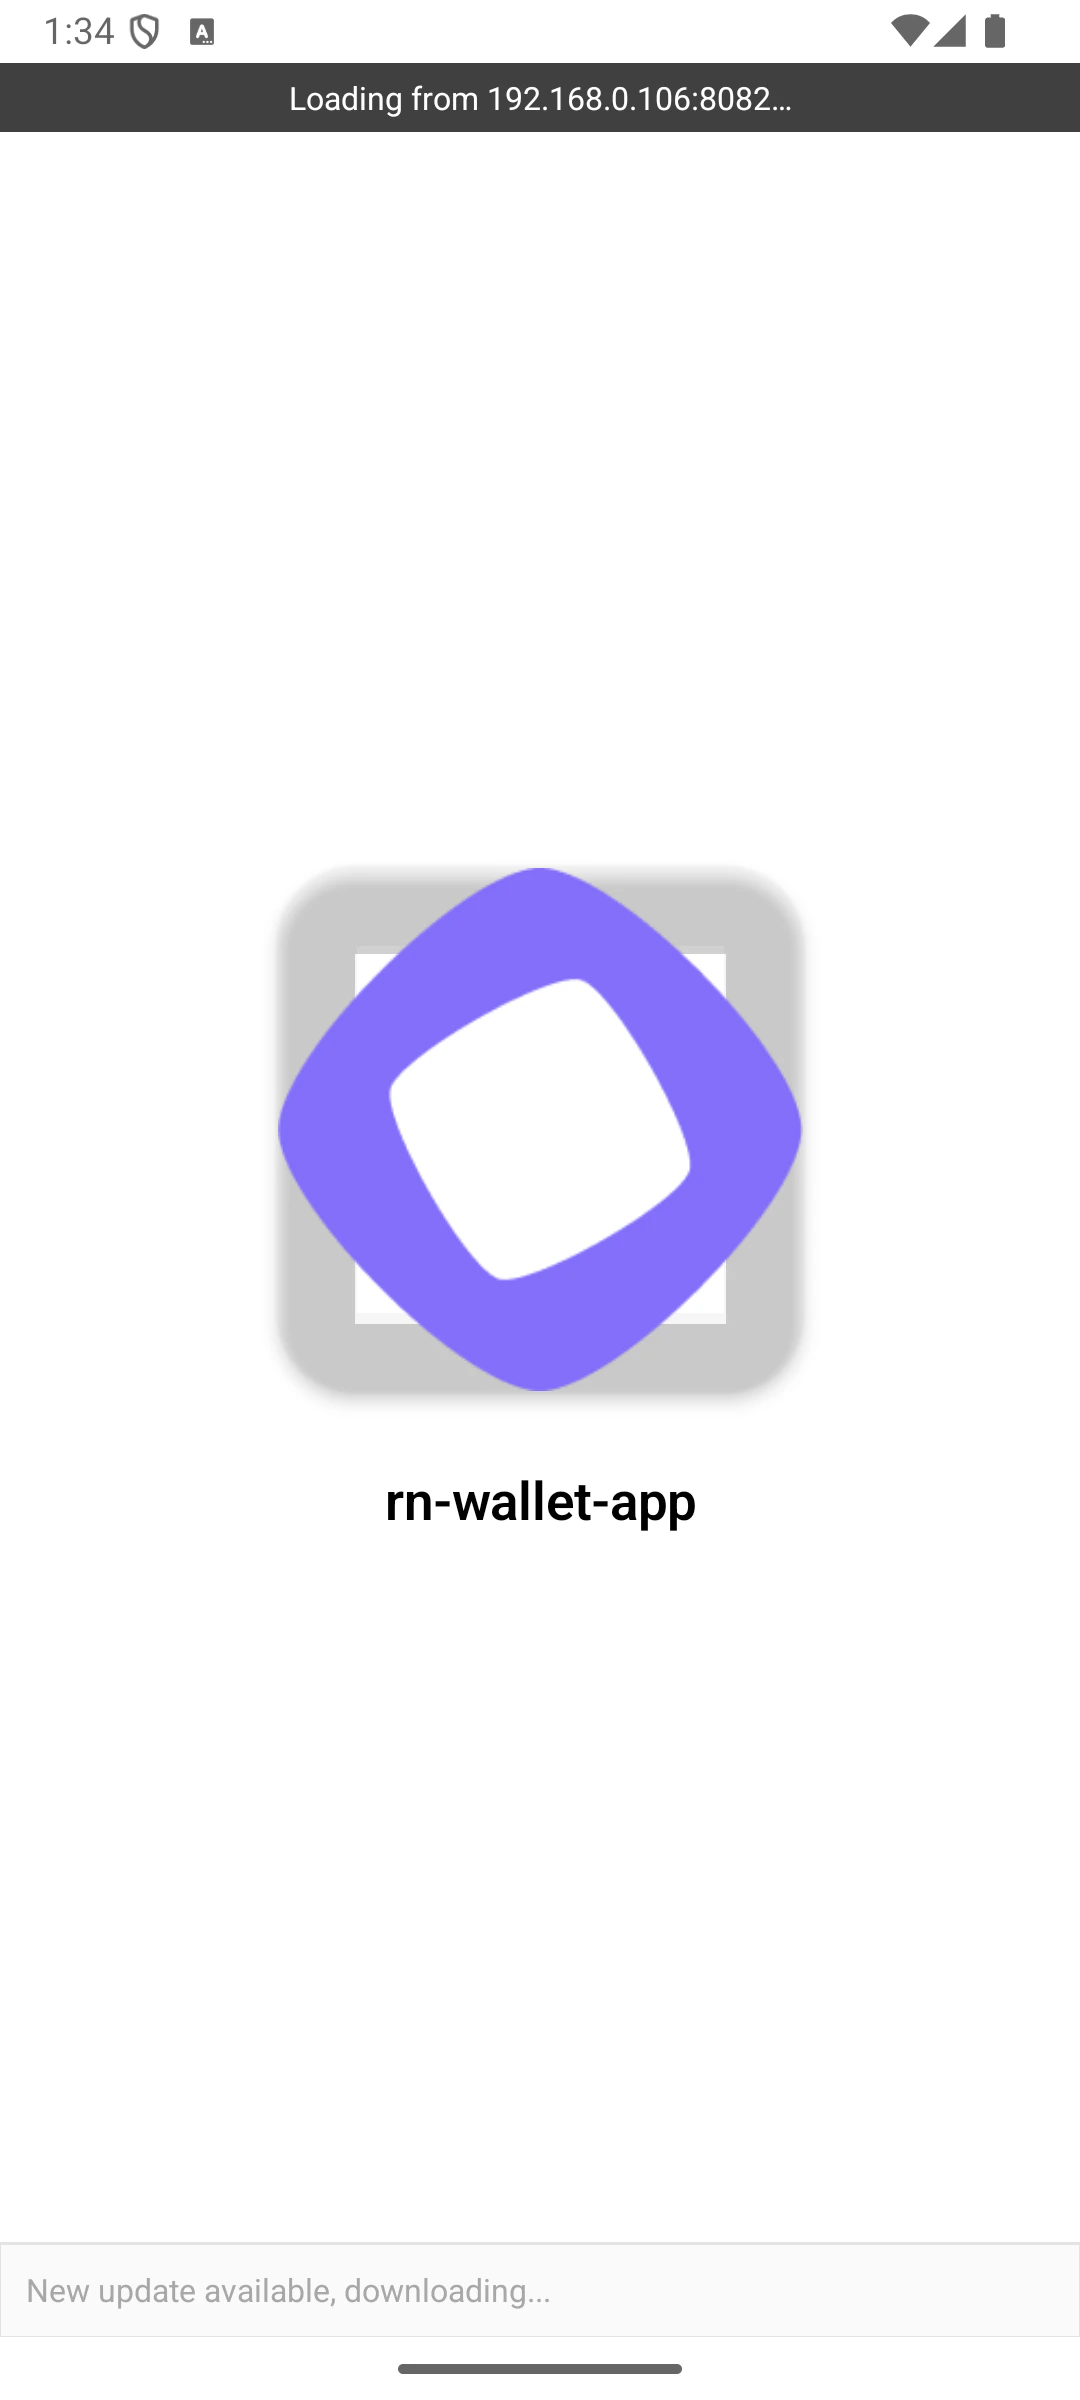
### 启动画面
| iOS |
Android |
|
|
编辑 `app.json` 中的 `splash` 对象以修改启动画面。
```json theme={null}
{
"expo": {
"name": "rn-wallet-app",
...
"splash": { <--- Edit this object
"image": "./assets/images/icon.png",
"backgroundColor": "#ffffff"
}
}
}
```
## 修改应用字体
您可以在 `assets` 文件夹内创建一个 `fonts` 文件夹,并将您的自定义字体文件放在 `fonts` 文件夹中。
要使用自定义字体,请在 `app/_layout.tsx` 文件中加载字体。
示例:
```ts theme={null}
const [loaded] = useFonts({
"SF-Pro-Rounded-Black": require("../assets/fonts/SF_Pro_Rounded/SF-Pro-Rounded-Black.otf"),
"SF-Pro-Rounded-Bold": require("../assets/fonts/SF_Pro_Rounded/SF-Pro-Rounded-Bold.otf"),
"SF-Pro-Rounded-Heavy": require("../assets/fonts/SF_Pro_Rounded/SF-Pro-Rounded-Heavy.otf"),
"SF-Pro-Rounded-Medium": require("../assets/fonts/SF_Pro_Rounded/SF-Pro-Rounded-Medium.otf"),
"SF-Pro-Rounded-Regular": require("../assets/fonts/SF_Pro_Rounded/SF-Pro-Rounded-Regular.otf"),
"SF-Pro-Rounded-Semibold": require("../assets/fonts/SF_Pro_Rounded/SF-Pro-Rounded-Semibold.otf"),
Inter_400Regular,
Inter_500Medium,
Inter_600SemiBold,
});
```
## 修改深度链接方案
在 `app.json` 文件中编辑 `scheme` 属性,以设置您的自定义深度链接方案。
```json theme={null}
{
"expo": {
...
"scheme": "rnwalletapp",
...
}
}
```
例如,如果将其设置为 `rnwalletapp`,则轻点 `rnwalletapp://` URL 时将打开您的应用。
这是一个构建时配置,在 Expo Go 中无效。
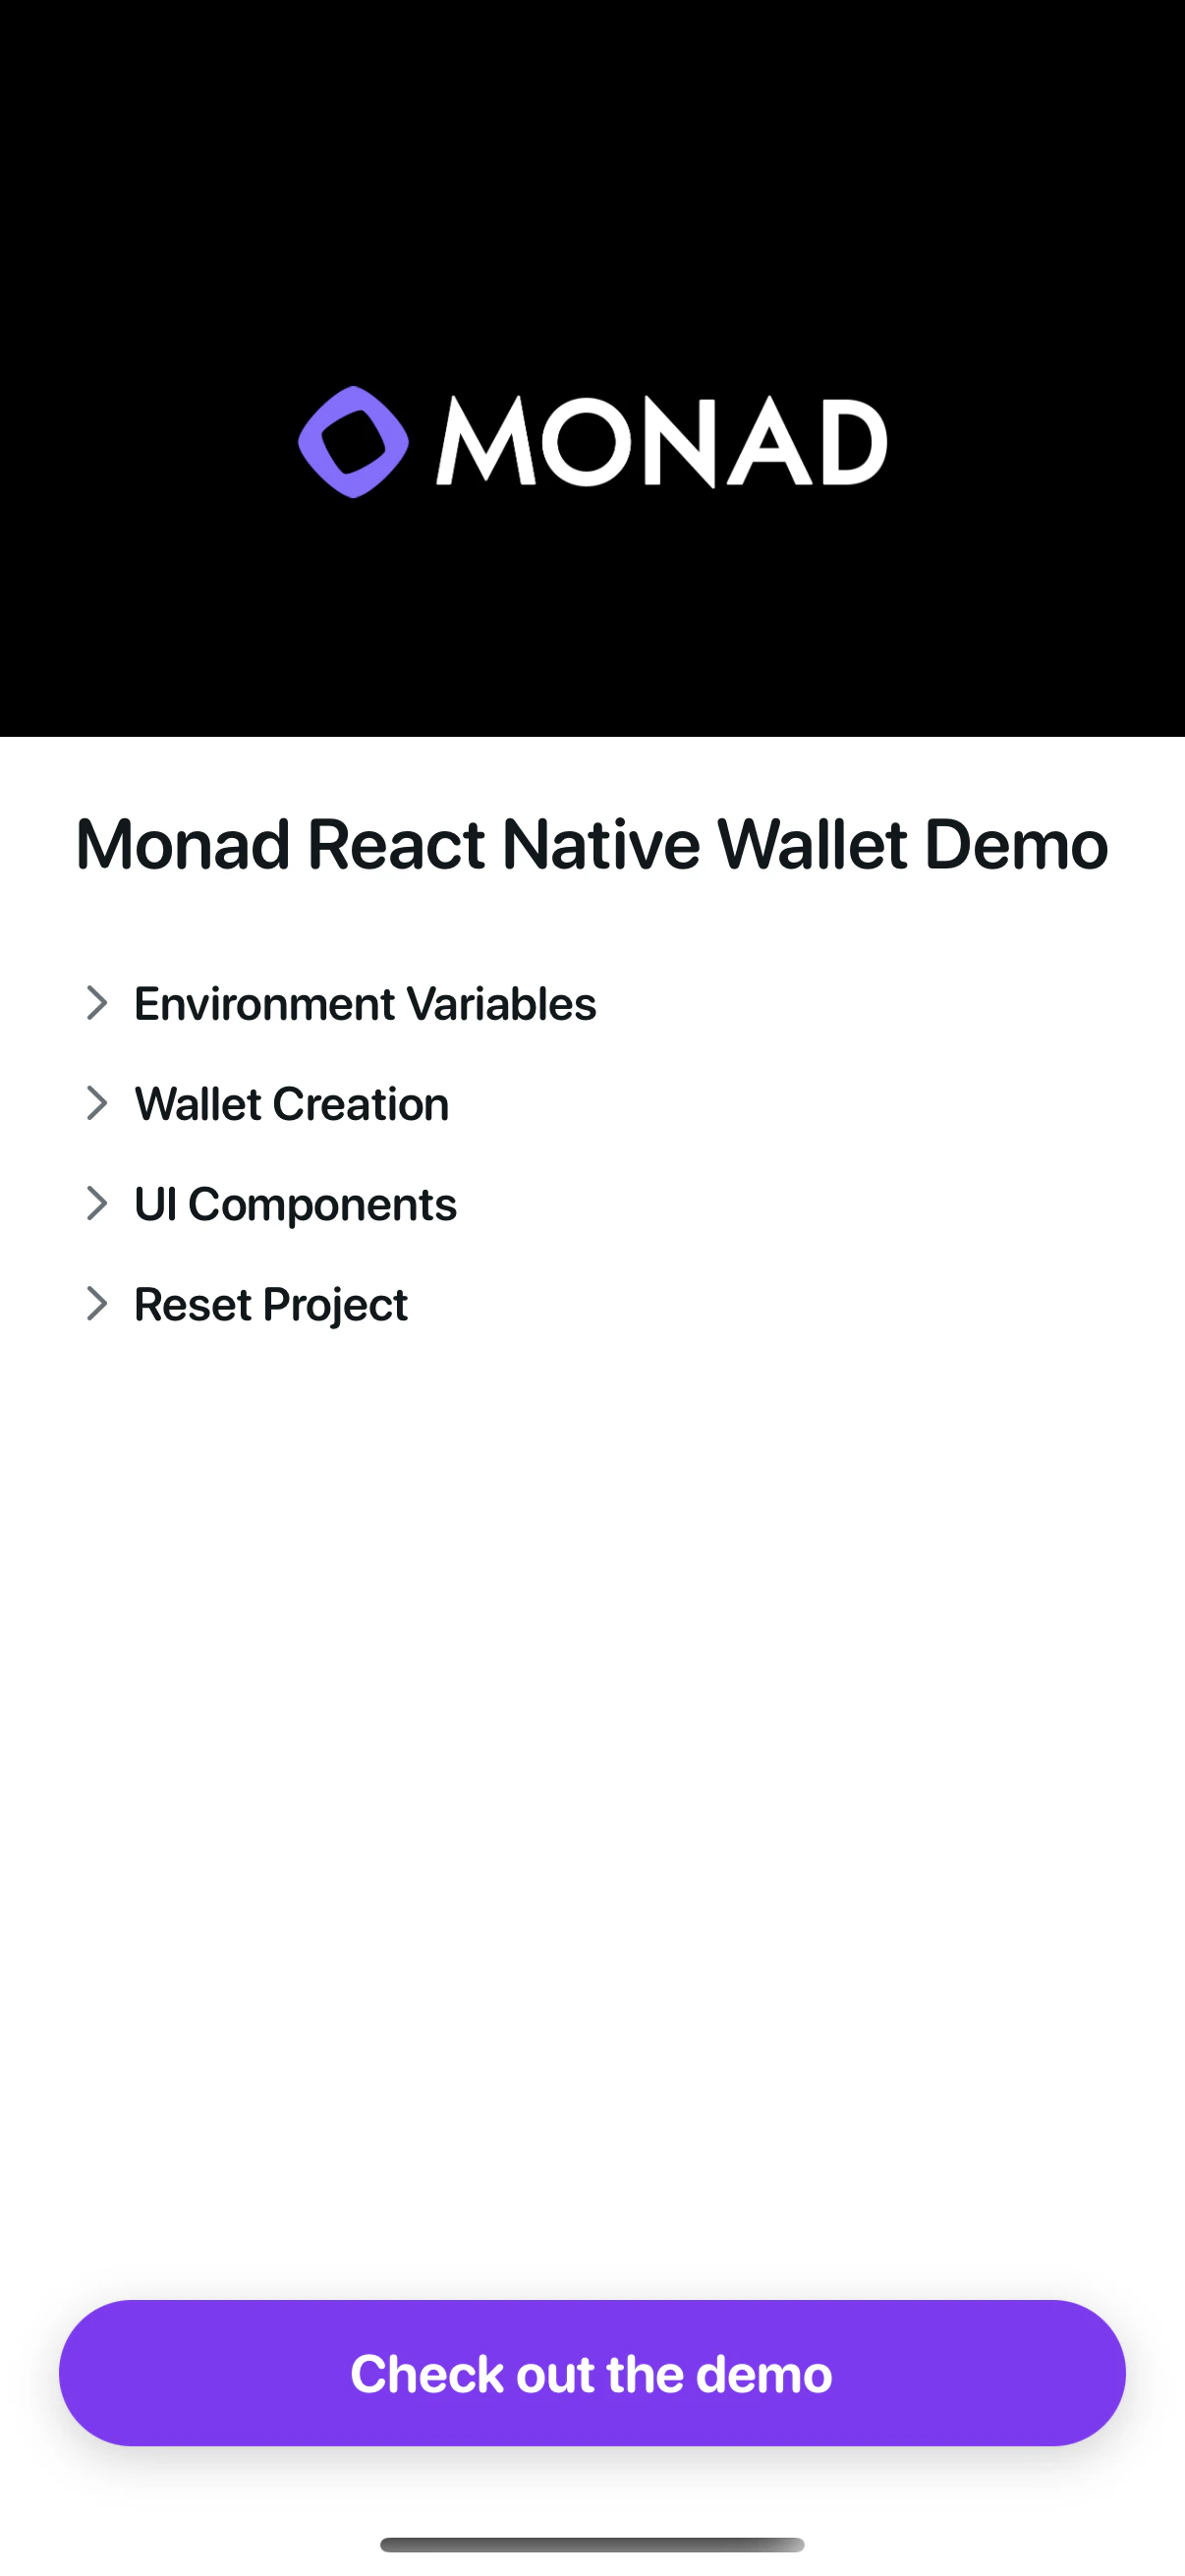
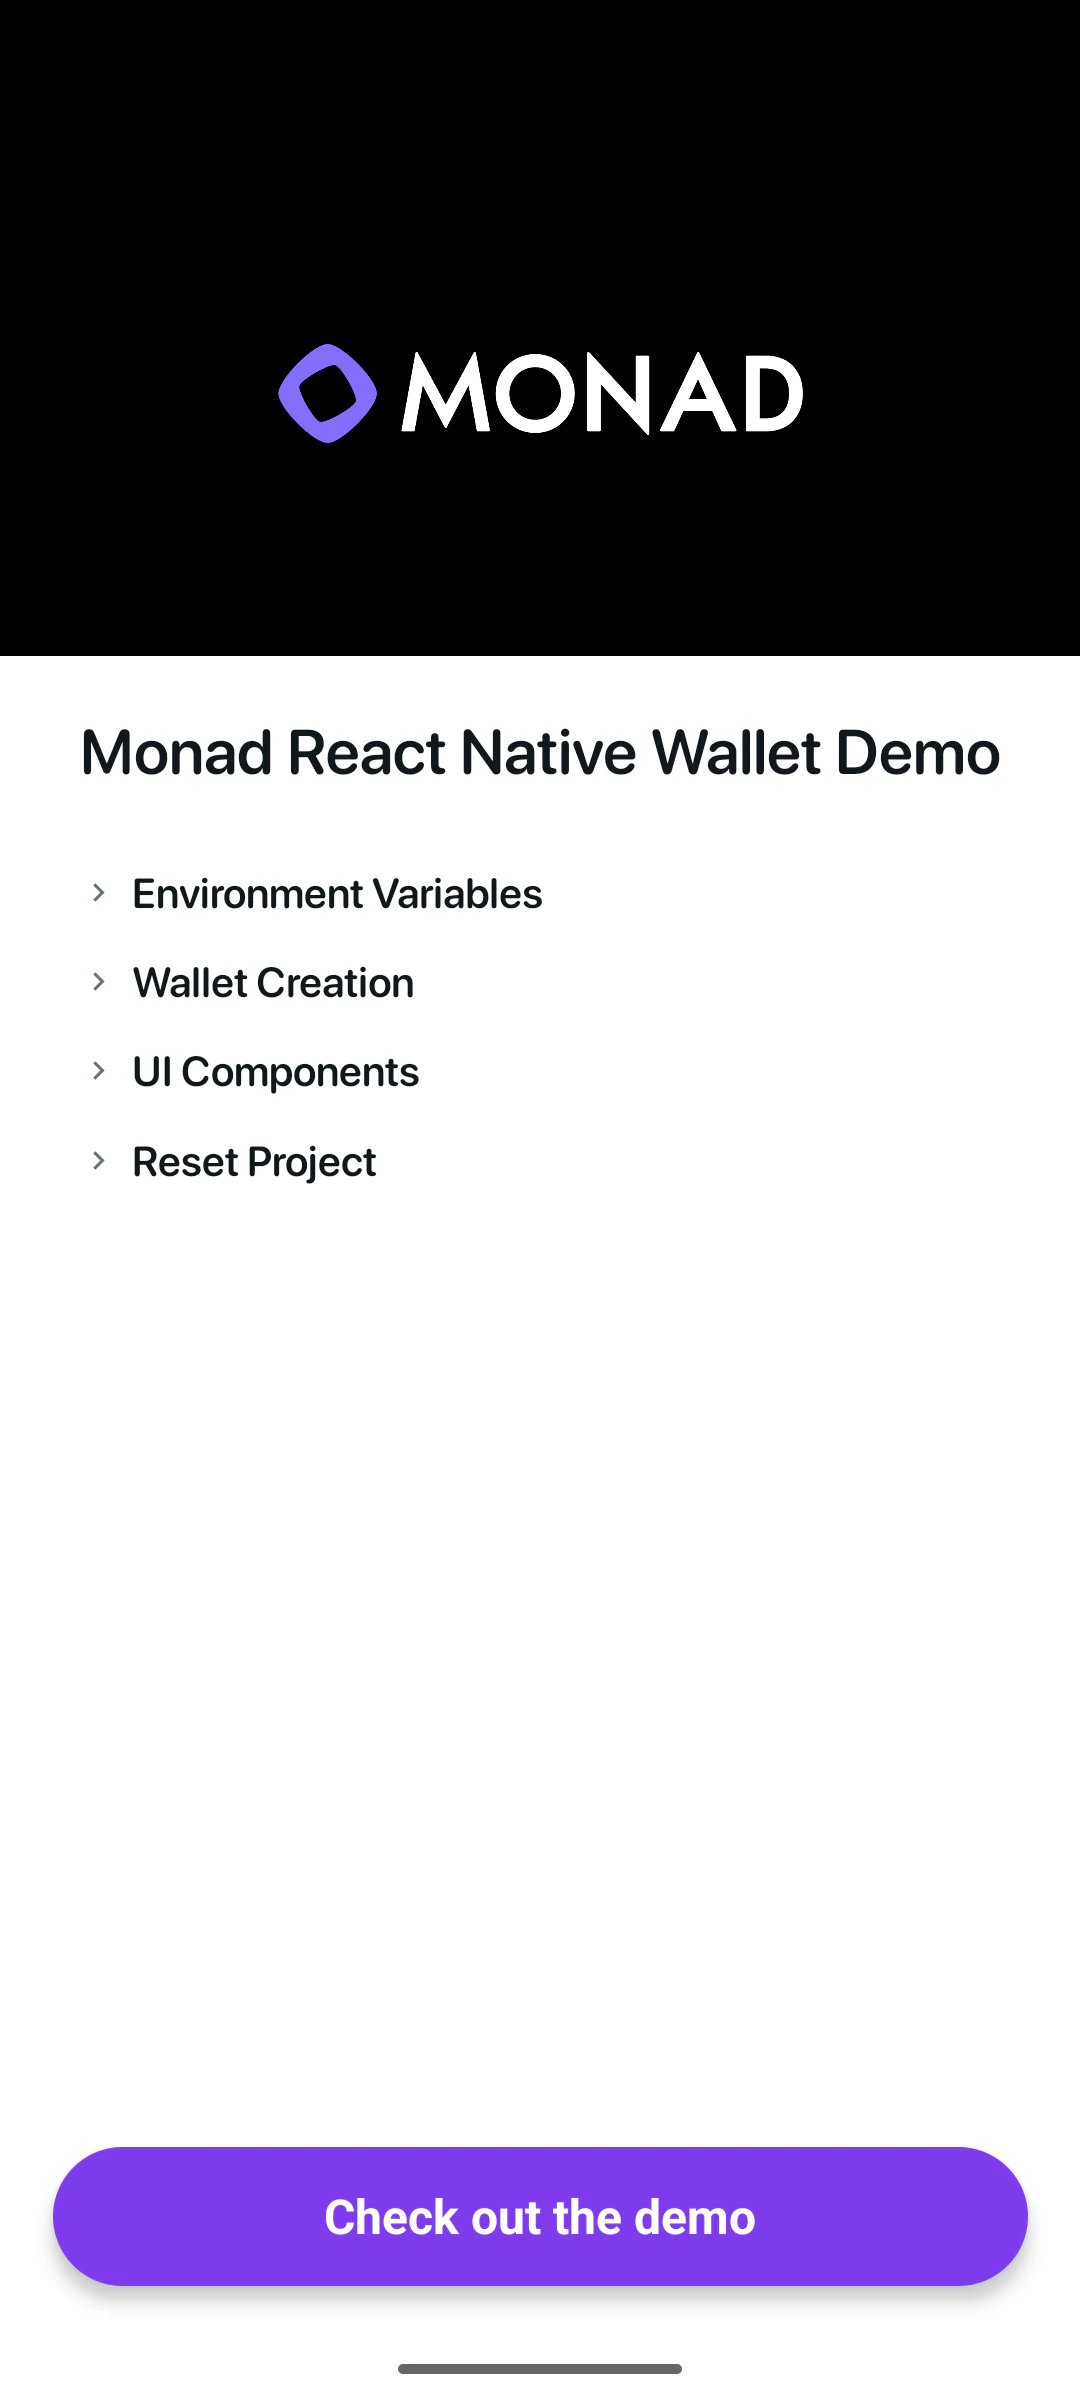
## 编辑登录页面
| iOS |
Android |
|
|
您可以通过编辑文件 `app/index.tsx` 中的代码来编辑登录页面。
## 钱包操作
该模板包含以下钱包操作的示例代码:
* [发送 USDC](https://github.com/monad-developers/react-native-privy-embedded-wallet-template/blob/demo/components/sheets/SendSheet.tsx)
* [签署消息](https://github.com/monad-developers/react-native-privy-embedded-wallet-template/blob/demo/components/sheets/SignSheet.tsx)
## 修改 package/bundle 标识符
将应用发布到应用商店时,您需要拥有唯一的 package/bundle 标识符,您可以在 `app.json` 中更改它。
别忘了在 Privy 仪表盘中更改该标识符
```json theme={null}
{
"expo": {
"name": "rn-wallet-app",
...
"ios": {
"bundleIdentifier": "com.anonymous.rn-wallet-app", <--- Edit this
...
},
"android": {
...
"package": "com.anonymous.rnwalletapp" <--- Edit this
},
}
}
```
## 查看演示应用
如果您想在开始开发之前尝试演示应用,可以切换到该仓库中提供的 `demo` 分支:
```bash theme={null}
git checkout demo
```
### 演示项目的文件夹结构(切换到 `demo` 分支查看)
```
react-native-privy-embedded-wallet-template/
├── app/
│ ├── _layout.tsx # Root layout of the project
│ ├── +not-found.tsx
│ ├── demo/ # This is entrypoint for the Wallet related code.
│ │ ├── _layout.tsx
│ │ ├── app/ # If Authenticated the user can access route /app
│ │ │ ├── _layout.tsx
│ │ │ └── index.tsx
│ │ └── sign-in/ # Unauthenticated user gets redirected to /sign-in
│ └── index.tsx # This is the landing page
├── assets/
│ ├── fonts/ # Custom fonts go here
│ │ └── SF_Pro_Rounded/ # Custom Font example
│ └── images/
│ ├── adaptive-icon.png
│ ├── favicon.png
│ ├── icon.png
│ ├── monad-icon.png
│ ├── monad-logo-inverted.png
│ ├── monad-logo.png
│ ├── partial-react-logo.png
│ └── splash-icon.png
├── components/
│ ├── sheets/ # All the bottom sheets are here
│ └── ui/
├── config/
│ ├── privyConfig.ts # Privy related config
│ ├── providers.tsx
│ └── wagmiConfig.ts # Monad Testnet related config
├── constants/
├── context/
│ ├── AuthContext.tsx
│ └── WalletContext.tsx # Wallet actions implementations are here
├── hooks/
├── screens/
│ ├── Email/ # Screen that asks for Email
│ ├── Home/ # Wallet Home screen (Authenticated users only)
│ ├── Landing/ # Screen with info on how to use the template
│ └── OTP/ # Screen that asks for the OTP code sent to email
├── types/
├── utils.ts
├── entrypoint.ts
├── app.json
├── babel.config.js
├── eas.json
├── eslint.config.js
├── metro.config.js
├── package.json
├── package-lock.json
├── README.md
├── tsconfig.json
```
## 了解更多
要了解使用 Expo、Privy 和 Monad 开发项目的更多信息,请查看以下资源:
* Expo [文档](https://docs.expo.dev/) | [指南](https://docs.expo.dev/guides) | [教程](https://docs.expo.dev/tutorial/introduction/)
* Privy:[创建钱包](https://docs.privy.io/wallets/wallets/create/create-a-wallet) | [发送交易](https://docs.privy.io/wallets/using-wallets/ethereum/send-a-transaction) | [签署交易](https://docs.privy.io/wallets/using-wallets/ethereum/sign-a-transaction)
* Monad:[支持的工具和基础设施](/zh/tooling-and-infra)
如遇任何问题,请在 [此处](https://github.com/monad-developers/react-native-privy-embedded-wallet-template/issues) 反馈。